

This delicious coconut and rhubarb slice has all the home comfort of your favourite crumble pudding. The crunchy coconut crumble topping hides a layer of chewy rhubarb on a base of delicious cookie. It's heaven in a slice!
Read moremini chocolate chip cookies (gluten free & dairy free)
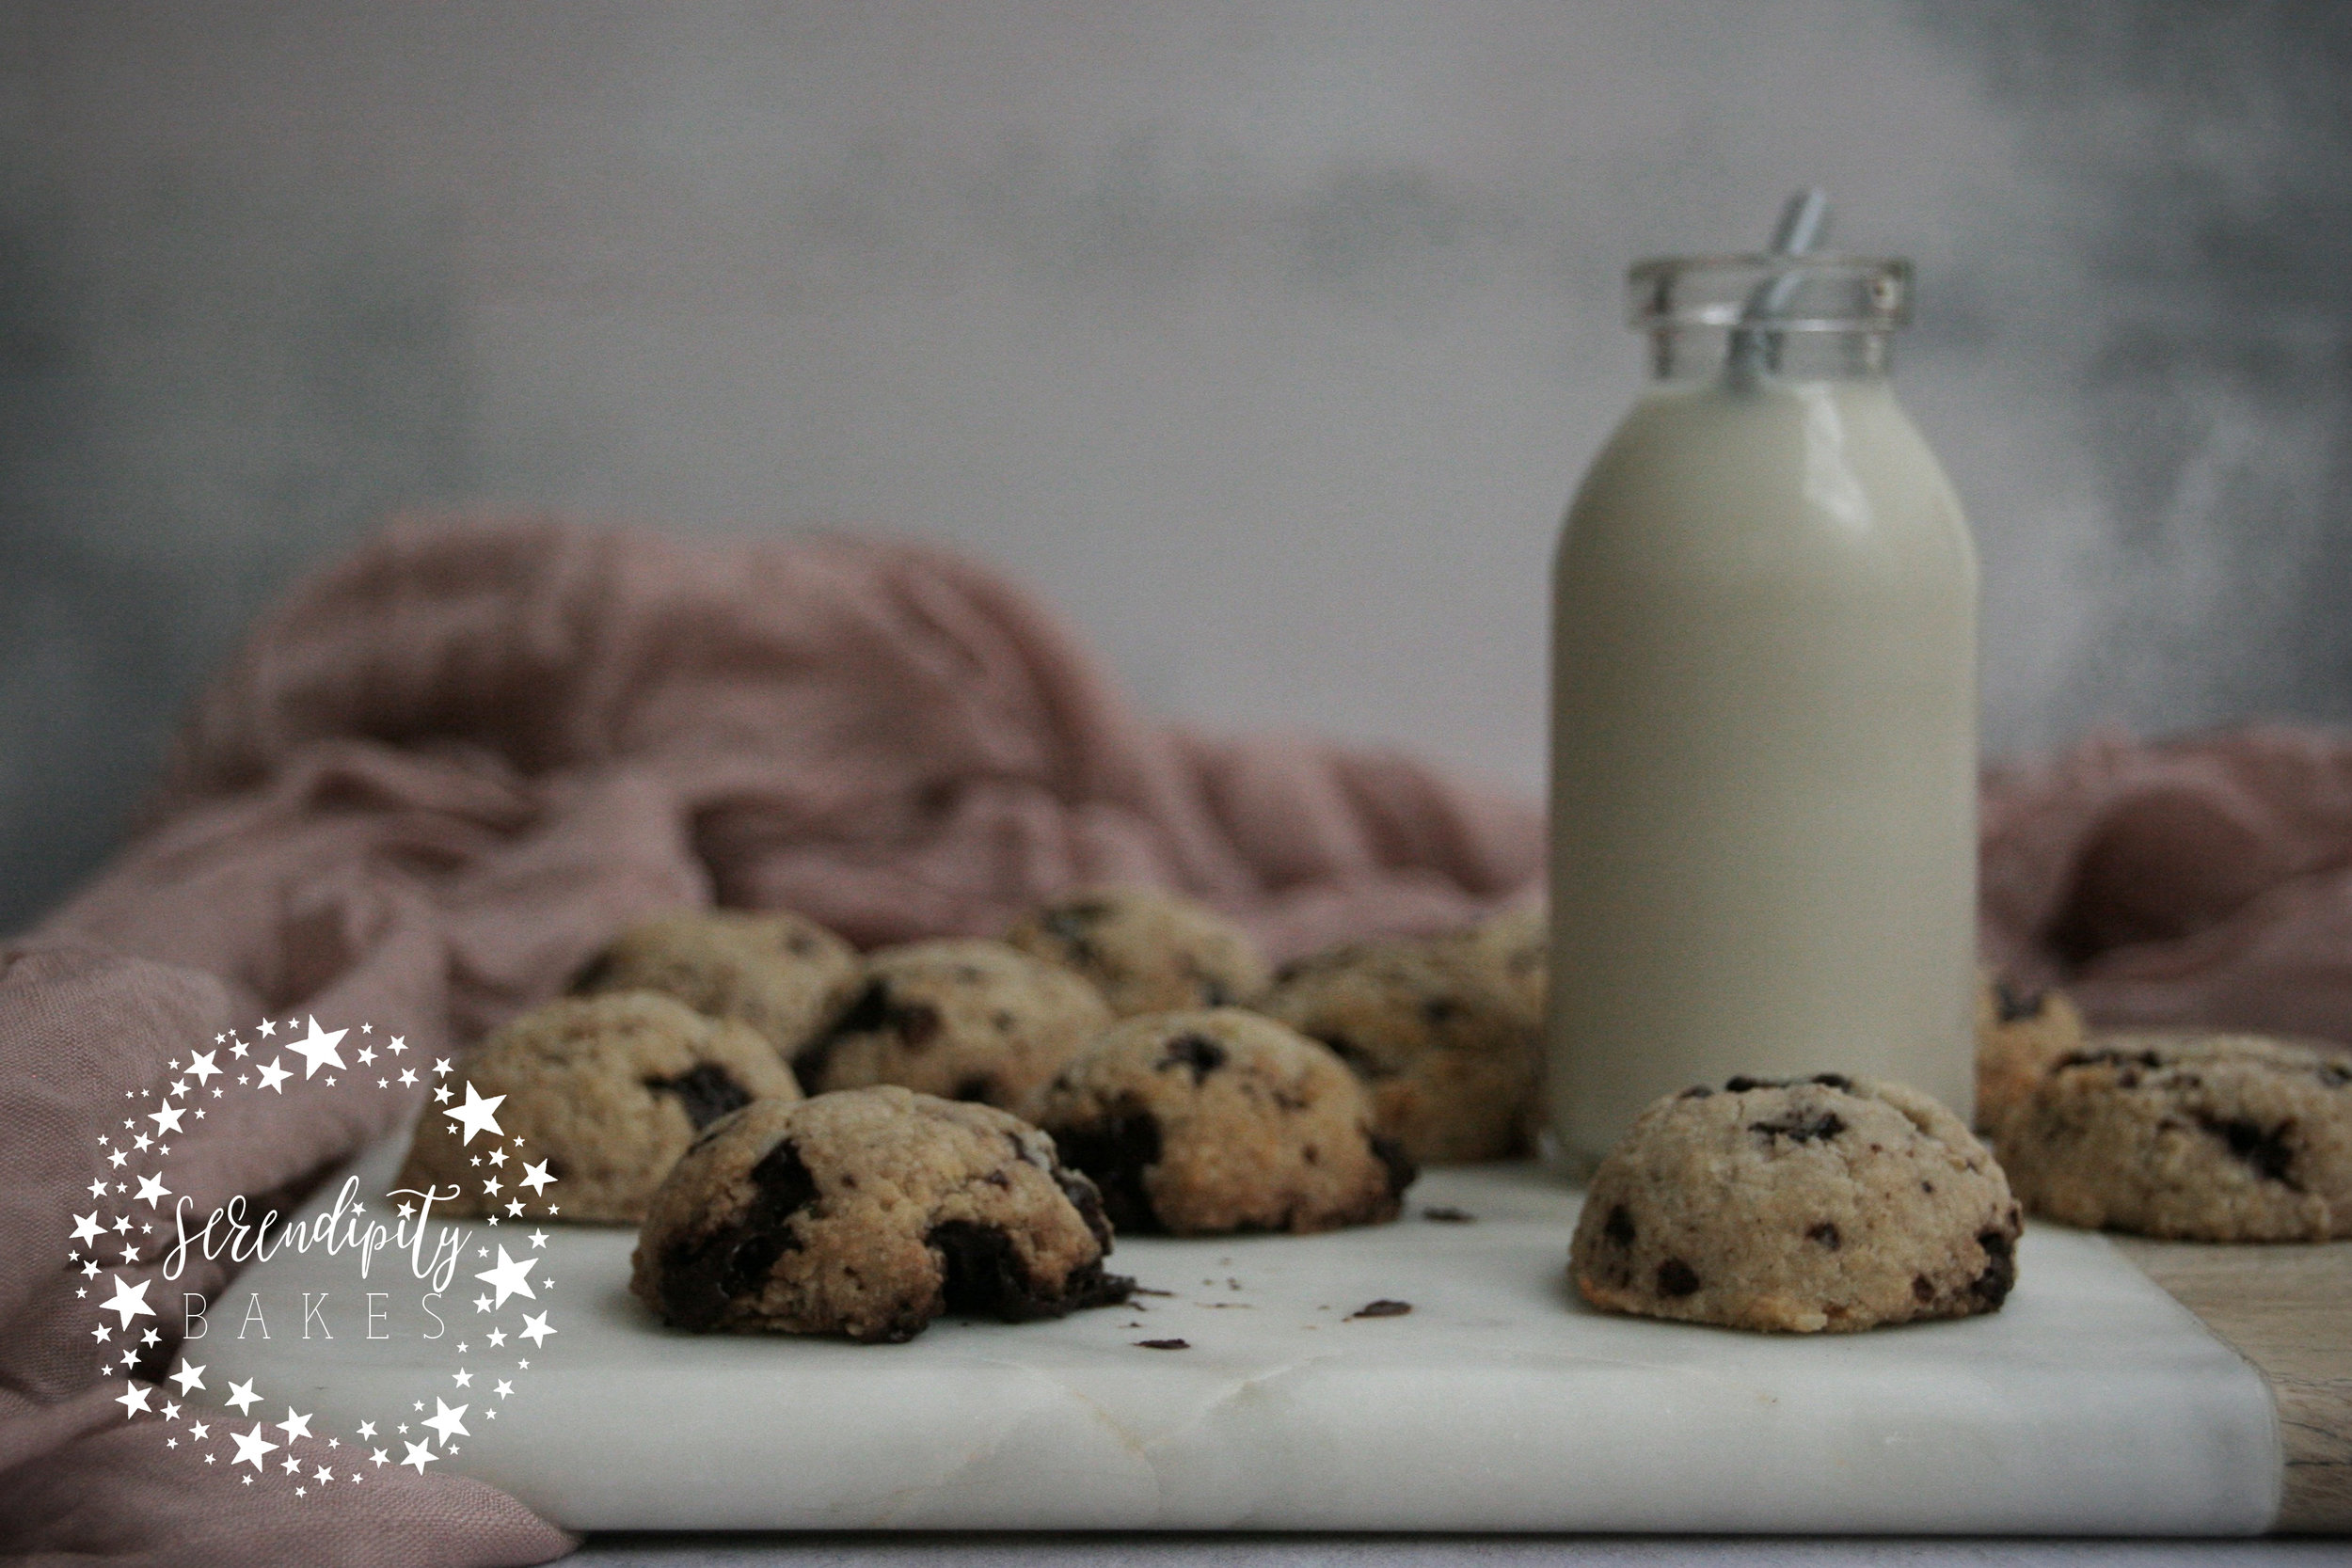
As summer beckons, it brings with it the desire to eat more healthily. But that doesn't mean we can't all enjoy a sweet treat from time to time! These mini chocolate chip cookies are gluten free and dairy free and perfect for the job :)
Read morecoconut fortune cookies of love

Coconut Fortune Cookies are just perfect for Valentine's Day - fill each one with a sweet message for your loved one :)
Read morechocolate chip + tahini cookies

These cookies are totally delicious with the flavour of tahini and rich dark chocolate chunks throughout. Best enjoyed warm from the oven!
Read moreLuscious Lemon Shortbread

Nothing beats homemade shortbread. This is my very favourite recipe -- a lovely rich buttery shortbread with a delightful crunch. It's especially decadent when topped with this beautiful rich lemon frosting made with freshly squeezed lemon juice. It's just divine!
Read morePeanut Butter and Chocolate Chip Skillet Cookies

Slightly in love with my mini skillet pans and these delicious Peanut Butter and Chocolate Chip Cookies baked perfectly in them! Crunchy yet squidgy cookies bejewelled with gooey chocolate pieces. How can you resist?
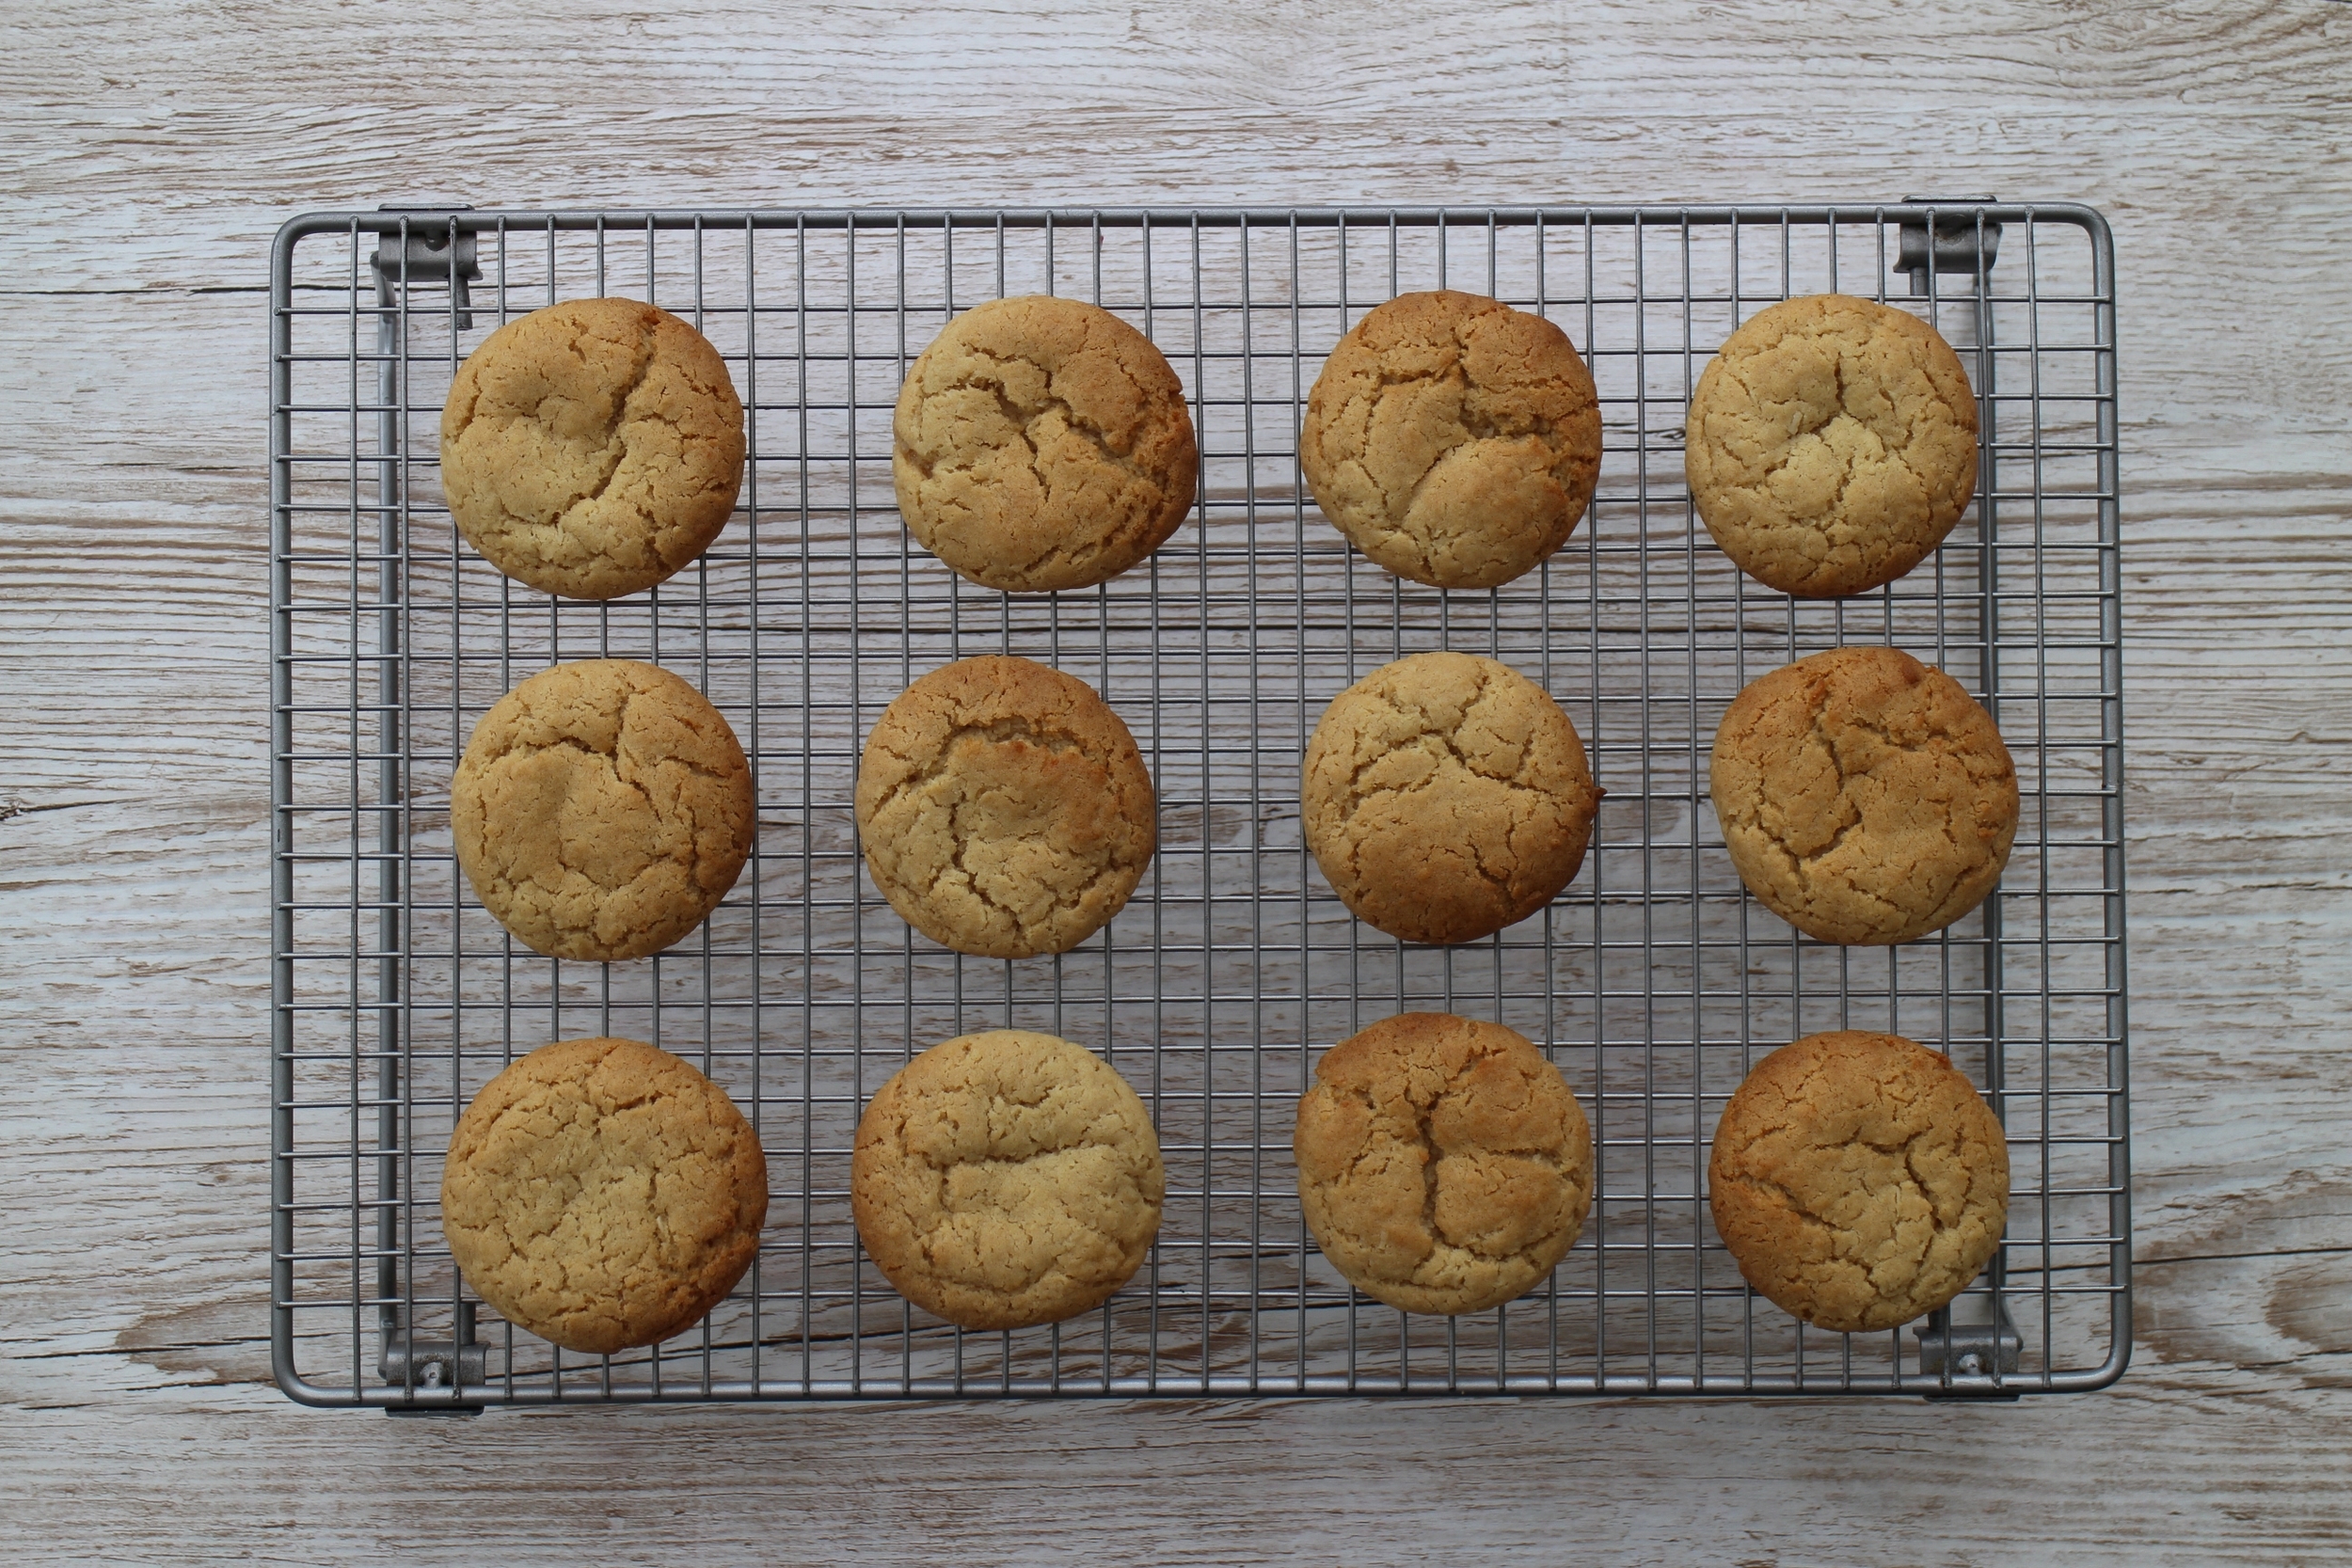
Read moreAnzac Cookies with Salted Caramel Sauce
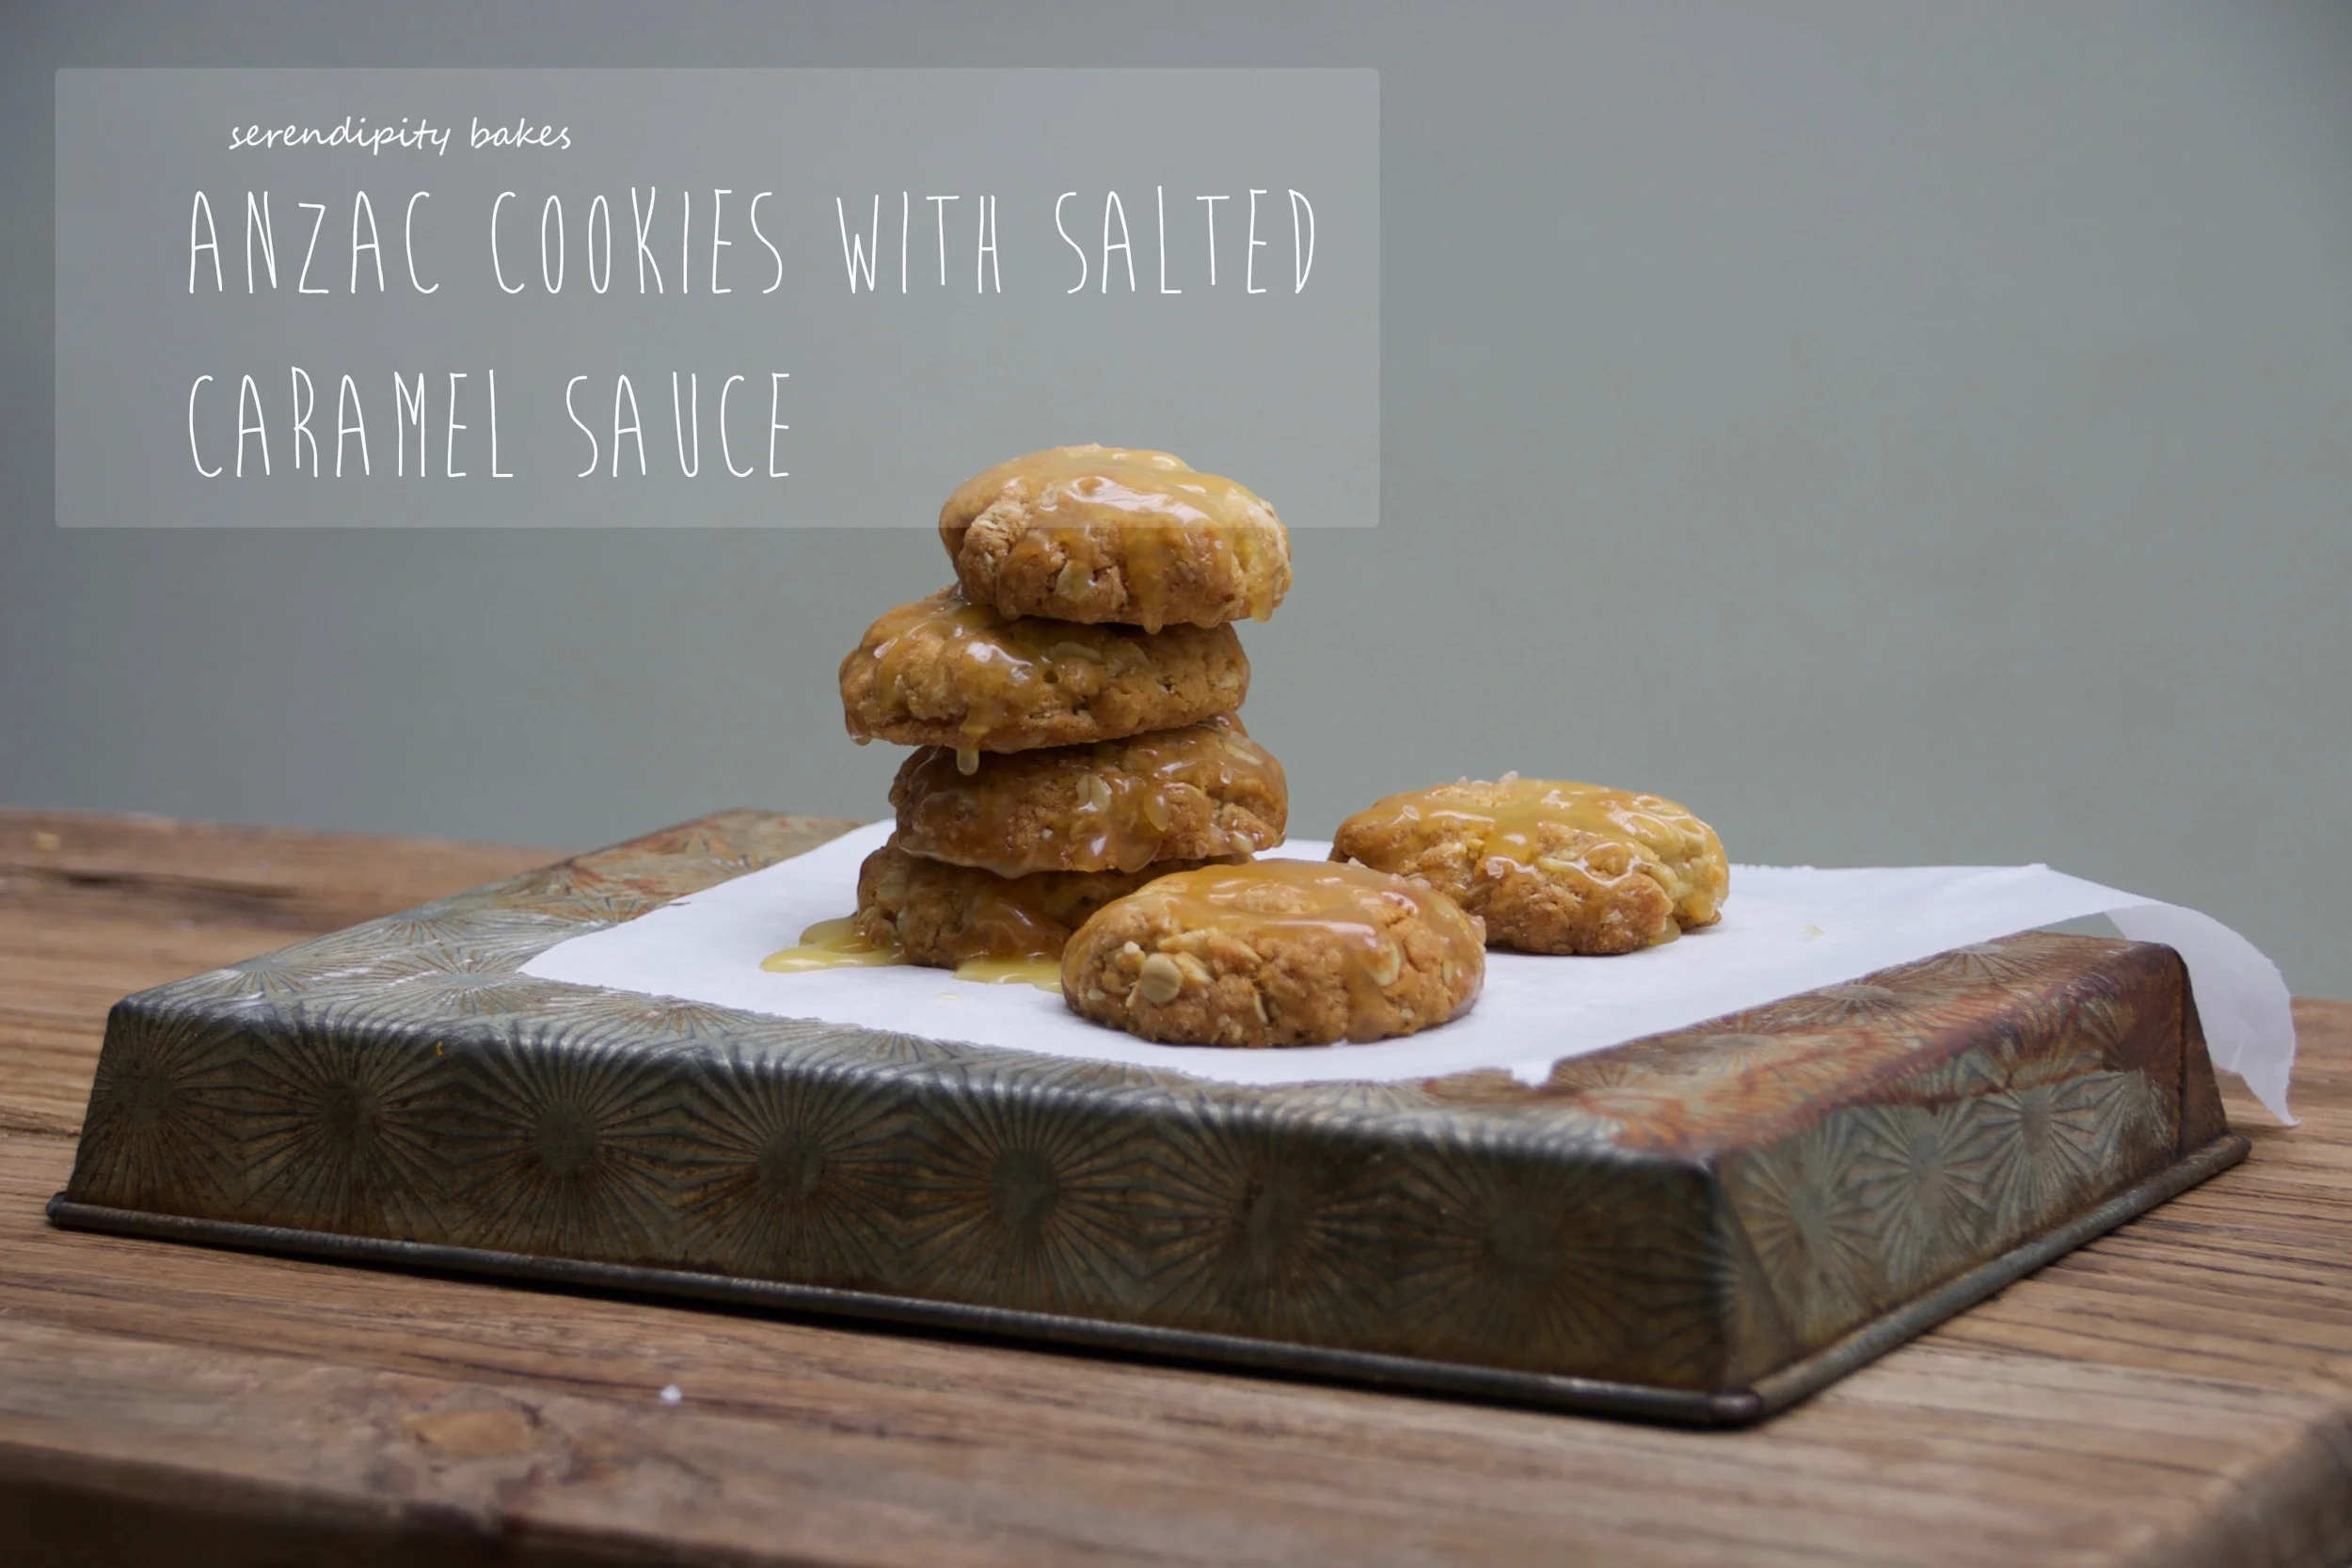
Every year, we celebrate today with a batch of Anzac cookies. Although living in the UK, we want our boys to remember their New Zealand heritage and every year Anzac Day honours the armies of New Zealand and Australia who fought at Gallipoli. Sweet Anzac cookies have become associated with the war because their ingredients don't spoil easily and so the wives of the army men could send these little biscuits to their loved ones and they wouldn't spoil on the long journey.

These cookies are simple to make and are full of ingredients that could easily be found in your kitchen at home. I wanted to shake them up a little so thought it would be fun to add a drizzle of salted caramel to make them even more delicious :)

We start by popping the oats, sugar and coconut into a bowl and sifting the flour in there too, whilst the golden syrup and butter are melted together over a low heat. When the butter and syrup are smooth and well mixed, we take the bicarb and mix it a tablespoon and a half of water, pop it in the saucepan with your sugary mixture and stir. Remove it from the heat and then pour this into the dry ingredients. The mixture needs to be combined well and then you're ready to shape your little cookies.

To make my cookies evenly sized, I always take a little time to weigh each cookie (these ones were around 30G each) but you can eyeball each scoop if you prefer. We roll the cookies into little balls and pop them onto a lined baking tray. When they're all ready, flatten each one a little and they're ready to go in the oven. Super easy.
They're quick to bake but it gives you just enough time to make the salted caramel sauce. We melt the golden syrup and sugar in a saucepan and then stir in the butter, cream and salt. Super yummy! Let it cool down to room temperature and when the cookies are baked and cooled, you can have lots of fun drizzling them with the sweet, sticky sauce :) I topped them with another sprinkling of sea salt. And they're done!

It's great to honour traditions and with something so simple to bake you can get the kids involved in the kitchen. Last year, my little boy made Anzac cookies for his house cookery competition and loved every minute!
But don't think that their simplicity means that they're not absolutely delicious and I think the salted caramel gives them an extra special twist.
They're just perfect for sharing with loved ones and friends 💕
Anzac Cookies with Salted Caramel Sauce
Makes around 20 cookies
Cookie Ingredients

- 200G PLAIN FLOUR
- 100G ROLLED OATS
- 110G CASTER SUGAR
- 65G DESICCATED COCONUT
- 45G GOLDEN SYRUP
- 150G UNSALTED BUTTER
- 1/2 TSP BICARBONATE OF SODA
Caramel Sauce Ingredients
- 100G LIGHT SOFT BROWN SUGAR
- 50G GOLDEN SYRUP
- 75G UNSALTED BUTTER
- 75ML DOUBLE CREAM
- 1 TSP SEA SALT
Method
- Preheat the oven to 170 degrees (fan)
- Line two baking trays
- Put the oats, sugar and coconut in a bowl and sift the flour over the top
- Stir to combine
- Melt the butter and golden syrup in a small saucepan over a medium heat until melted and smooth
- Mix the bicarb with with a 1.5 tablespoons of water
- Add this to the sugar mixture and remove from the heat
- Mix this with the dry ingredients until fully combined
- Form little balls of mixture (weigh them if you want identical cookies) and place them on the baking trays
- Flatten each ball slightly and then pop them in the oven for around 10-12 minutes or until they are golden in colour
- Whilst they're in the oven, make your salted caramel sauce
- To make this, place the sugar and golden syrup in a small saucepan with a tablespoon of water
- Bring it just to the boil and then simmer for 3 minutes
- Add the butter, cream and sea salt in one go and stir for another minute until everything is melted and fully incorporated
- Transfer to a bowl and allow to cool at room temperature
- When they cookies and the salted caramel are cooled, drizzle the cookies with the caramel
- Add a final flourish of sea salt to the cookies and enjoy :)
Orange Blossom & Almond Cookies

Delicious almondy goodness shines through in these tasty little Almond Cookies with just a hint of Orange Blossom. A twist on the traditional Greek Almond Cookie!
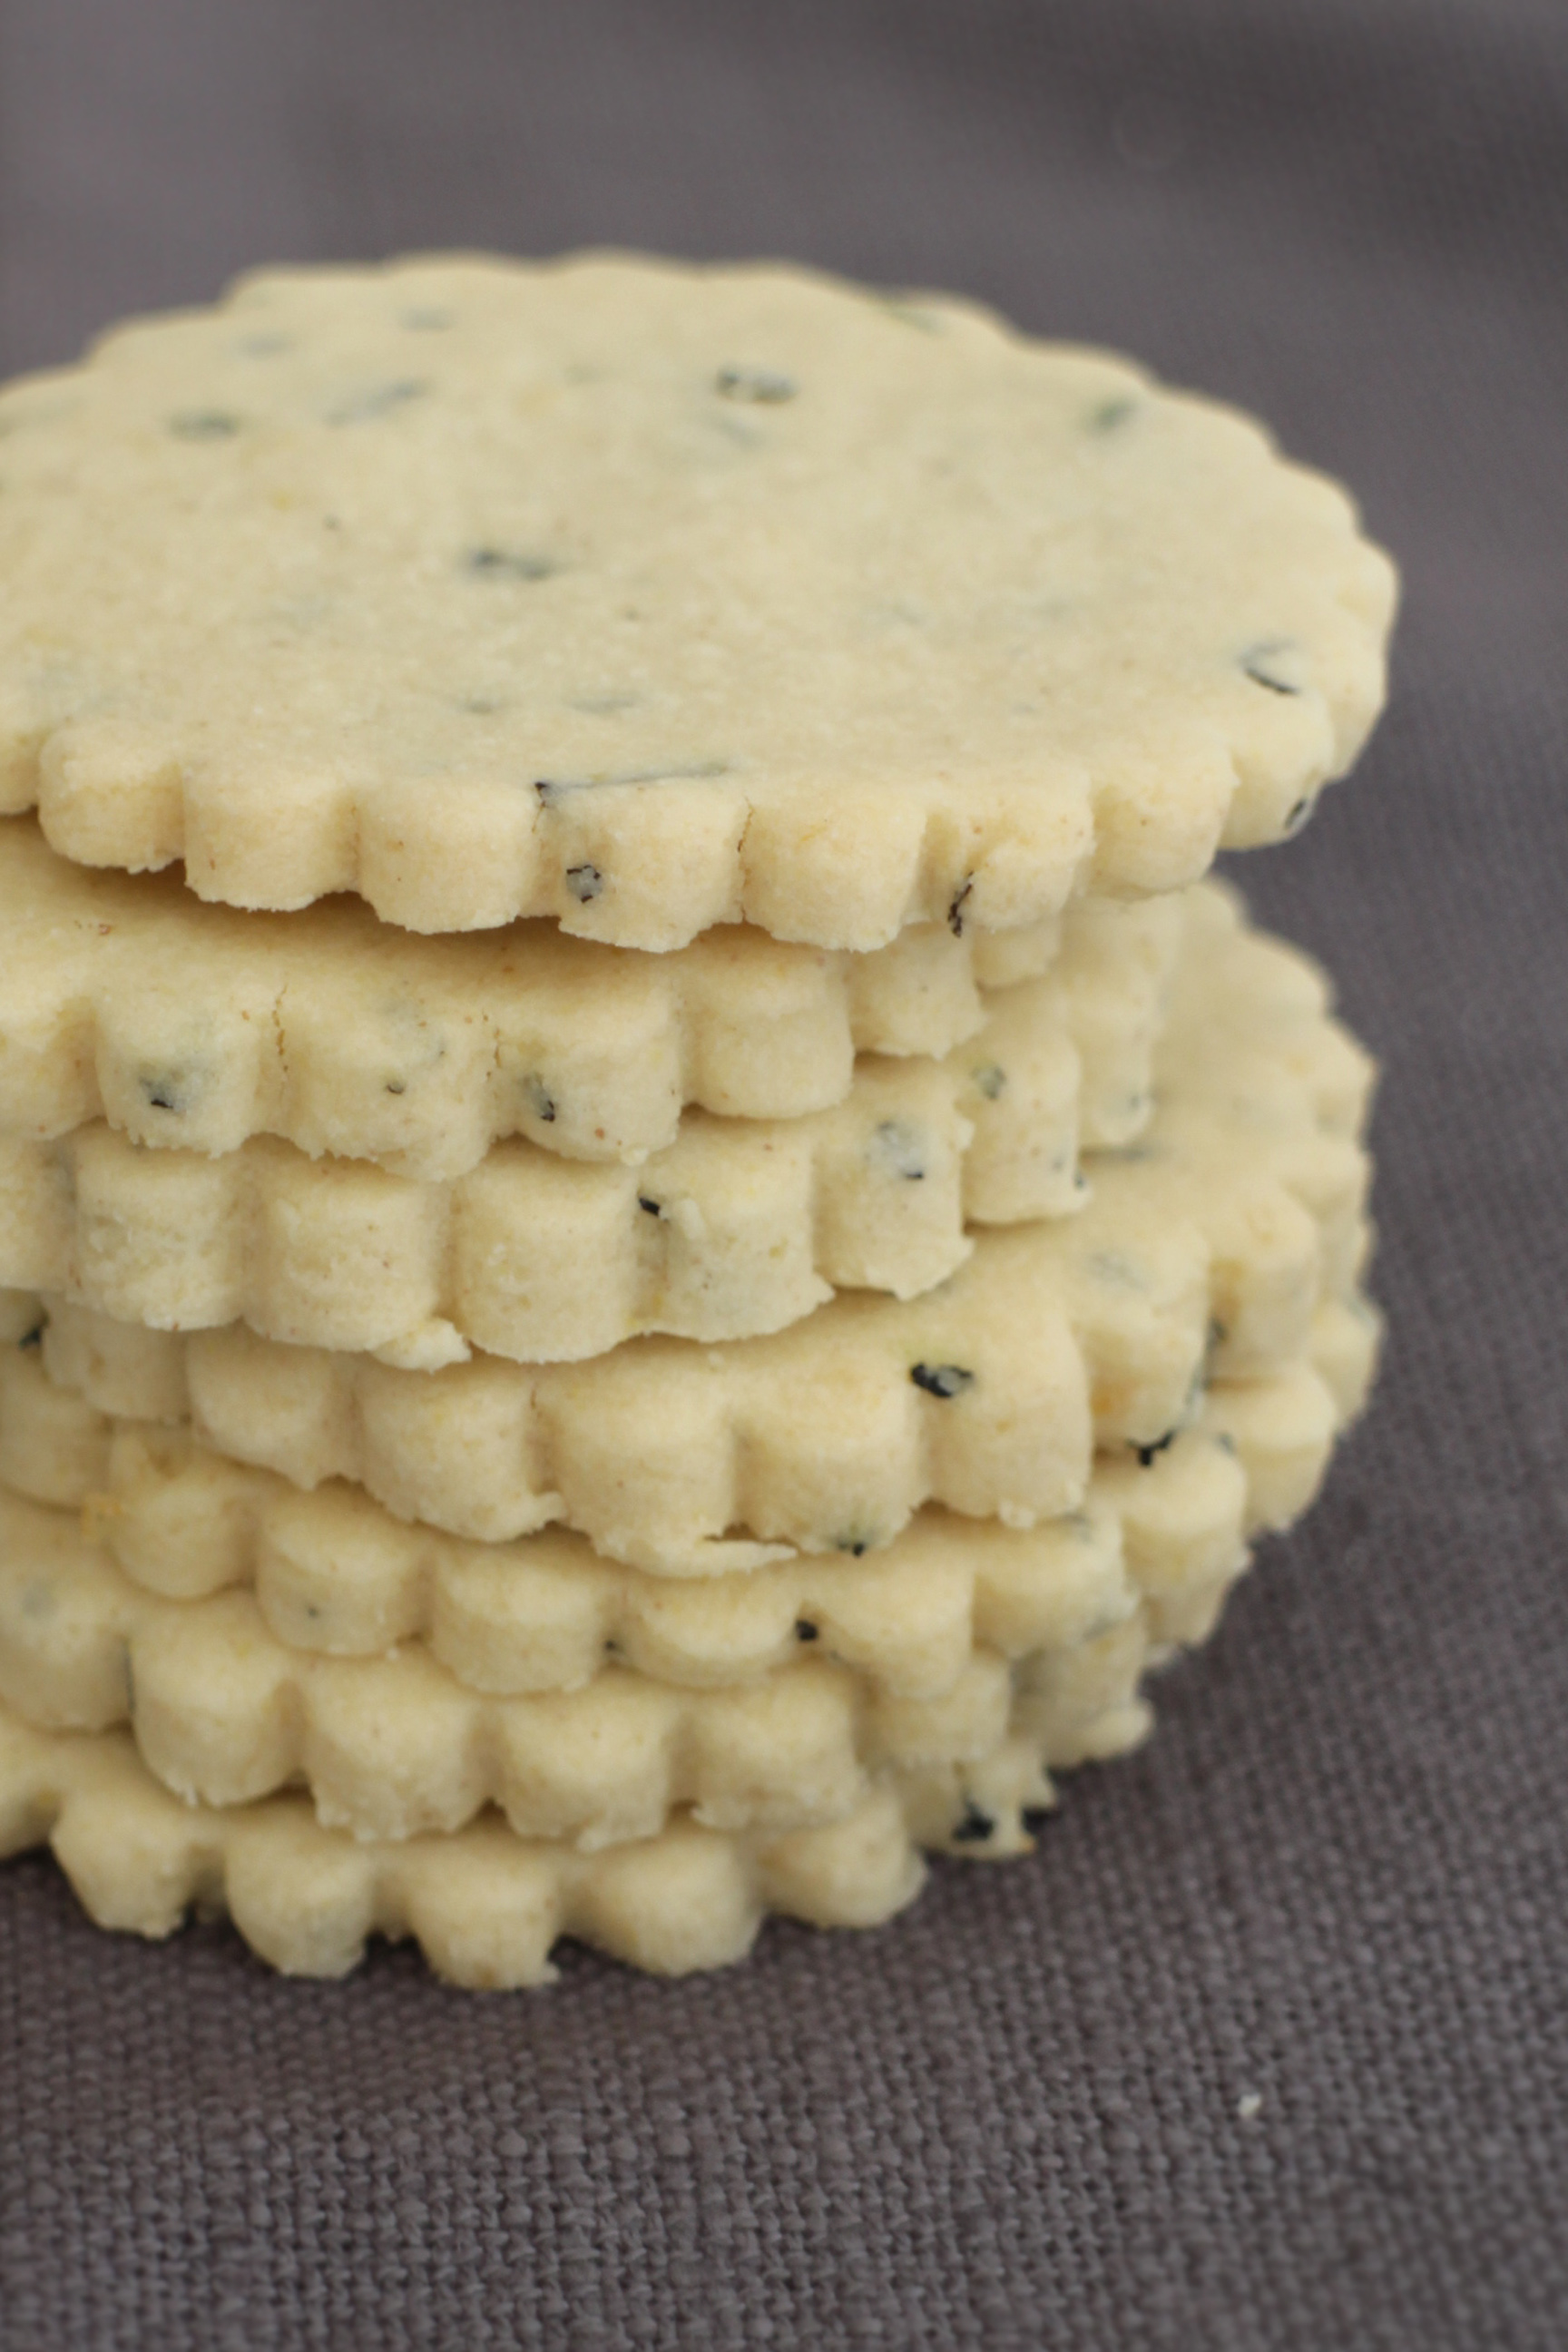
Read moreLemon & Earl Grey Shortbread

Although our winter has been pretty mild, there's a biting wind and we tend to get torrential rain one minute (usually just before the school run is about to start!) and glorious sunshine the next. I'm definitely in need of a little bit of comfort and so it'a been a biscuit sort of week in our house.
I went to wholesale earlier in the week and came back with a big box of beautiful lemons. They are the sign that spring is on its way and are brightening up my kitchen daily. I have dinner plans for the weekend with them, but I had a biscuit plan today.

My quest for dairy free alternatives is ever on my mind and I wanted to have a go at dairy free shortbread -- and why not make it gluten free too? I'm always a huge fan of lemon so my shortbread biscuits were to be lemon and I decided to pair them with earl grey tea. Now I'm not an earl grey tea drinker but I thought it would be interesting to try.

The dairy free alternative I used was Dairy Free Pure Sunflower which was an experiment as I found it at the supermarket and hadn't used it before. The flour was Gluten Free Plain Flour and I also added in some Corn Flour too. The dough is easy to make. The butter, vanilla essence, earl grey, lemon zest and sugar are creamed together in a bowl for around 5 minutes. Then the flour and cornflour are stirred in and mixed gently to form a dough. This is a sticky dough. I popped it in the freezer overnight and it came out of freezer soft the next day so don't worry if yours has this consistency.
The surface should be well-floured and a little more flour sprinkled on top of your dough before rolling it. I found it easier to pat down the dough with my hand until it was the thickness I was looking for (0.5cm) and then a quick roll with rolling pin just to smooth the surface. Once you have used your cutter to great effect (I used a 6cm cutter), gently move each cookie to a lined baking tray. They don't spread much during baking so you don't need to leave too much space between each biscuit.

Then bake them at 170 degrees (fan) for 15 minutes. They don't change much in colour or go golden brown like other biscuits might. You should remove them from the oven and gently move each one on to a cooling tray with a spatula and allow to cool.
Using tea in these biscuits might not be to your taste. You don't have to put it in. I loved the speckled texture but it does add a floral note to the final biscuit. They would work beautifully with just lemon -- maybe with the zest of two lemons since it's your only flavour.
I love these little shortbread biscuits. They are light, have a beautiful snap and are perfect with a cup of tea. I have eaten almost the entire batch on my own!
Lemon & Earl Grey Shortbread (Vegan and Gluten Free)
adapted from Wallflower Girl's Vegan Chamomile & Lemon Shortbread
Ingredients
- 200G DAIRY FREE PURE SUNFLOWER (or an alternative dairy-free butter)
- 1 TSP VANILLA PASTE OR EXTRACT
- 1 TBSP EARL GREY (loose tea)
- ZEST OF 1 LEMON
- 100G CASTER SUGAR
- 300G GLUTEN-FREE FLOUR
- 1 TBSP CORN FLOUR
Method
- Make the dough the day before you want to bake your biscuits
- Place your butter, vanilla, earl grey, lemon and sugar in a bowl and cream together -- around 5 minutes
- Stir in the gluten free flour and corn flour and gently mix until a dough is formed -- it will be a sticky dough
- Wrap in clingfilm and place in the freezer overnight
- When you're ready to bake them, preheat the oven to 170 degrees (fan) and line a baking tray with parchment
- Flour your surface well and place the dough on top, sprinkling the top of the dough with more flour
- Using your hands, pat the dough until it's around 0.5cm thick
- Flour your rolling pin and gently roll the surface just to make it smooth
- Using a cutter, cut out your shapes and gently move them to the baking tray
- Bake for 15 minutes
- Remove from the oven and gently transfer your biscuits from the baking tray to a cooling rack
- Allow to cool for 10 minutes and then enjoy :)
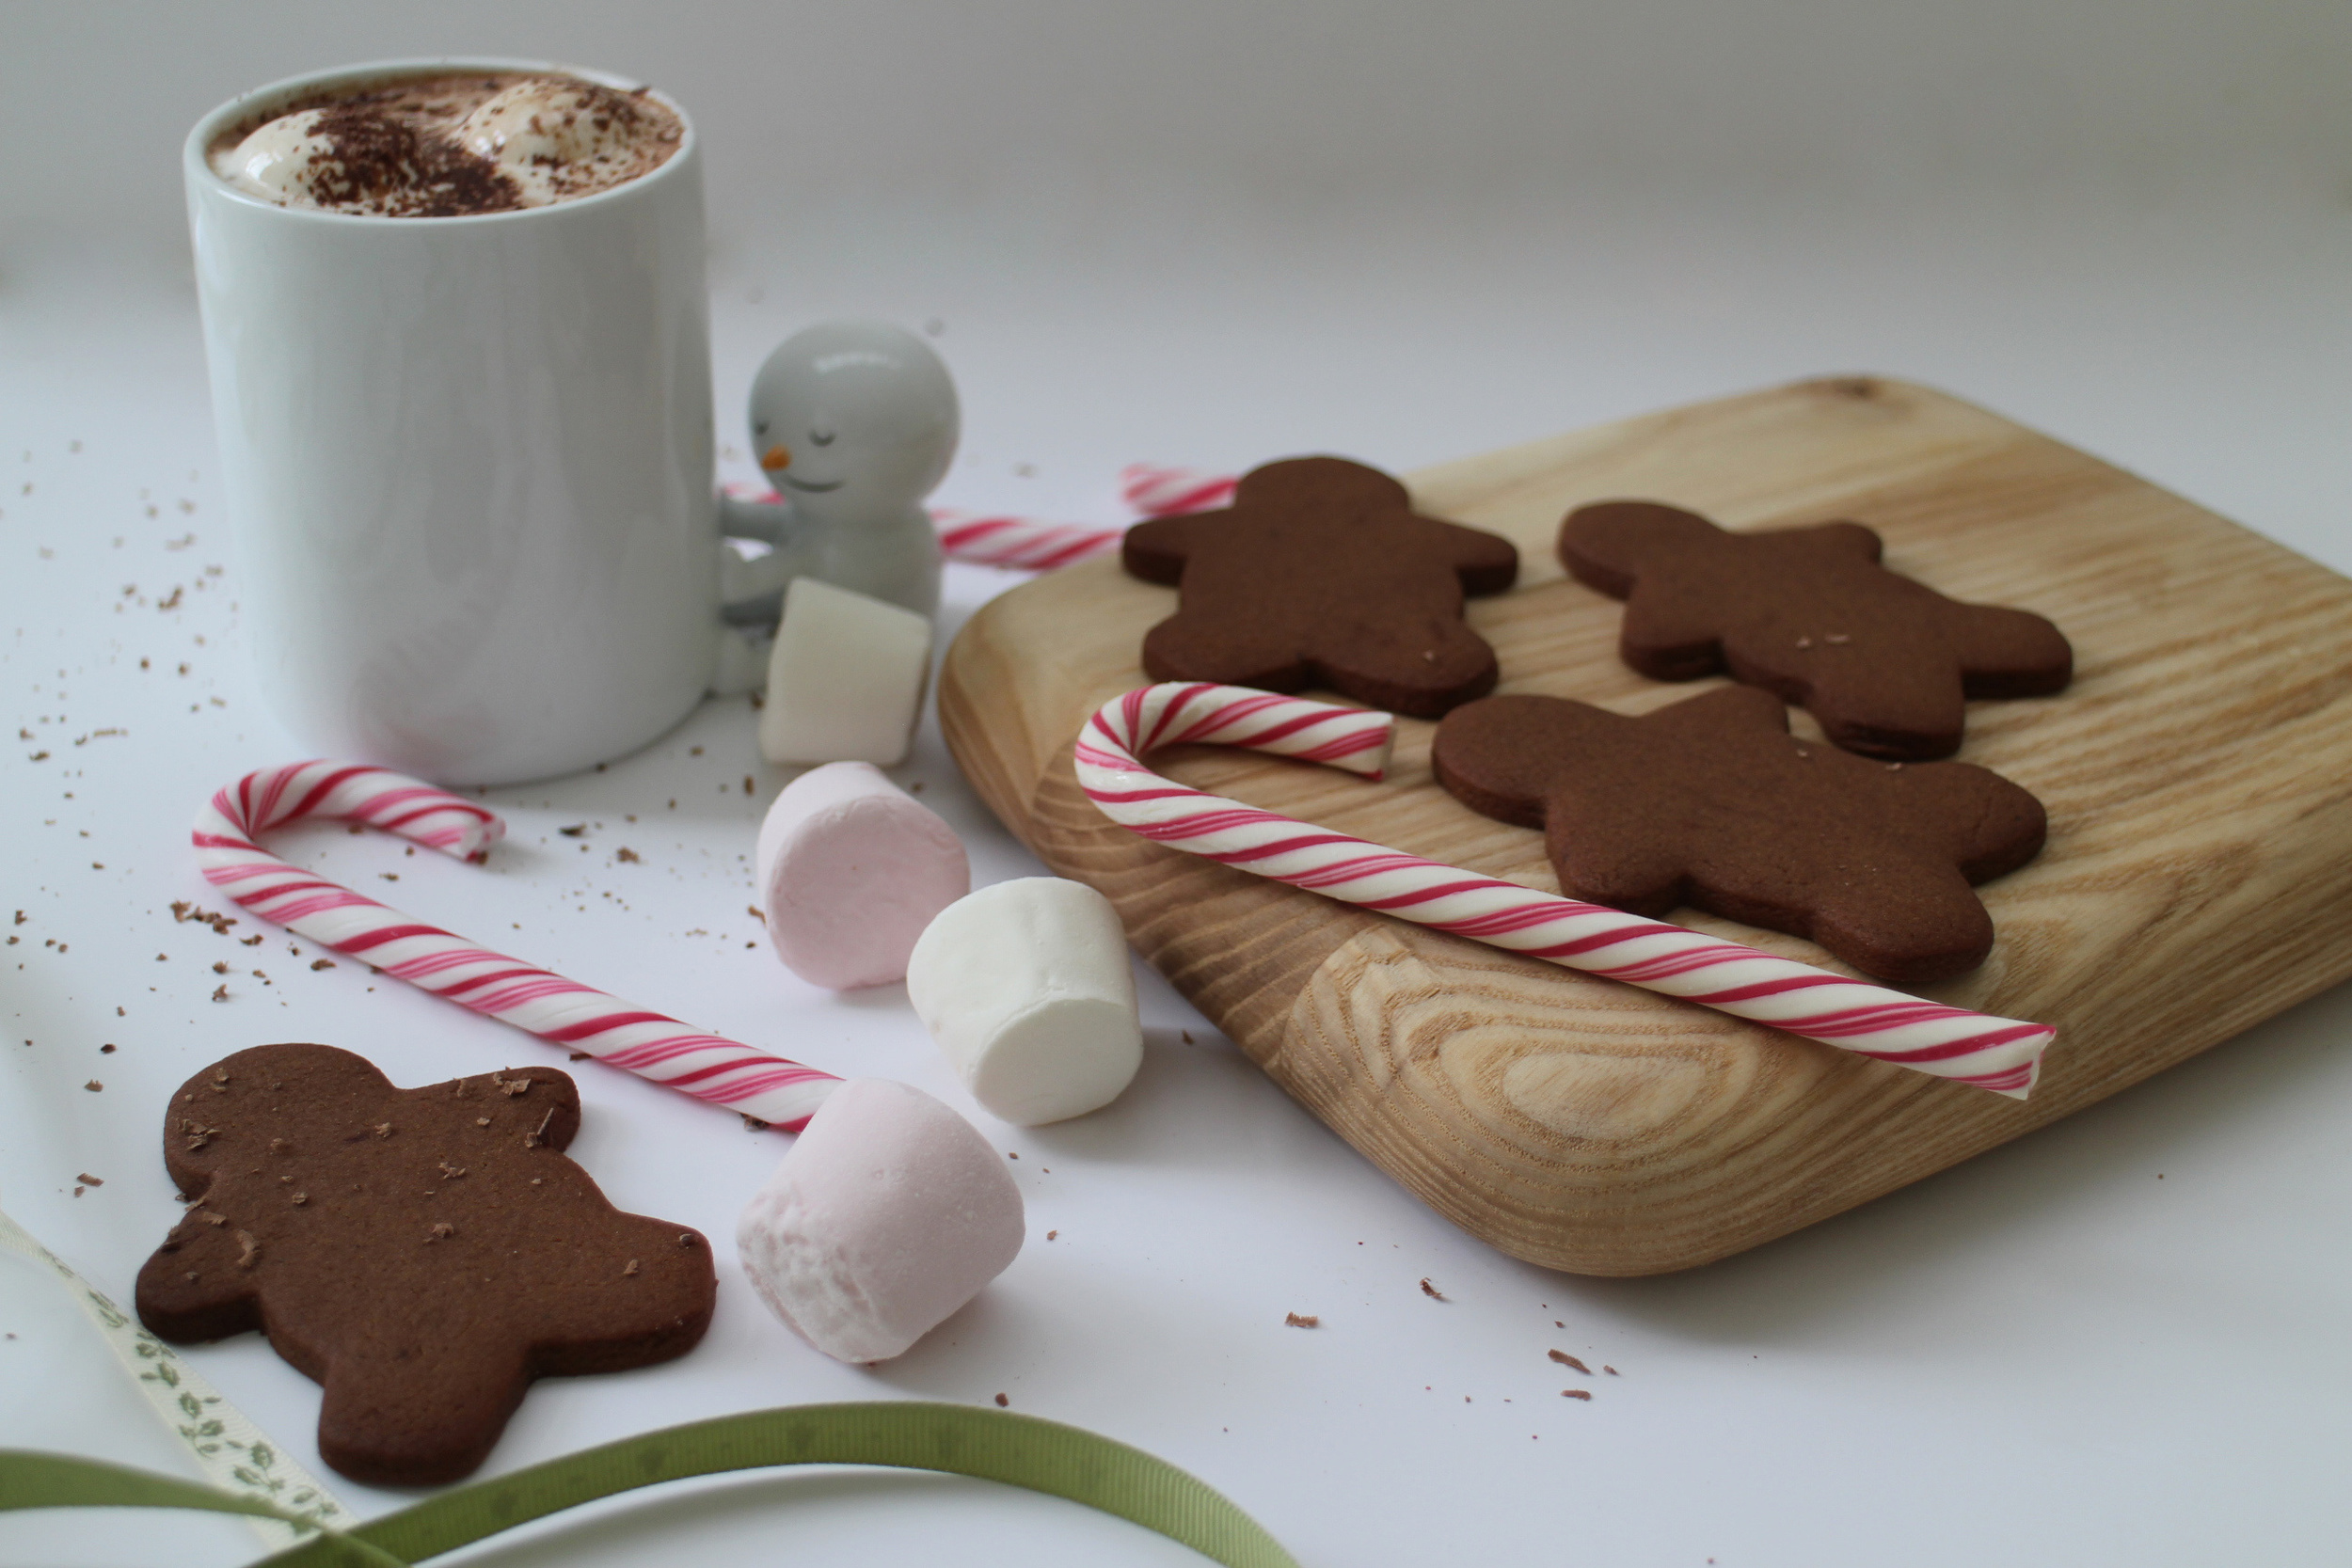
Chocolate Gingerbread Men

I can't believe how quickly the weeks are flying towards Christmas now. It seemed like everyone was digging out their Christmas spirit so early this year and then in the midst of parties, carol concerts and the seemingly neverending activities at school over the festive period, suddenly the boys are on holiday for four weeks and we're counting down to the big day.
I had a list as long as my arm of things I was going to bake this Christmas. But then, a couple of weeks ago, we had dairy, nut and egg allergies diagnosed in the family. They're not life threatening but they kind of scuppered my plans. And although I know that I will be still be baking with dairy, eggs and nuts in the future, we're just being a little more considered and restrained right now whilst we make our lifestyle choices.
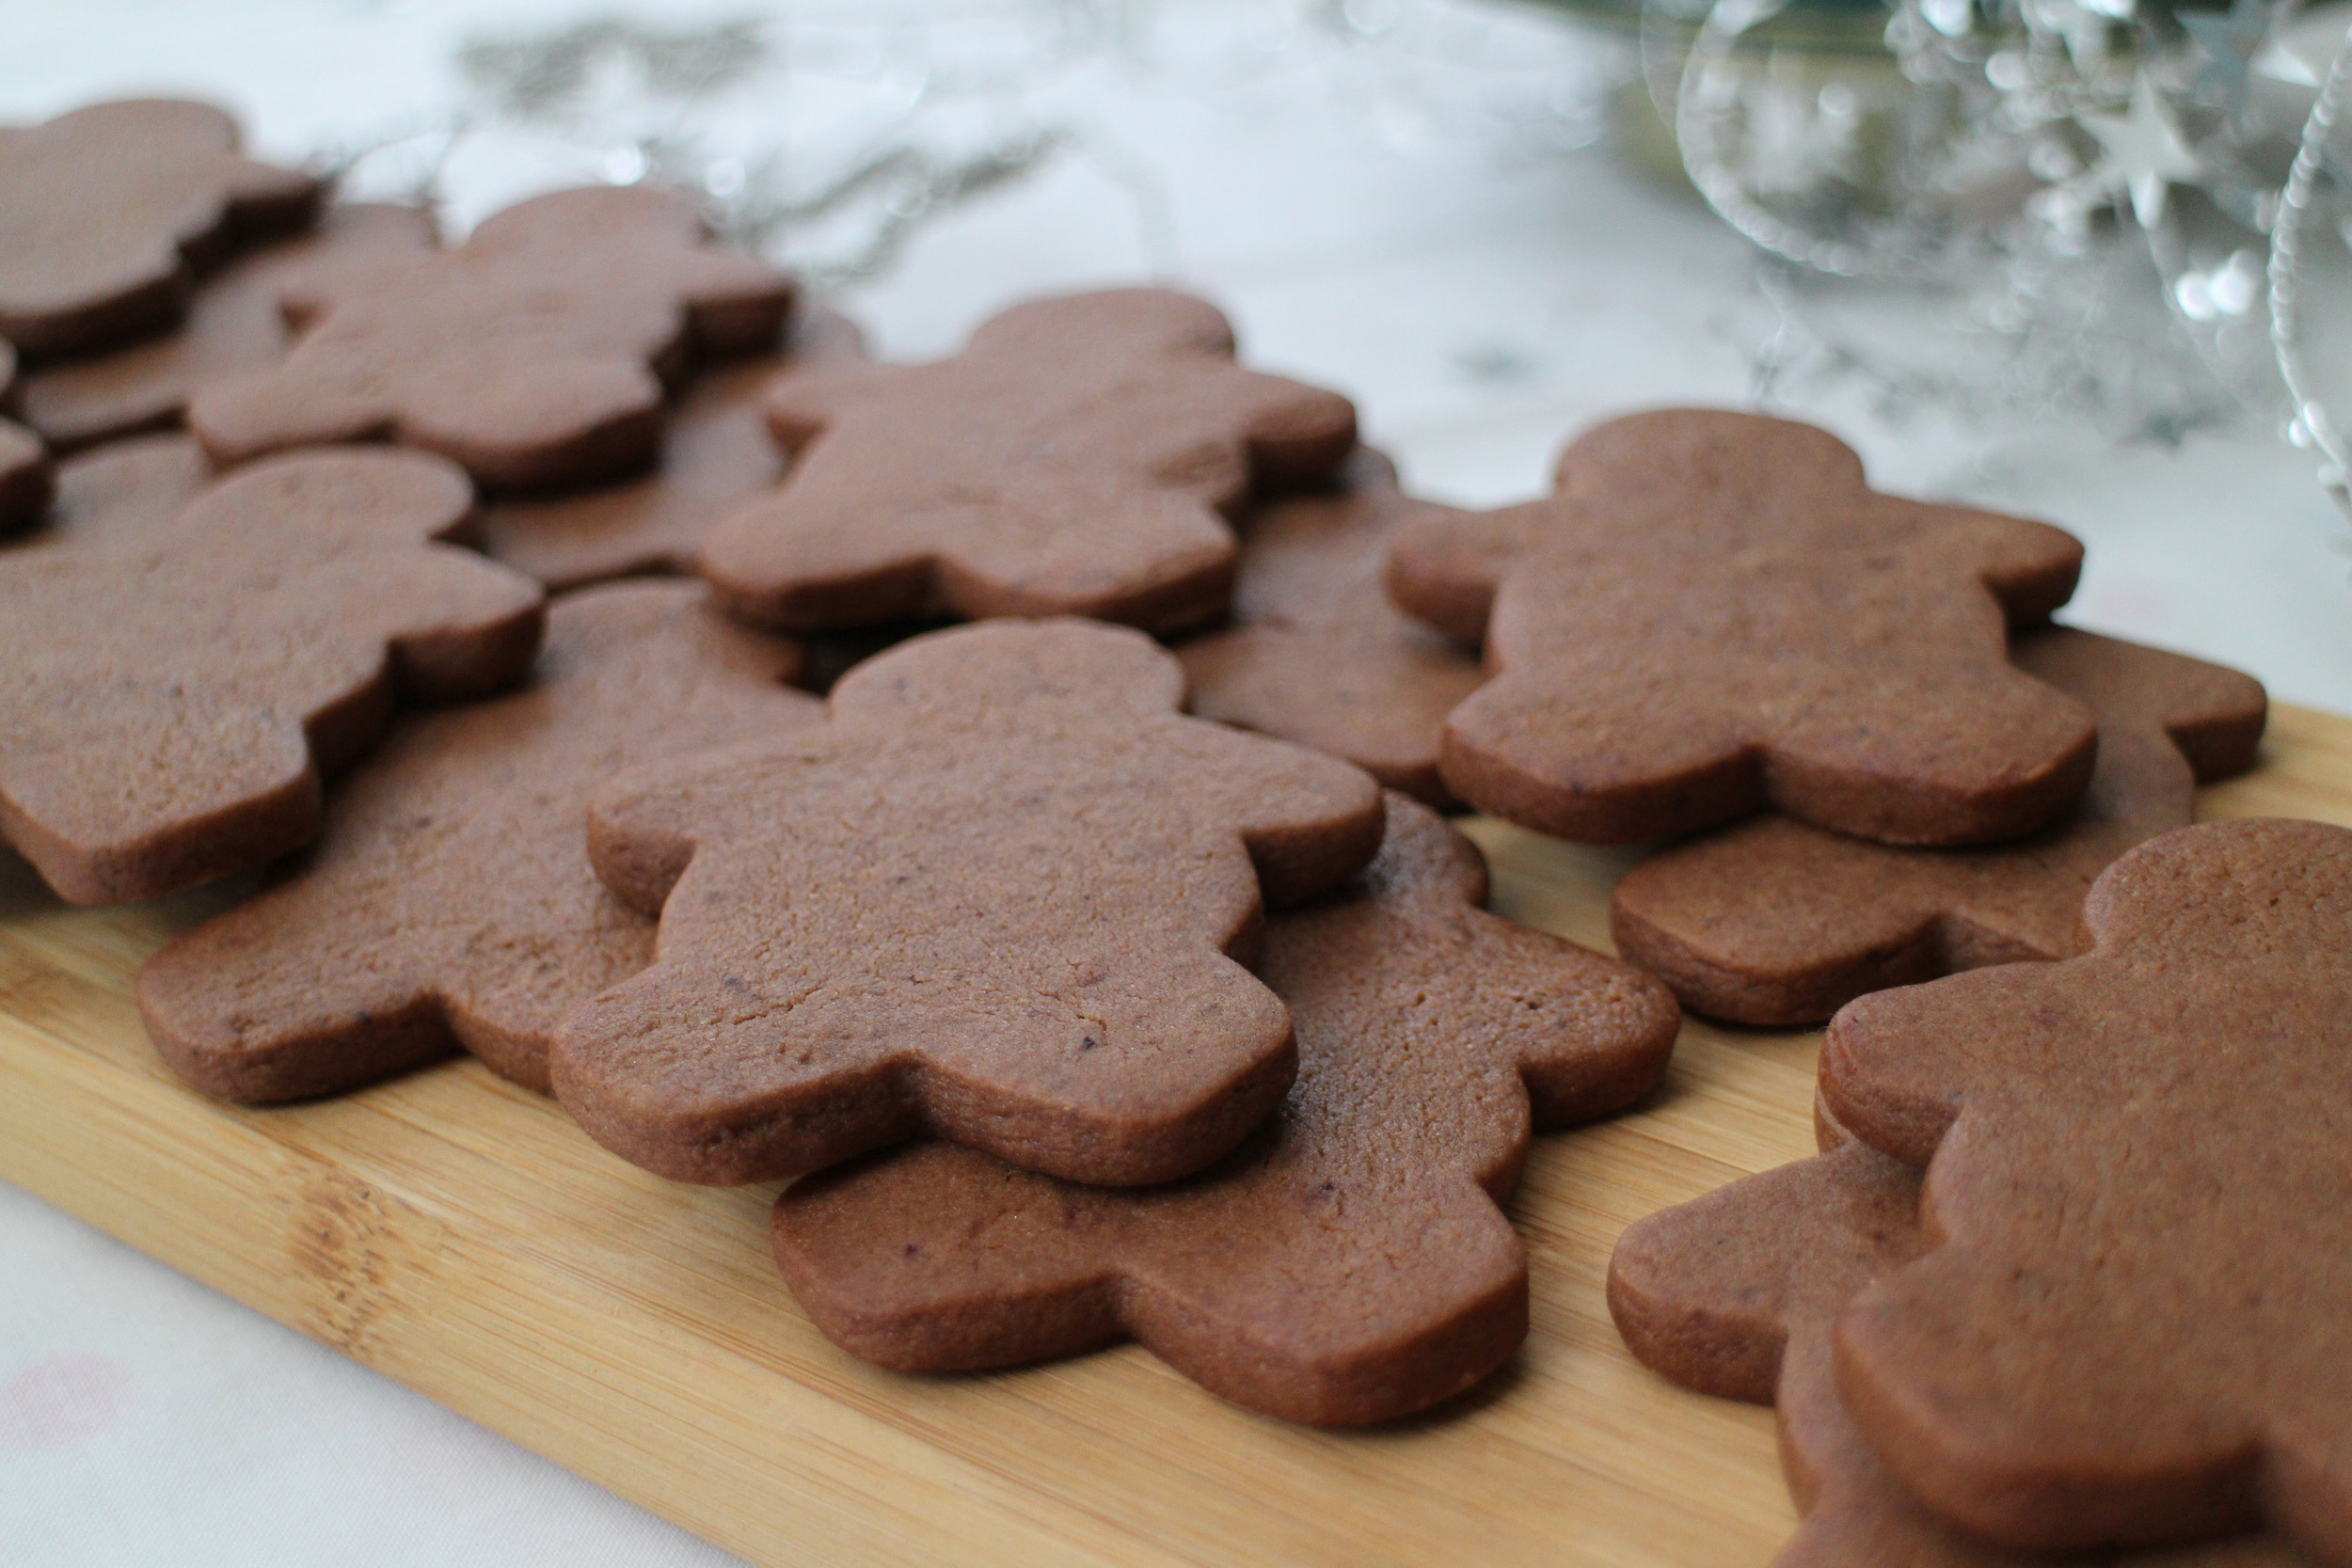
But being Christmas time, we couldn't let it go by without out little gingerbread family. Whilst these Chocolate Gingerbread Men do contain butter, the rest of the ingredients are on our okay list and we made them pretty small (with a 5cm cutter) but just big enough to decorate.
The dough is really easy to make. After the butter is creamed in a mixer, all the rest of the ingredients are added in one go and combined. This is a soft dough and needs refrigerating so once I'd made and refrigerated it, I then cut out my little army and then popped them back in the fridge until I was ready to bake them the next day. To me, biscuits baked fresh are just the best when you have friends coming to visit.

You can use any cutters you like. I have a great set from Ikea with 3D stars, Christmas tree and reindeer which are lots of fun but I gave them to some adult friends to decorate before taking any photos and their creations disappeared home with their new friends! I bought some coloured icing pens and the kids just loved decorating them. Here is our little family :)

For me, Christmas just isn't the same without gingerbread and gingerbread people are such a fun way to celebrate with friends. I haven't met a child yet (and now it seems an adult too!) that doesn't love to become an artist and bring out their inner child.
Naked or decorated, these gingerbread men are just delicious. Just the right amount of chocolate throughout and then a lovely, but not overly intense, taste of ginger. I think this makes them perfect for kids but still completely moreish for adults.
And just right to enjoy with a mug of hot chocolate and marshmallows :)
Chocolate Gingerbread Men (makes around 20 x 5cm shapes)
Ingredients
- 125G UNSALTED BUTTER, SOFTENED
- 100G LIGHT BROWN SUGAR
- 230G GOLDEN SYRUP
- 375G PLAIN FLOUR, SIFTED
- 1 TSP BAKING SODA, SIFTED
- 25G COCOA, SIFTED
- 2 TSP GROUND GINGER
- 1 TSP PUMPKIN SPICE (you can use allspice here but I'd start with 1/2 tsp and then add to taste)
- COLOURED ICING PENS (optional)
Method
- Beat the butter and sugar in a mixer for at least 5 minutes until pale
- Add the golden syrup, flour, baking soda, cocoa and spices and beat on low speed until combined
- Place on a sheet of baking paper and then pop another sheet on top
- Roll out the dough until around 1/2 cm thick
- Refrigerate for at least one hour so the dough has time to firm up
- Remove from the fridge and cut out your shapes - the dough will soften and get sticky quite quickly so just pop it back into the fridge if needed to firm up for 5-10 minutes
- You can either bake your shapes now or refrigerate them again until ready
- Pre-heat the oven to 160 degrees
- Bake for 12 minutes for a snap to the biscuit (a couple of minutes less if you want them a little softer)
- When you remove them from the oven, the biscuits will be soft and very fragile so you need to leave them to cool down completely before handling them
- When they're cool, it's time to have some fun and decorate them - or eat them just as they are :)
Monte Carlo Biscuits

We're back from our final fling of the summer in Tuscany and appear to have left the sunshine behind us! There are only two days left until the boys go back to school. Wow, where did nine weeks go? It's been a whirlwind of going away, entertaining the boys and having lots of visitors as well as a very important fifth birthday for my youngest. I've baked many of my favourite recipes time and again, recipes I've discovered through this blog. And when my gluten-free niece came visiting from New Zealand, I didn't bat an eyelid at baking some special cakes and puds for her when a year ago the idea of gluten free baking would have sent me into a spin!
I have a stack of recipes I'm looking forward to trying when a little more of the day is my own again but for today, the weather is grey and gloomy so we're having our last lazy day of the summer hols and the boys wanted to turn their hands to baking something yummy. It had to be something whose ingredients are store cupboard essentials as we haven't been near a supermarket since our return from sunnier climes.

We decided upon Monte Carlo Biscuits. These Australian classic biscuits are sweet and filled with jam and buttercream and have been made by Arnott's Biscuits since 1926. I must confess I have never had one before. I saw a version of the recipe on the Australian Good Food website and Frank Camorra's comment on there made me smile: "I remember the first time I saw a Monte Carlo, I couldn't believe how big it was". Having made them today, I can completely relate to that. They are enormous.

I love coconut so for me, this is my favorite part of the cookie but the addition of golden syrup (or you could use honey) also makes them lovely and chewy too. As I said before, they are enormous and I would definitely make something a little daintier next time - I mean, my youngest struggled to get it in his mouth for a bite! There are a lot of recipes available for these biscuits, very similar in ingredients and method. Not having tasted one of these before, I opted for Donna Hay's vanilla buttercream filling which is pretty sweet and has a higher butter content than most of the other recipes - and is exceptionally yummy :)


As the finished biscuits are 7cm in diameter, next time I would divide the dough in half again and make 20 sandwiched biscuits. But these biscuits are gorgeous. I can see why they're such a favourite down under.
Not sure they'll be hanging around for long in this house. Especially when my antipodean hubby spots them ;-)
Monte Carlo Biscuits Makes 10 biscuits sandwiched together (adapted from Donna Hay and Modern Australia | Good Food)
Biscuit Ingredients

- 125G UNSALTED BUTTER, SOFTENED
- 160G LIGHT BROWN SUGAR
- 2 TBSP GOLDEN SYRUP (or you could use honey here as an alternative)
- 1 EGG
- 300G SELF-RAISING FLOUR
- 50G DESSICATED COCONUT
- 70G STRAWBERRY JAM (or you could use raspberry jam)
Buttercream Ingredients
- 160G UNSALTED BUTTER, SOFTENED
- 200G ICING SUGAR
- 1 TSP VANILLA EXTRACT
Method
- Preheat the oven to 180 degrees (fan)
- Line two baking trays with greaseproof paper
- Beat together the butter, sugar and golden syrup until light and creamy - this should take 2-3 minutes
- Add the egg and mix it until just combined
- Sift the flour over the dough and add the coconut, then mix together until they're combined
- Divide the mixture into 20 balls (around 35g per ball) and place them on the prepared trays ensuring enough space for them to spread
- Bake for 12 minutes until they're golden brown
- Leave them to cool on their trays for 5 mins and then transfer them to a cooling rack until they're cool
- Make the buttercream by placing the butter, icing sugar and vanilla extract in the mixing bowl and beating the buttercream for around 5 mins until smooth and creamy
- Either spread or pipe a dollop of buttercream on half of the cooled biscuits
- Add jam on top of the buttercream and then sandwich the biscuits together using one of the halves without cream or jam
- Enjoy :)
Viennese Swirls & Custard Creams
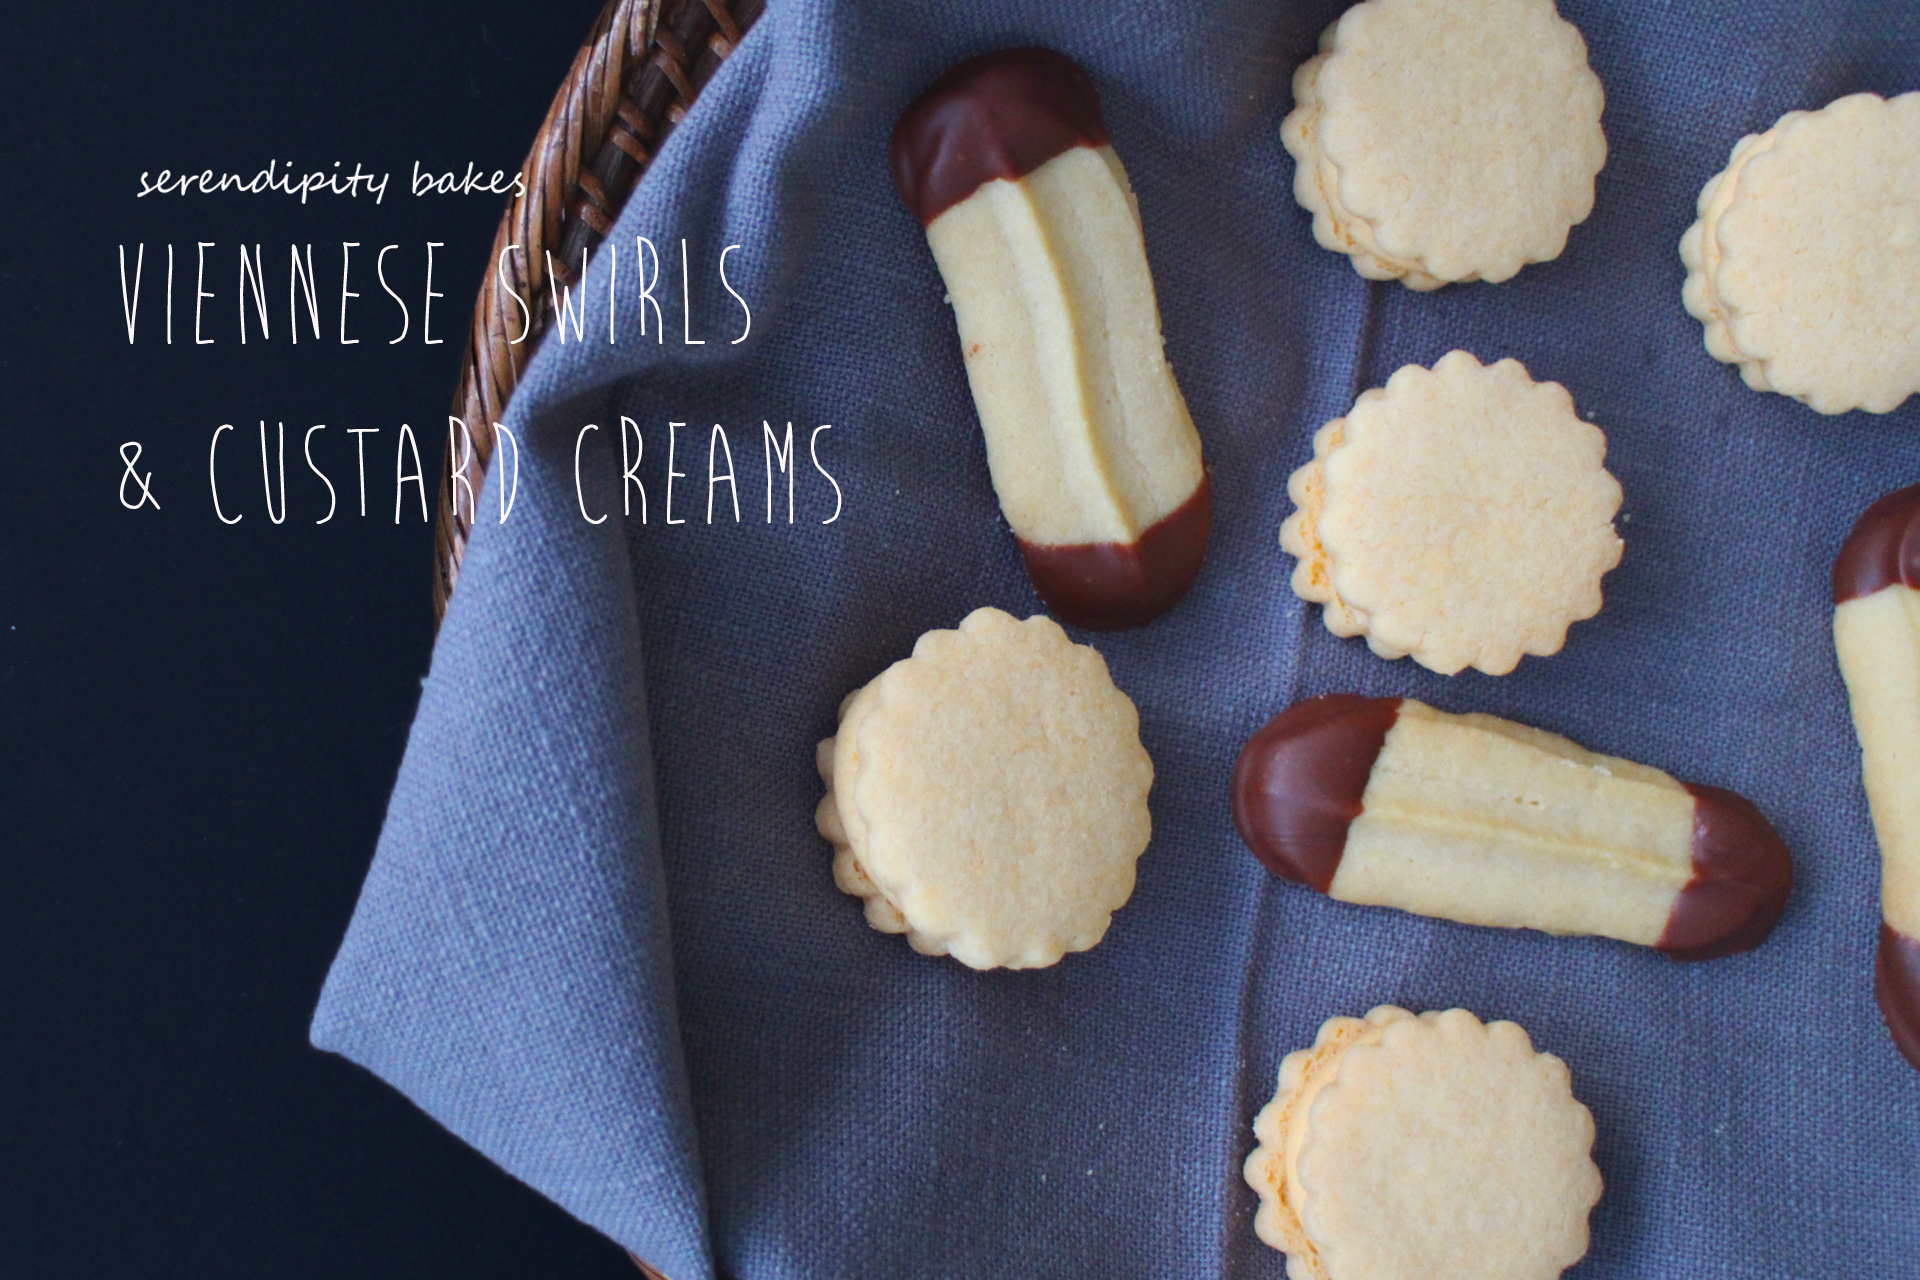
So as the whole of the UK gears up for GBBO (the Great British Bake Off's new series) tonight, we've been promised the most eclectic bunch of contestants yet. And with a special mathematical formula, predictions are that Flora and Nadiya will be going head to head in the final. And we haven't even met them yet!!!! Ooh err! The excitement. I, for one, will be firmly glued to my TV screen :)
Read morePistachio Cookies

A quick post for the end of the week as we take off on our holiday expedition for 2 weeks of sun and fun with the boys. These Pistachio Cookies are seriously good. I mean, SERIOUSLY good. You have to love coconut and pistachios but add an egg white and some icing sugar and these are the only ingredients of these tasty little cookies. I also love the rich green colour inside as you bite into them! I pinned the recipe a while ago and they're from Zerrin's Give Recipe blog if you want to take a look at more of her tasty recipes :)
Read moreWhite Chocolate Oreos

Chocolate covered oreos. I've been seeing them all over Instagram for some time - mostly American or Canadian bakeries, but they're a trend that appeals to me. I mean chocolate + oreos = how can you go wrong? Mostly, the chocolate covered oreos across the internet are pretty and delicate, but mine are more for fun. I knew they were a success when my eldest son pottered over to me in the kitchen, asked me what I was making and then looked me in the eye saying, "Mummy, remember that I am your official taste tester forever. I'd like that one there with the sprinkles."
Read moreLavender & Maple Coconut Macaroons

Back to the big smoke after our mini-break in the countryside and we swapped flowers, animals and rolling hills for Kensington in the sunshine as we headed to the Science Museum for Space exploration! Great fun, but thoroughly exhausting - and hubby and I were relieved to collapse on the sofa by late afternoon :) I needed a pick-me-up, moreish and yummy - and healthy would be an added bonus.
After searching for lavender throughout the local stores and garden centres over the last couple of weeks (having decided not to order it online as it would take too long and then had to wait even longer to find it naturally) I found some last week at my parents' house. Dried lavender from last year's lavender crop in their garden and I only needed three-quarters of a teaspoon. It's been safely sitting in my bag for when I had enough time to make the second recipe I wanted to try from Hemsley & Hemsley, their Lavender & Maple Coconut Macaroons. I LOVE all the ingredients of these little macaroons, even though most shop assistants I approached when searching for the lavender to use in cooking looked at me like I was nuts.
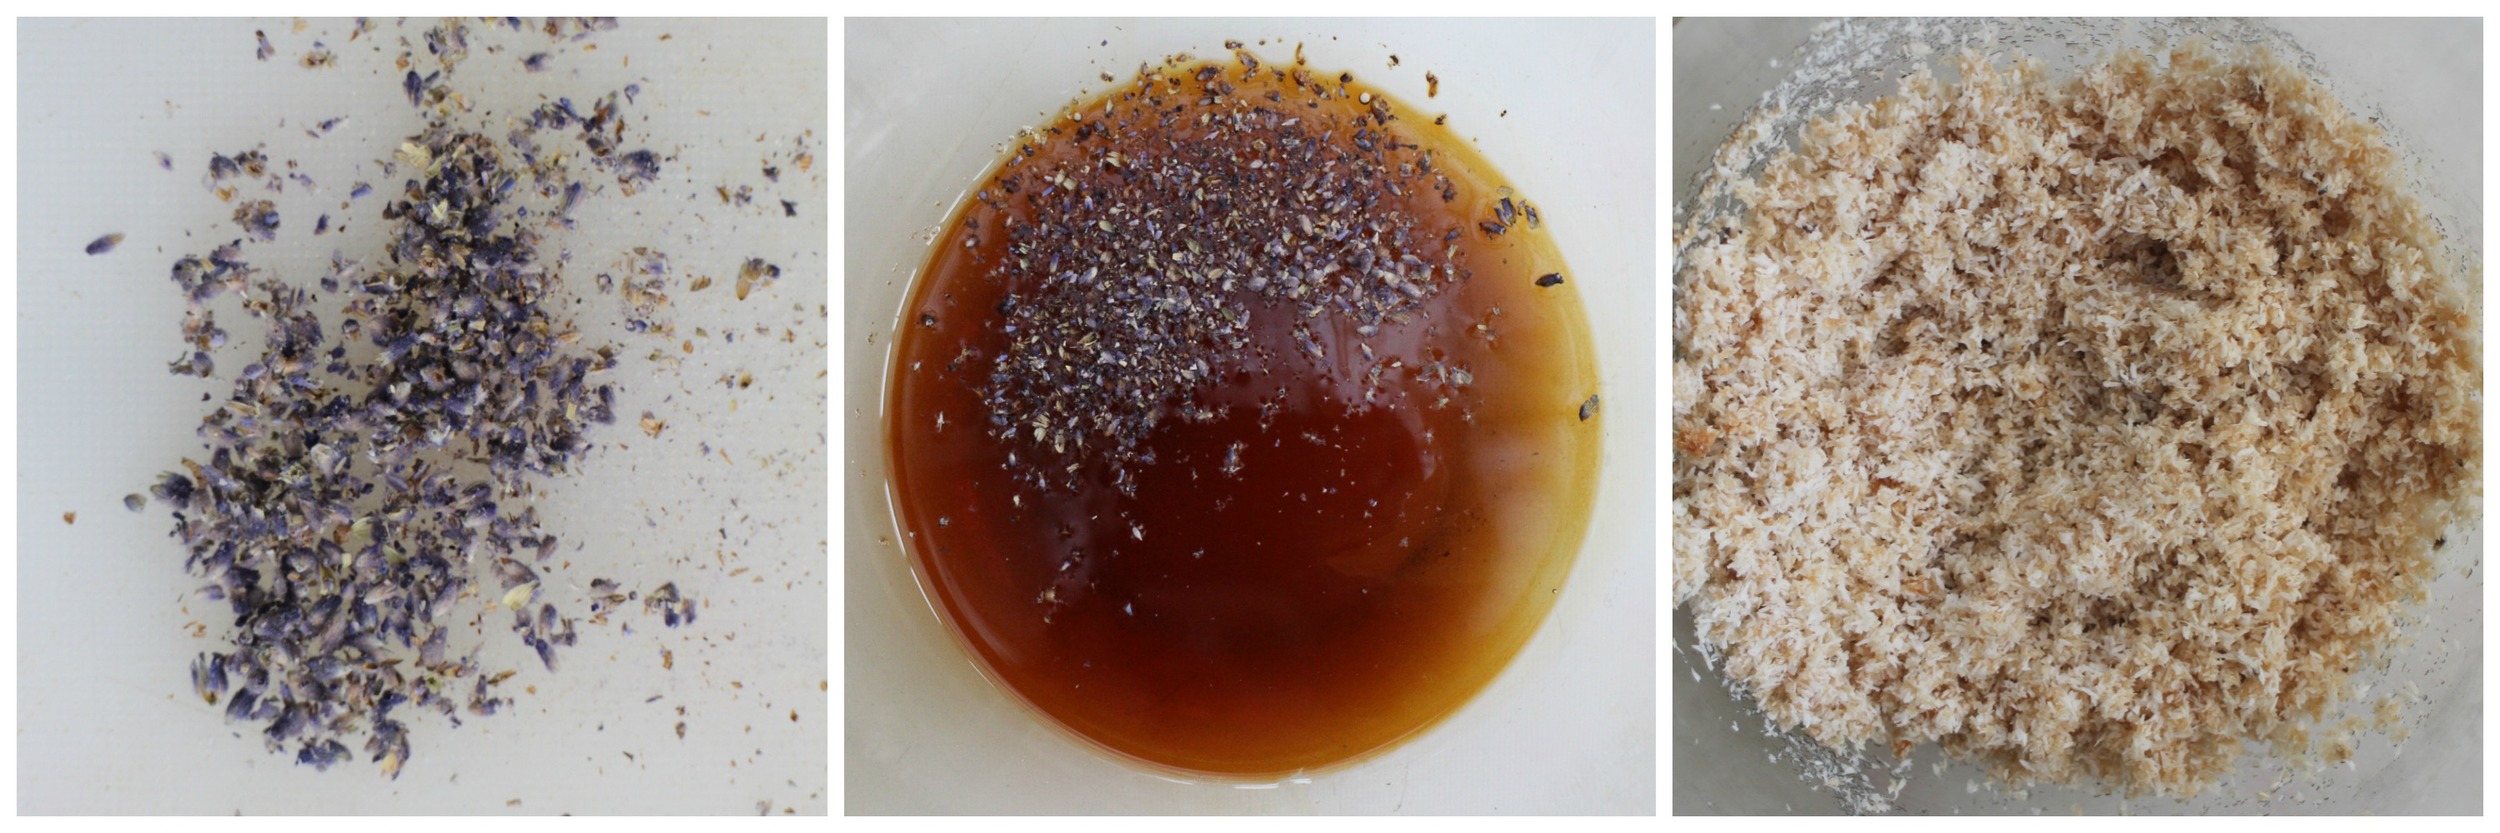
This recipe is gluten and dairy free and the only sugar comes from the maple syrup so this is a healthy alternative to cookies and cakes. The macaroon itself is made predominantly from shredded coconut so for me, is very reminscent of the macaroons I enjoyed when growing up, when macarons (the deliciously almondy French variety I love so much) were a thing of distant dreams. As with many of my other bakes, I used liquid egg whites but you can use the whites of 3 medium eggs instead if you prefer. There is just the merest hint of lavender in these macaroons and I think this could be upped, probably to at least 1 tsp next time I make them. They don't take long to make, so provided you have the ingredients in your store cupboard, you can whip them up in no time for a lunchbox or afternoon treat.

I love these little macarons. There's not much about coconut I don't like, but I really like the pairing with maple syrup and the hint of lavender for a slightly more unusual twist. This is the second recipe I've made from Hemsley & Hemsley (see the Pumpkin Puds recipe here) and am hard pushed to say which I prefer more, so I forsee I will be making these two recipes many times over - just while I make my mind up, of course!
Lavender & Maple Coconut Macaroons Makes 18 (from Hemsley & Hemsley)
Ingredients
- APPROX ¾ TSP LAVENDER FLOWERS
- 4 TBSP MAPLE SYRUP
- ½ TBSP VANILLA EXTRACT
- 150G UNSWEETENED DESSICATED COCONUT
- 180G LIQUID EGG WHITES (OR EGG WHITES OF 3 MEDIUM EGGS)
- 1/8 TSP SALT
Method
- Preheat the oven to 170 degrees and line two baking trays with parchment paper
- Finely chop the lavender and mix it with the maple syrup, vanilla extract and coconut in a large bowl
- In a separate bowl, whisk the egg whites with the salt until stiff peaks form
- Gently fold the egg whites in with the coconut mixture using a metal spoon
- Using a tablespoon measure, scoop the mixture onto the baking parchment and then neaten the mounds with your hands
- Bake for 12 to 15 minutes until the macaroons are lightly browned
- Remove them from the baking tray and place on a wire rack to cook (I used a slice to remove them as they were a bit sticky underneath but they came away easily)
- They are quite soft when they first come out of the oven, but firm up as they cool down!
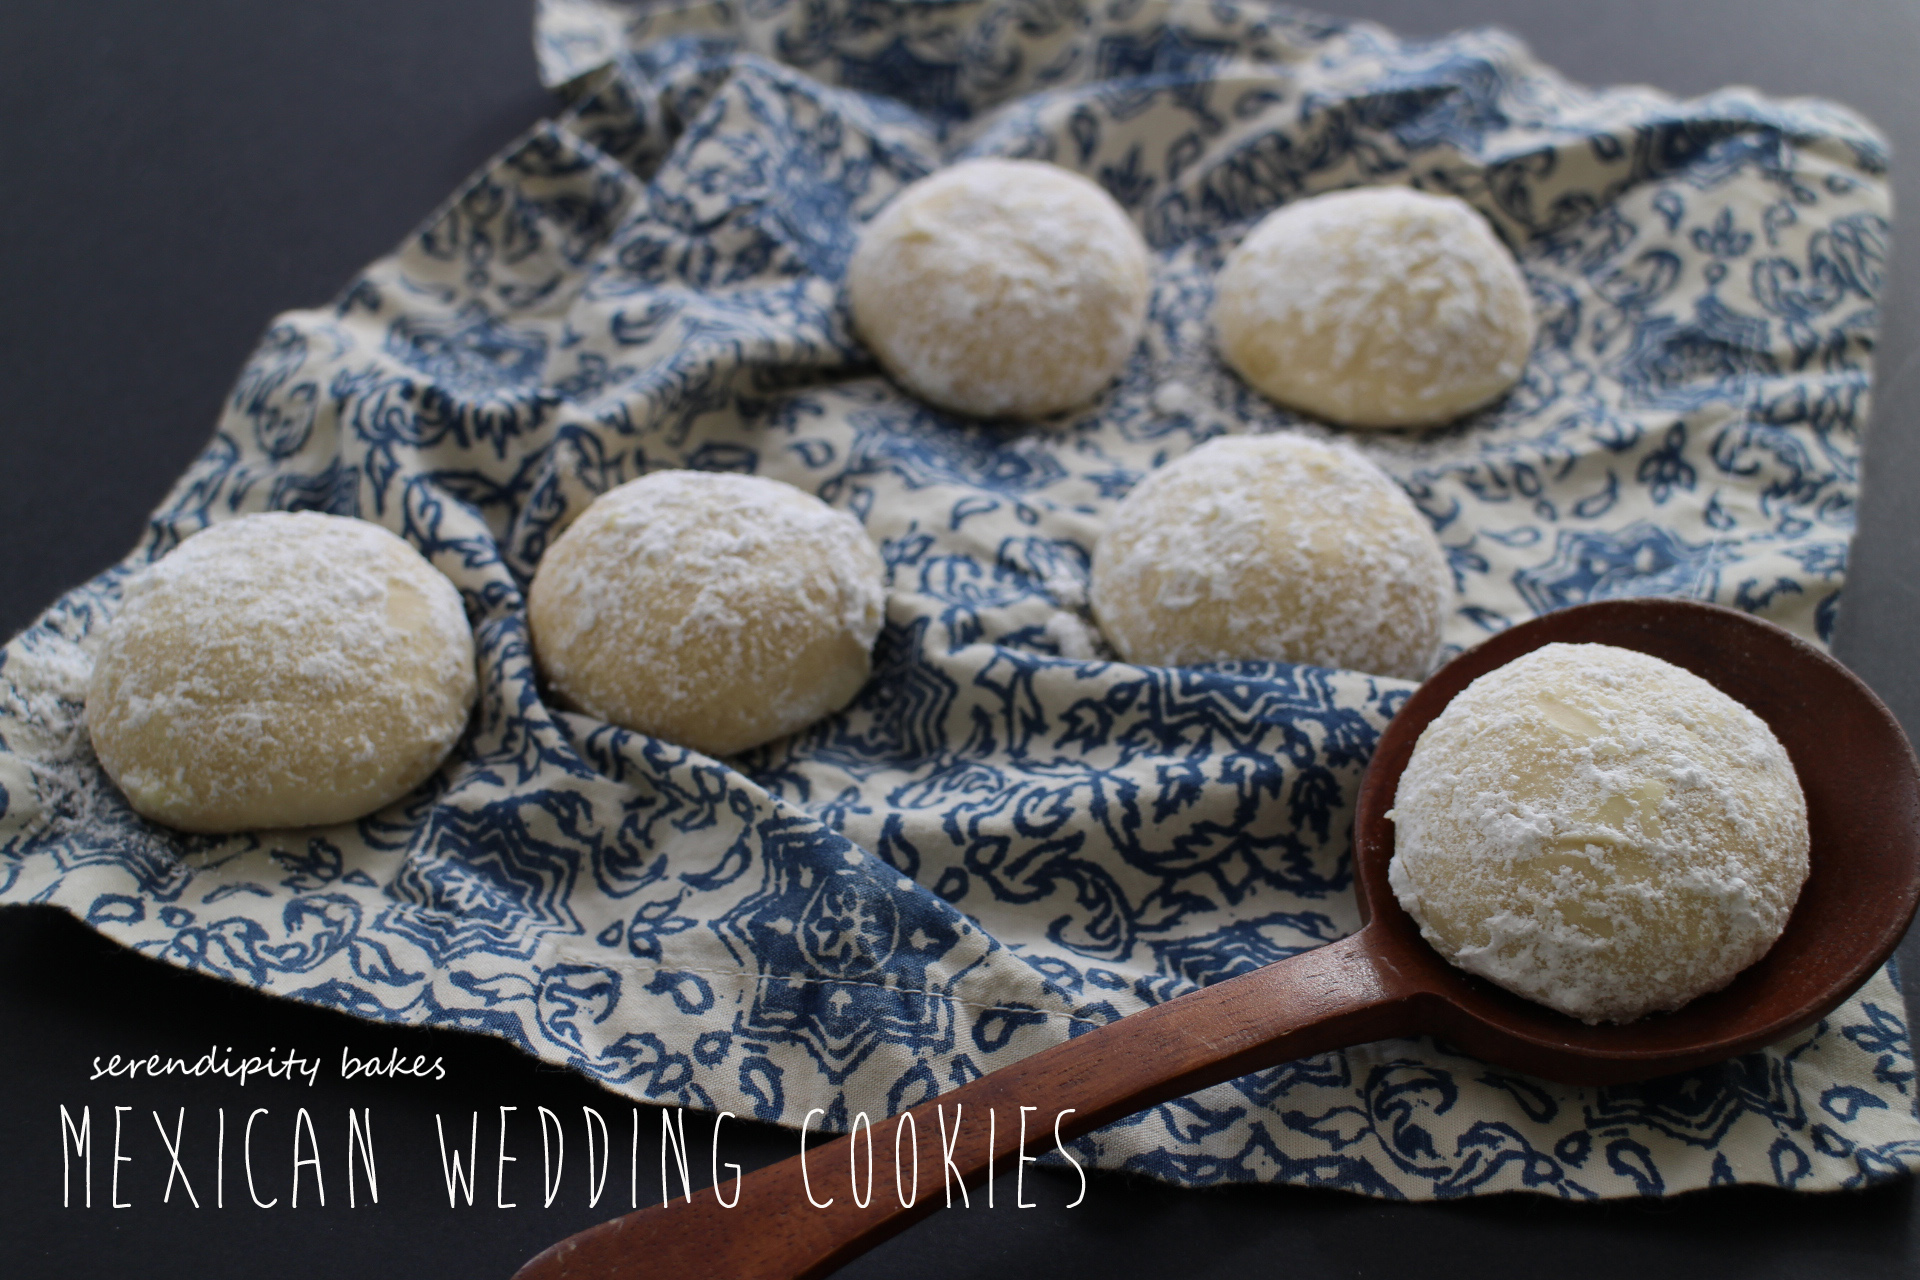
Mexican Wedding Cookies
The calm before the storm. The last week of spring term at school before four whole weeks with the boys. For our last few days of calm, it's been a pretty busy week with an open book day, easter school concert and our spring fair. As well as baking for the fair (this time experimenting with both regular cupcakes as well as gluten-free and dairy-free offerings), I went with a friend to do a Biscuiteer Beatrix Potter icing course - always great to learn a new skill, but I need a LOT more practice and my desire to make everything perfect meant I wasn't entirely satisfied with my finished biscuits! (I think we chose a very tricky icing course as our first attempt) You can see photos of my easter fair and biscuit decorating endeavours on facebook and instagram :)
So now as I sit writing this, I'm already in the storm of the school holidays and with several bakes planned for this week, I'm just wondering how I'm actually going to get time to get everything done! We have a new local bakery (a chain that's fast springing up across London) and as I went on my maiden voyage to the one which has opened two minutes from our house, I had a delightful little biscuit called a Mexican Wedding Cookie. I instantly knew I wanted to recreate this at home so set about looking into the tradition and recipe behind this little treat.
Mexican Wedding Cookies are also known amongst other names such as Russian Tea Cakes, Viennese Sugar Balls and Polvorones - but we're going to call them the name by which I discovered them, so called as they're often presented as favours at Mexican weddings. They're very simple to make and require only a handful of ingredients. It seems like everyone has their own recipe for these and all slightly different so I decided to mix them all up in the one below. They have a light velvety taste but a slight crunch too. The only thing I might try differently next time is to add some other ground nuts to see if this gives a little more crunch (maybe hazelnuts and/or pecans). But they are seriously yummy!

Mexican Wedding Cookies Makes 30 cookies
Ingredients
- 230G BUTTER
- 60G ICING SUGAR
- 1 TSP VANILLA EXTRACT
- ¼ TSP SALT
- 250G PLAIN FLOUR
- 95G GROUND ALMONDS
- 90G ICING SUGAR IN A BOWL (FOR ROLLING WHEN BAKED)
Method
- Heat the oven to 165 degrees (fan) and line two baking trays
- Put the butter, icing sugar and vanilla in a mixing bowl and beat until light and fluffy
- Then add the salt, flour and ground almonds and mix on the lowest setting until the dough forms
- Using a tbsp measure, make little round balls with 1 tbsp dough and line them up on the baking trays, one inch apart
- Bake for around 15 mins - you want the balls to be set but not browned so worth checking on them from 12 mins onwards
- Remove from the oven and leave a for few minutes to cool down and then roll them in the remaining icing sugar - and then enjoy!
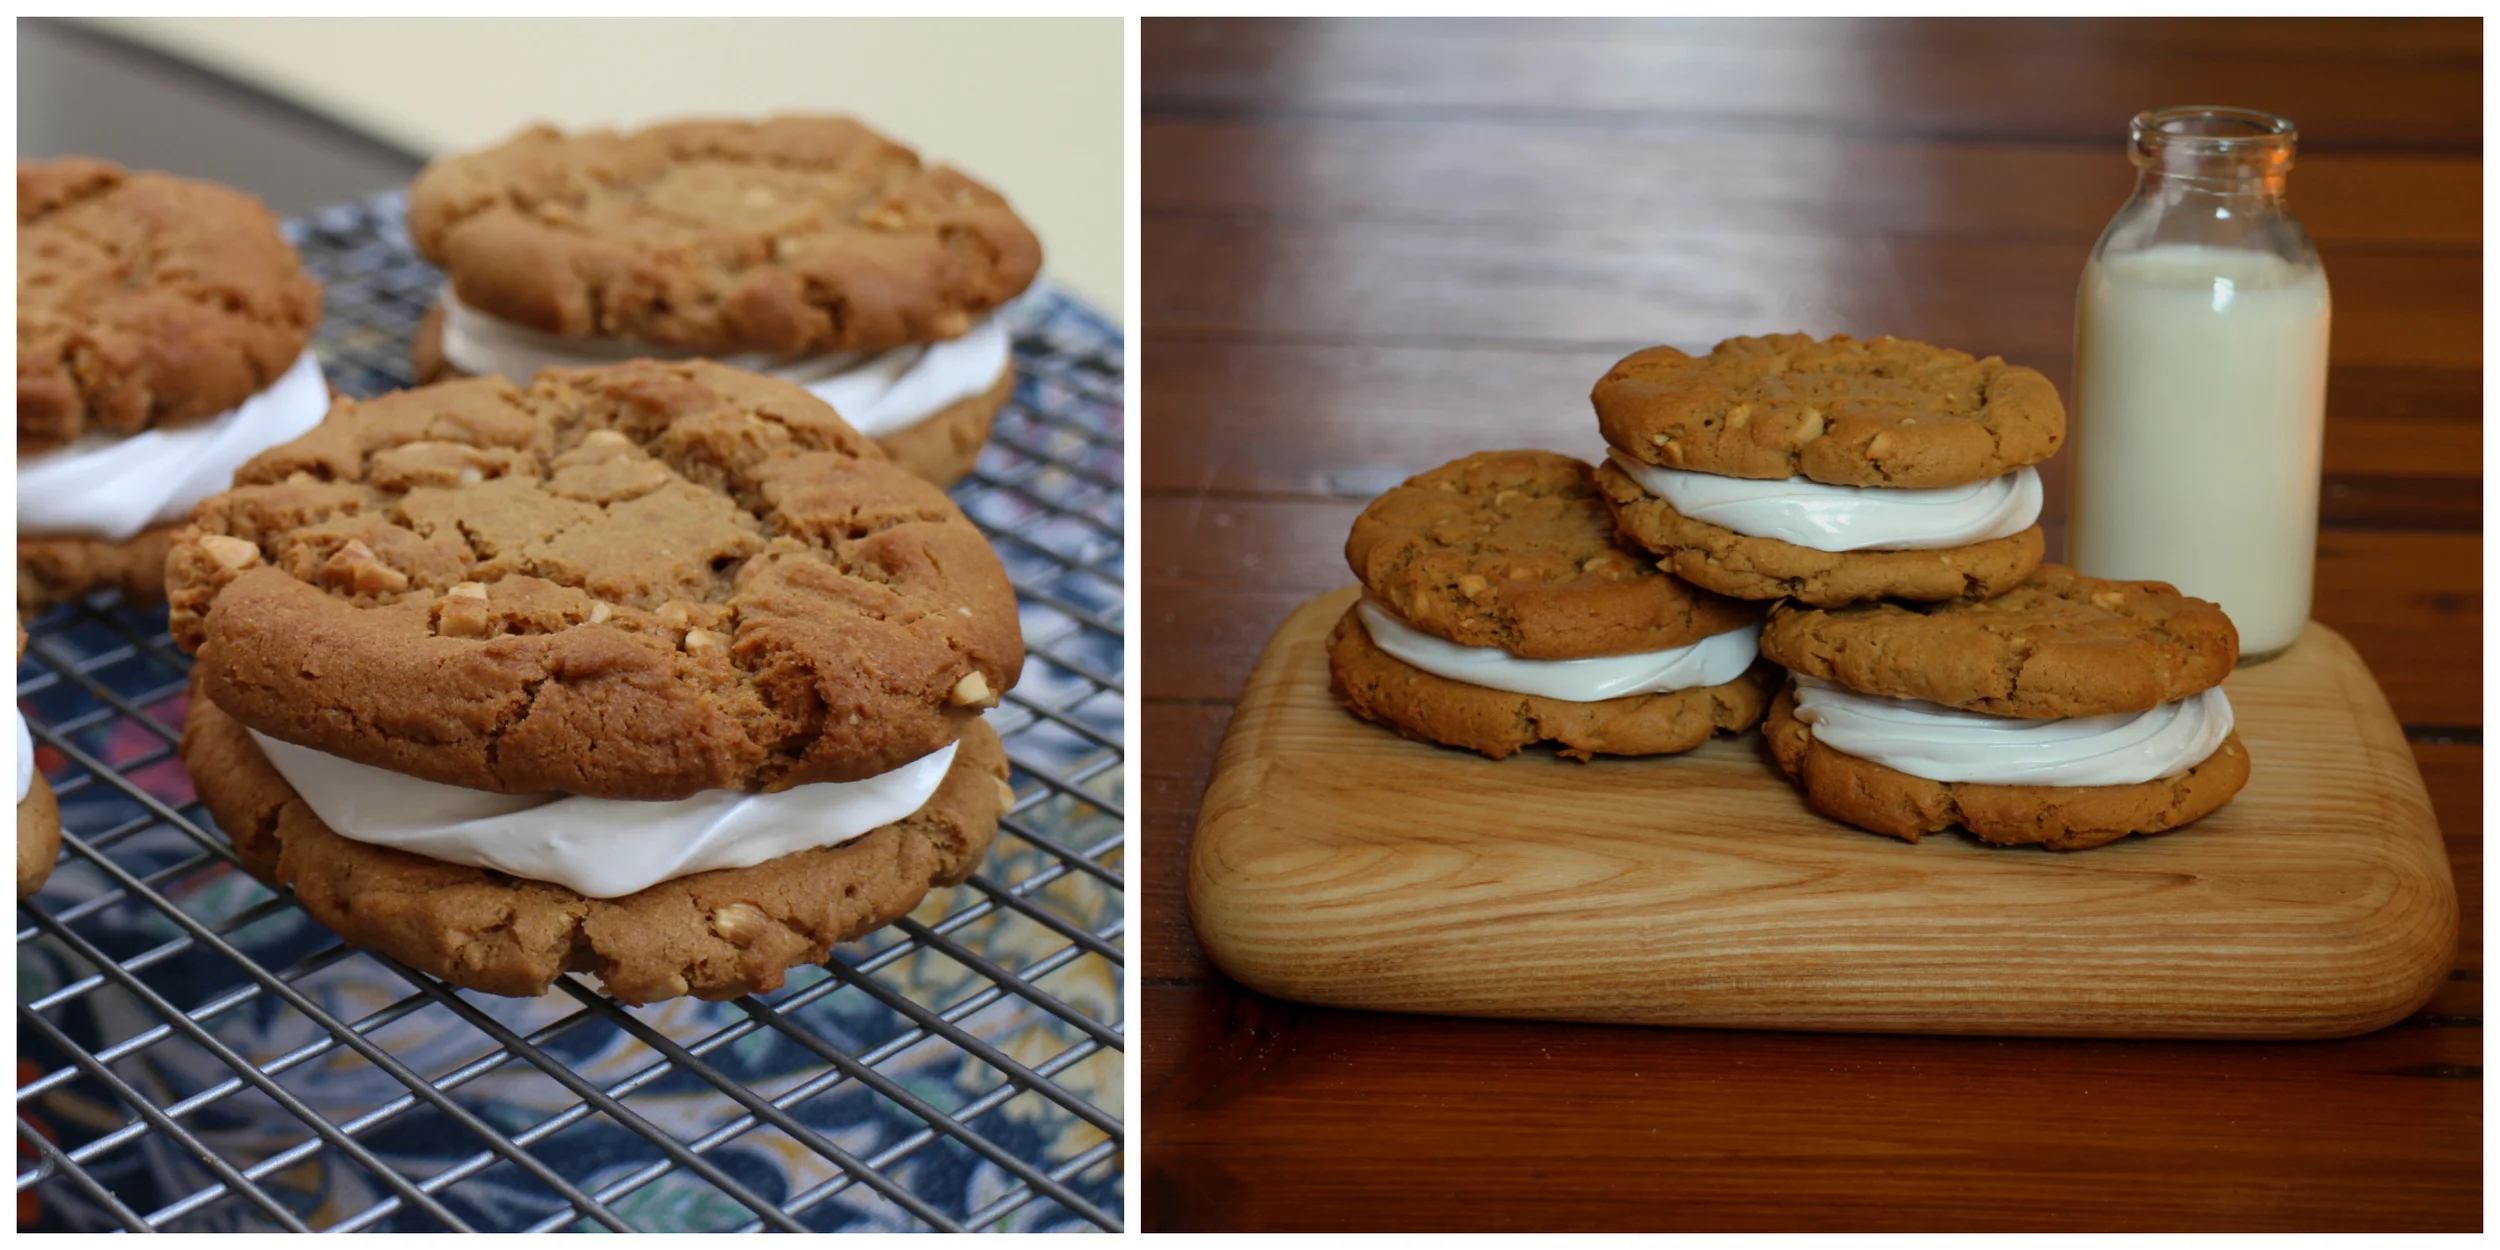
Peanut Butter & Marshmallow Cookies

Woo hoo, it's Friday! I've definitely got that TGIF feeling today! There was much excitement in our house this morning as not only was there the eclipse, but it's the House Singing Competition this afternoon (cue crazy costumes and Freddie Mercury songs on the way to school!) Then I had a lovely breakfast with a friend, booked a cheeky little Biscuiteer decorating course and came home to bake cookies for a playdate this afternoon.
We have our Easter Fair at school next week and when I was looking at gluten and dairy free options for this, I found this cookie on Bakers Royale. Made made with peanut butter, it's both gluten and dairy free. I've found a number of gluten free recipes using peanut butter, however the marshmallow frosting transforms this into something much more indulgent (I contemplated turning the frosting pink but living in a house of men, resisted the urge!)

Mine is an adapted version - for one thing, I use liquid egg whites to make my meringues and marshmallows which you can pick up in the supermarket. These have been pasteurised which makes them safe for pregnant people which is an added bonus - in this recipe we do heat the egg whites but you can feel safer knowing that they have been already been pasteurised. It does change the properties a little but I've always had complete success with them.
This recipe makes 6 large sandwiched cookies. As they're quite sweet, I'd probably try to get 9 or 12 cookies out of the dough next time - as they are, they are a huge sweet treat and maybe more dessert sized than snack sized!!
Peanut Butter & Marshmallow Cookies (adapted from Bakers Royale)
Peanut Butter Cookie Ingredients
- 1 CUP (225G) CRUNCHY PEANUT BUTTER (USE WHICHEVER TYPE YOU PREFER)
- 1 CUP (140G) BROWN SUGAR
- 1 LARGE EGG
- 1 TSP BICARBONATE OF SODA
- 1 TSP VANILLA EXTRACT
Method
- Put the oven on to 160 degrees
- Prepare two baking trays with greaseproof paper
- Put all the ingredients in a mixing bowl and combine until smooth
- Put 1½ tablespoons of mixture on the baking tray - this should make 12 little mounds
- Then flatten the cookie with a fork in a criss cross pattern
- Bake for 12 minutes until the edges are golden
- Wait for them to cool for a few minutes and then using a slice (they'll still be soft) move them to a cooling tray
Marshmallow Frosting Ingredients
- 165G LIQUID EGG WHITE (5 EGG WHITES)
- 300G WHITE SUGAR
Method
- Mix the liquid egg white and sugar in a microwaveable bowl and heat to 70 degrees celcius - I do this in blasts of 20 seconds and then stir and take the temperature
- When it's reached the right temperature, transfer it to a mixer with whisk attachment. If you feel the outside of the bowl it should feel warm/hot to the touch and you need to beat the meringue until the bowl has cooled down - around 10 minutes on high speed until the meringue has formed stiff peaks.
- Then put the meringue into a piping bag with the nozzle of your choosing and pipe meringue onto one half of each cookie and sandwich it together with another half
- I did have half a bag a marshmallow frosting left which you could use to decorate cupcakes or any other cake that needs a bit of jazzing up - or eat it straight from the piping bag if you prefer :)
Valentine's Cookies

Happy Valentine's Day! A romantic day for many, but not for us. It will always be a special someone's birthday in our house and we celebrate my elder son's birthday over Valentine's Day every year. However, he came home earlier this week telling me that his teacher had asked who was going to make her a Valentine's cookie. At six (seven today!) years old, they're all eager to please so he put his hand up and volunteered - then promptly came home and told me the news that "we needed to make cookies". Given the amount of homework and after school activities we have every week, I knew he was really saying "you need to make us cookies"!!
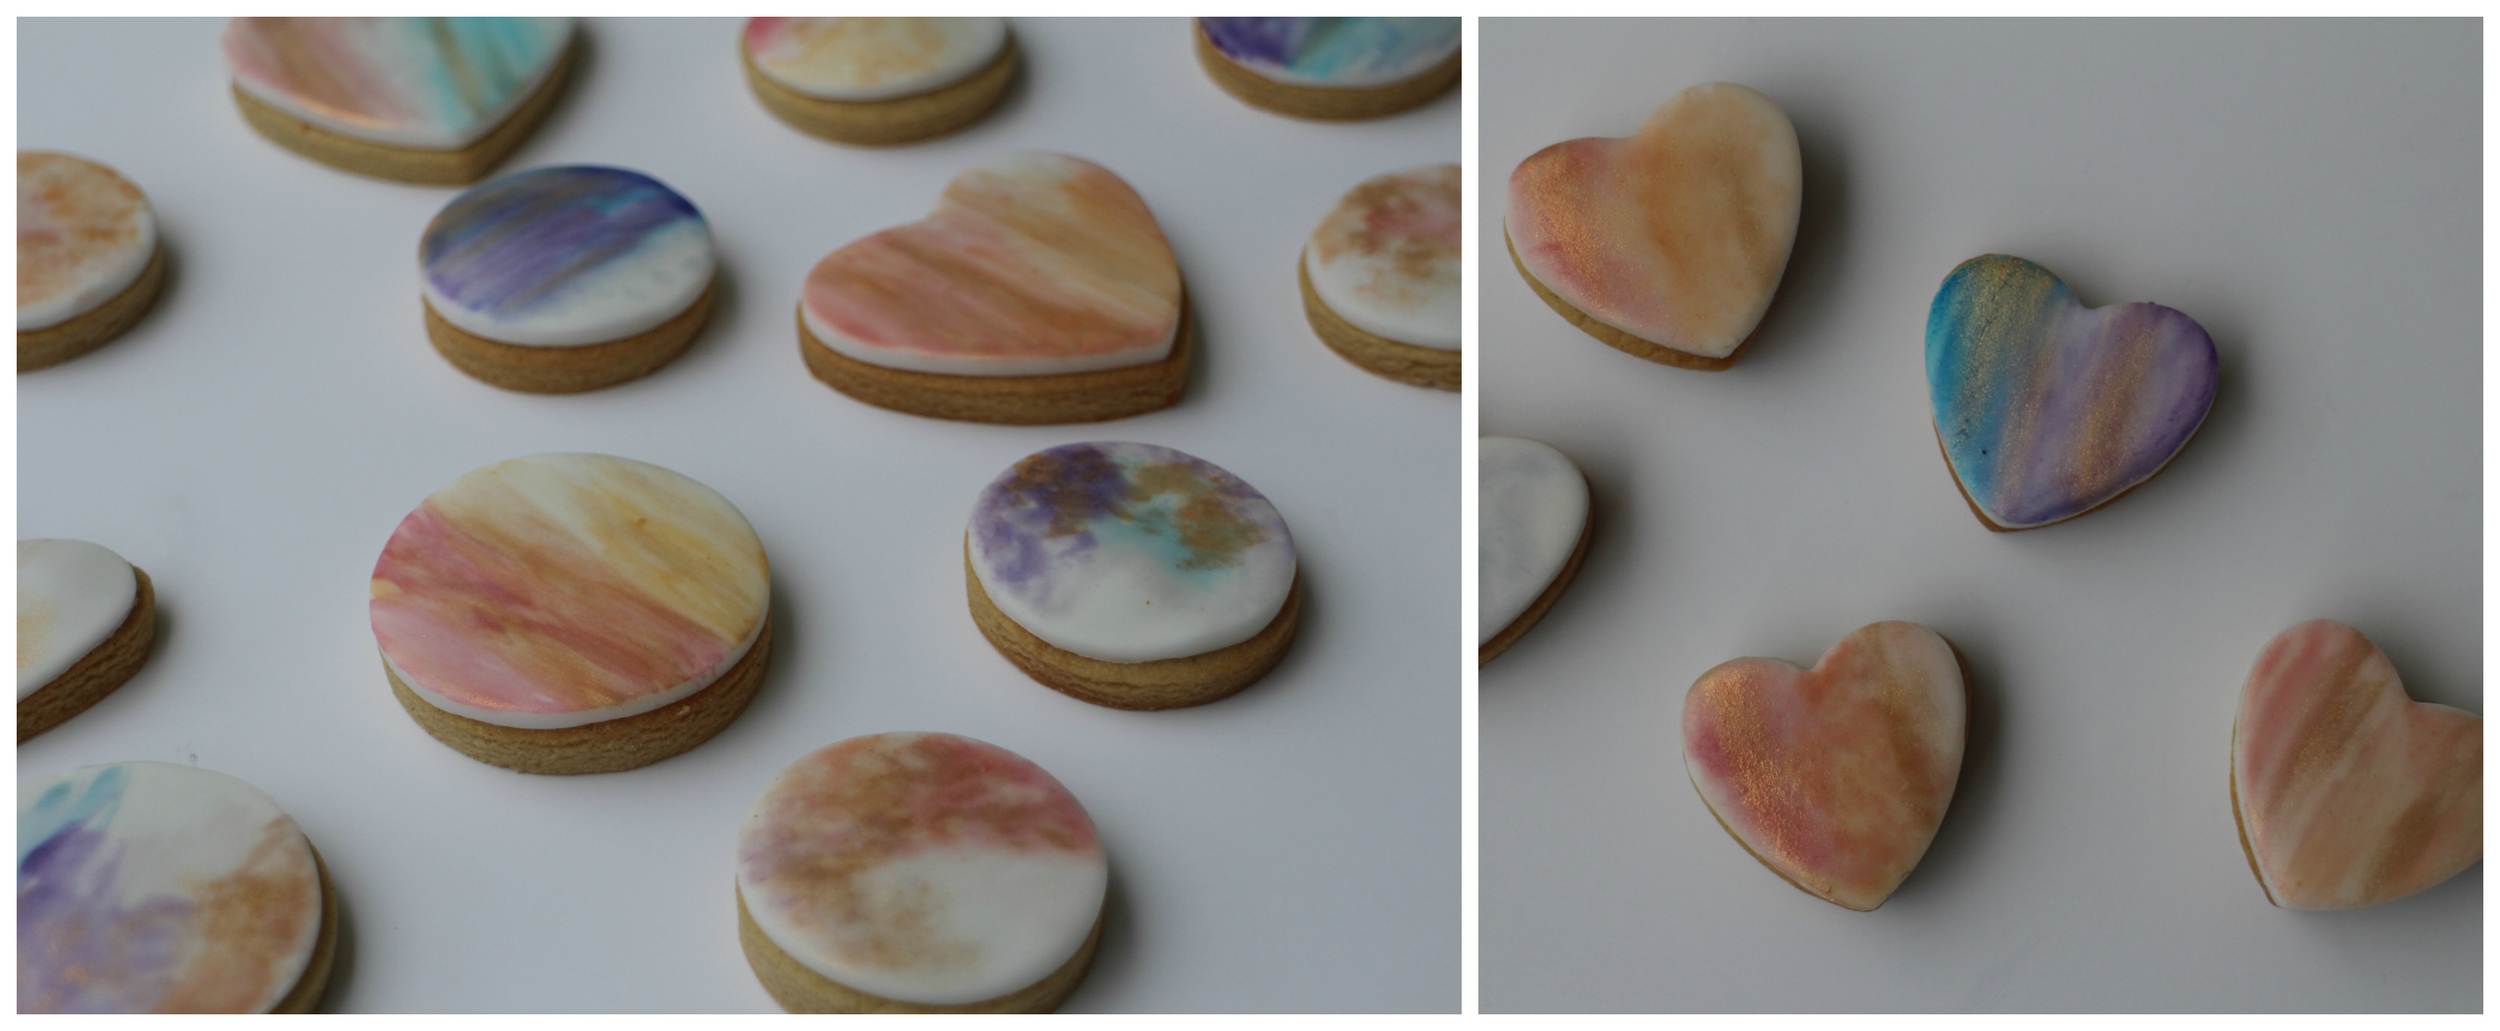
Everyone's making Valentine's cakes and cookies right now, but I've been especially mesmerised by the fabulous Nectar and Stone who make the most gorgeous baked goodies and package them beautifully as gifts. Unfortunately they're based in Melbourne so I can't pop in for a visit - but that doesn't stop me drooling over their very pretty Instagram feed!
Inspired by their lovely painted cookies, I decided I'd create some with watercolour paint effect and gold highlights. It was lots of fun making these. The base is a simple vanilla cookie with a fondant topper hand-painted using Sugarflair Edible Tints mixed with vodka. But given the fun I had, I think this would be a great activity to do with children and edible pens would work perfectly for kids to draw pictures and create their own masterpieces. I'm definitely re-visiting these during the holidays! In the meantime, with some lovely packaging and a hand-written note, these are a perfect gift to celebrate a day of romance :)

Vanilla Cookies (30 small cookies)
Ingredients
- 200G UNSALTED BUTTER
- 200G GOLDEN CASTER SUGAR
- 1 MEDIUM FREE-RANGE EGG, BEATEN
- 2 TSP VANILLA PASTE
- 400G PLAIN FLOUR
Method
- Cream the butter and sugar and then add the beaten egg and combine.
- Stir in the vanilla paste (you can use vanilla essence if you don't have the paste, but the paste gives the final cookie dough the lovely little specks of vanilla throughout).
- Gently fold in the flour and mix through until the dough comes together.
- Wrap the dough in clingfilm and then leave it in the refrigerator for at least 30 mins to firm up.
- When you're ready to bake your cookie, pre-heat the oven to 180 degrees (160 degrees fan).
- Lightly flour your work surface and then roll out the dough to 4-5mm thickness. If the dough crumbles apart, mould it back together with your hands.
- Stamp out your shapes using your desired cookie cutters (I used hearts and circles) and place them well apart on lined baking trays.
- Large cookies take around 10-14 mins until they're pale golden (keep your eye on them after 10 mins to ensure they don't burn) and the little cookies take around 5-8 mins.
To decorate
- Roll out sugarpaste in your desired colour (I used Renshaw White Sugarpaste but you can get other brands and supermarkets are now doing their own too)
- Cut out your toppers using the shapes you used for your cookies (use the same size topper to cookie) and attach to the cookie with a little water or edible glue.
- Then using Sugarflair Edible Tints (I used pink, peach, pale blue, purple and gold), mix with a little vodka and paint onto your cookie. I wanted the watercolour effect so I made sure it was diluted enough (just test it on a piece of kitchen towel until your get your desired colour strength).
- Create your masterpiece and then package in a little bag with a handwritten note!

Chocolate Sables

I've been meaning to master sables. Or at least have a go at them. I've had so many yummy desserts lately that have involved Sables Breton. But they're for another day. Remember I said I had about a hundred zillion cookery books? Well, this baking journey meant that I had to invest in just a couple more and I was really excited when Edd Kimber's Patisserie Made Simple arrived the other day. The photo of yummy Chocolate Sables jumped out at me and I knew they would be the first recipe to try. It would also involve tempering chocolate and until now that's kind of scared me. But no more! A great result on my very first attempt. Thanks, Edd :)
The trickiest part of this recipe for me was rolling the dough into uniform logs when the dough was kind of crumbly which meant that I didn't quite achieve Edd's 4cm thick logs and they ended up being nearer 7cm which I only realised when I was ready to cut them up into the individual biscuits. Of course, being me, I needed them to be more precise and armed with the smallest cutter I have (5cm) I used this to make them neater and all the same size.
The chocolate tempering went very smoothly. The only bit that had me unsure was after the initial temperature of 50 degrees had been achieved, I had to stir constantly until the temperature dropped to 28 degrees and I'd assumed this would be quick. Aha, not so! It took about 15 minutes but with a little patience it all worked out well.
These little biscuits are very rich so I decided to sprinkle them with chopped hazelnuts to cut through some of the intense chocolate flavour and for me, this worked really well. Hubby thinks they'd be good with ice-cream. Hmmm...looks like dessert tonight is sorted :)

Chocolate Sables (recipe from Edd Kimber's Patisserie Made Simple)
Ingredients
275g PLAIN FLOUR
40g COCOA POWDER
3/4 tsp BICARBONATE OF SODA
200g UNSALTED BUTTER AT ROOM TEMPERATURE
50g CASTER SUGAR
100g LIGHT SOFT BROWN SUGAR
1/2 tsp VANILLA EXTRACT
175 g DARK CHOCOLATE, 65-70% COCOA SOLIDS PREFERRED, ROUGHLY CHOPPED
Method
Sift the flour, cocoa powder, baking soda and 1½ teaspoons salt together into a medium bowl and stir to combine. Set aside. Place the butter in a large mixing bowl and beat until smooth and light. Add the sugars and vanilla extract and beat together for 2 minutes until smooth. Add the dry ingredients and with the mixer on low speed, mix together until the mixture is sandy. Add the chocolate and mix to combine.The final dough should look like soil and should not be over-beaten. Tip the mixture onto the work surface and very gently knead to bring together. Divide the dough in half and roll into logs, about 4cm in diameter. Wrap in clingfilm and refrigerate.
Preheat the oven to 180 degrees | 160 degrees fan and line two baking trays with parchment paper. Using a thin sharp knife, cut the log into cookies about 1cm thick - don’t worry if the cookies crumble, just press them gently back together. Place onto the prepared baking trays and bake for 10-12 minutes or until they have spread and are lightly set around the edges but still soft in the middle. Allow to cool on the tray for 10 minutes before transferring to a wire rack to cool completely.
Tempering Chocolate
The amount of chocolate you start with will make the same amount of tempered chocolate. I used 150g roughly chopped dark chocolate (it should be good quality chocolate and have been stored in a cool place - I used 85% cocoa solids but you can use your own favourite chocolate here).
Put 3/4 of the chocolate in a heatproof bowl and set this over a saucepan of gently simmering water, making sure that the water does not touch the bottom of the bowl. Stirring regularly, heat the chocolate to 50-55 degrees (this is the temp for dark chocolate; milk and white chocolate are different). Then remove the bowl from the heat and add the remaining chocolate, stirring constantly until the temperature drops to 28-29 degrees. Return the bowl to the heat and stirring constantly, heat again until the temperature increases to 31-32 degrees. The chocolate should now be tempered. Drop a little bit onto baking parchment and let it set for a couple of minutes. If no streaks appear, you are good to go! If you do see streak, you will have to start again :(
Now that the biscuits are cool, dip them into the chocolate and then sprinkle on a little of whatever you fancy!

Bacon & Chocolate Chip Cookies

Welcome to my very first blog post (ever!) As this baking adventure is all about testing my creative skills, challenging me to create new things and embracing new taste sensations, I decided to make these Bacon & Chocolate Chip Cookies from the fabulous I Am A Food Blog (Stephanie Le's website is very cool and as well as having amazing food photography, she has so many fun recipes to try).
Now I'm not a savoury and sweet kind of girl (I mean, I like my pancakes with maple syrup but I'm just not that sure about the bacon on the side bit) although I liked the sound of trying a new tasting cookie - and as I was going to my very first coffee morning of the year, what better opportunity than gifting some of these cookies? What I love about cookies is being able to prepare the dough the day before and then get them out of the fridge the morning of, all ready to go on their baking trays, and you have freshly baked yummy treats in no time. So the verdict? Well, I just loved them and everyone else thought they were pretty scrummy too (especially the little bits of rock salt on top of a sweet cookie and the salty bacon throughout). Pretty darn good. And I will DEFINITELY be making them again. So I think that qualifies as a very successful first official bake...and coffee morning :)

Bacon and Chocolate Chip Cookies
This is taken from I Am A Food Blog but I've added some extra info that will help me next time I make them. Stephanie makes 9 cookies out of the dough and these are huge so next time I may split this into 18 dough balls and cook them for less time.
Ingredients
1 ¾ CUPS PLAIN FLOUR
½ TSP BAKING SODA
¾ TSP BAKING POWDER
145g BUTTER AT ROOM TEMPERATURE
115g CASTER SUGAR
½ CUP + 1 TBSP SUGAR
½ CUP + 2 TBSP BROWN SUGAR
1 EGG
1 TSP VANILLA EXTRACT
½ CUP DARK CHOCOLATE CHIPS
6 SLICES ENGLIGH BACON, FINELY CHOPPED & PAN-FRIED UNTIL CRISPY & DRAINED ON PAPER TOWER (THIS MAKES AROUND A ½ CUP OF BACON BITS)
SEA SALT
Method
- Sift the flour, baking soda and baking powder into a bowl and set aside. Cream the butter and sugars until light and fluffy. Add the egg and mix well, ensuring you scrape down the sides of the bowl.
- Now add the dry ingredients and mix until just combined. Drop in the chocolate and bacon and mix through until evenly distributed. Refrigerate for 24 hours.
- The evening before baking, line a baking tray with parchment paper and divide the mixture into 9 balls and then pop them back into the fridge until ready to bake.
- When ready to bake, pre-heat the oven to 175 degrees and sprinkle the dough balls with a little sea salt. Bake for around 18-20 minutes until the cookies are golden brown but still soft.
- Cool on their baking tray for 10 minutes before moving to a cooling rack. Then – ENJOY!