• About
  • Blog
  • Recipe Index
  • Your Celebrations
  • Contact Me
Menu

Serendipity Bakes

Street Address
City, State, Zip
Phone Number

Your Custom Text Here

Serendipity Bakes

  • About
  • Blog
  • Recipe Index
  • Your Celebrations
  • Contact Me

Lemon & Earl Grey Shortbread

March 3, 2016 Nicola King

Although our winter has been pretty mild, there's a biting wind and we tend to get torrential rain one minute (usually just before the school run is about to start!) and glorious sunshine the next. I'm definitely in need of a little bit of comfort and so it'a been a biscuit sort of week in our house.

I went to wholesale earlier in the week and came back with a big box of beautiful lemons. They are the sign that spring is on its way and are brightening up my kitchen daily. I have dinner plans for the weekend with them, but I had a biscuit plan today.

My quest for dairy free alternatives is ever on my mind and I wanted to have a go at dairy free shortbread -- and why not make it gluten free too? I'm always a huge fan of lemon so my shortbread biscuits were to be lemon and I decided to pair them with earl grey tea. Now I'm not an earl grey tea drinker but I thought it would be interesting to try.

The dairy free alternative I used was Dairy Free Pure Sunflower which was an experiment as I found it at the supermarket and hadn't used it before. The flour was Gluten Free Plain Flour and I also added in some Corn Flour too. The dough is easy to make. The butter, vanilla essence, earl grey, lemon zest and sugar are creamed together in a bowl for around 5 minutes. Then the flour and cornflour are stirred in and mixed gently to form a dough. This is a sticky dough. I popped it in the freezer overnight and it came out of freezer soft the next day so don't worry if yours has this consistency.

The surface should be well-floured and a little more flour sprinkled on top of your dough before rolling it. I found it easier to pat down the dough with my hand until it was the thickness I was looking for (0.5cm) and then a quick roll with rolling pin just to smooth the surface. Once you have used your cutter to great effect (I used a 6cm cutter), gently move each cookie to a lined baking tray. They don't spread much during baking so you don't need to leave too much space between each biscuit.

Then bake them at 170 degrees (fan) for 15 minutes. They don't change much in colour or go golden brown like other biscuits might. You should remove them from the oven and gently move each one on to a cooling tray with a spatula and allow to cool.

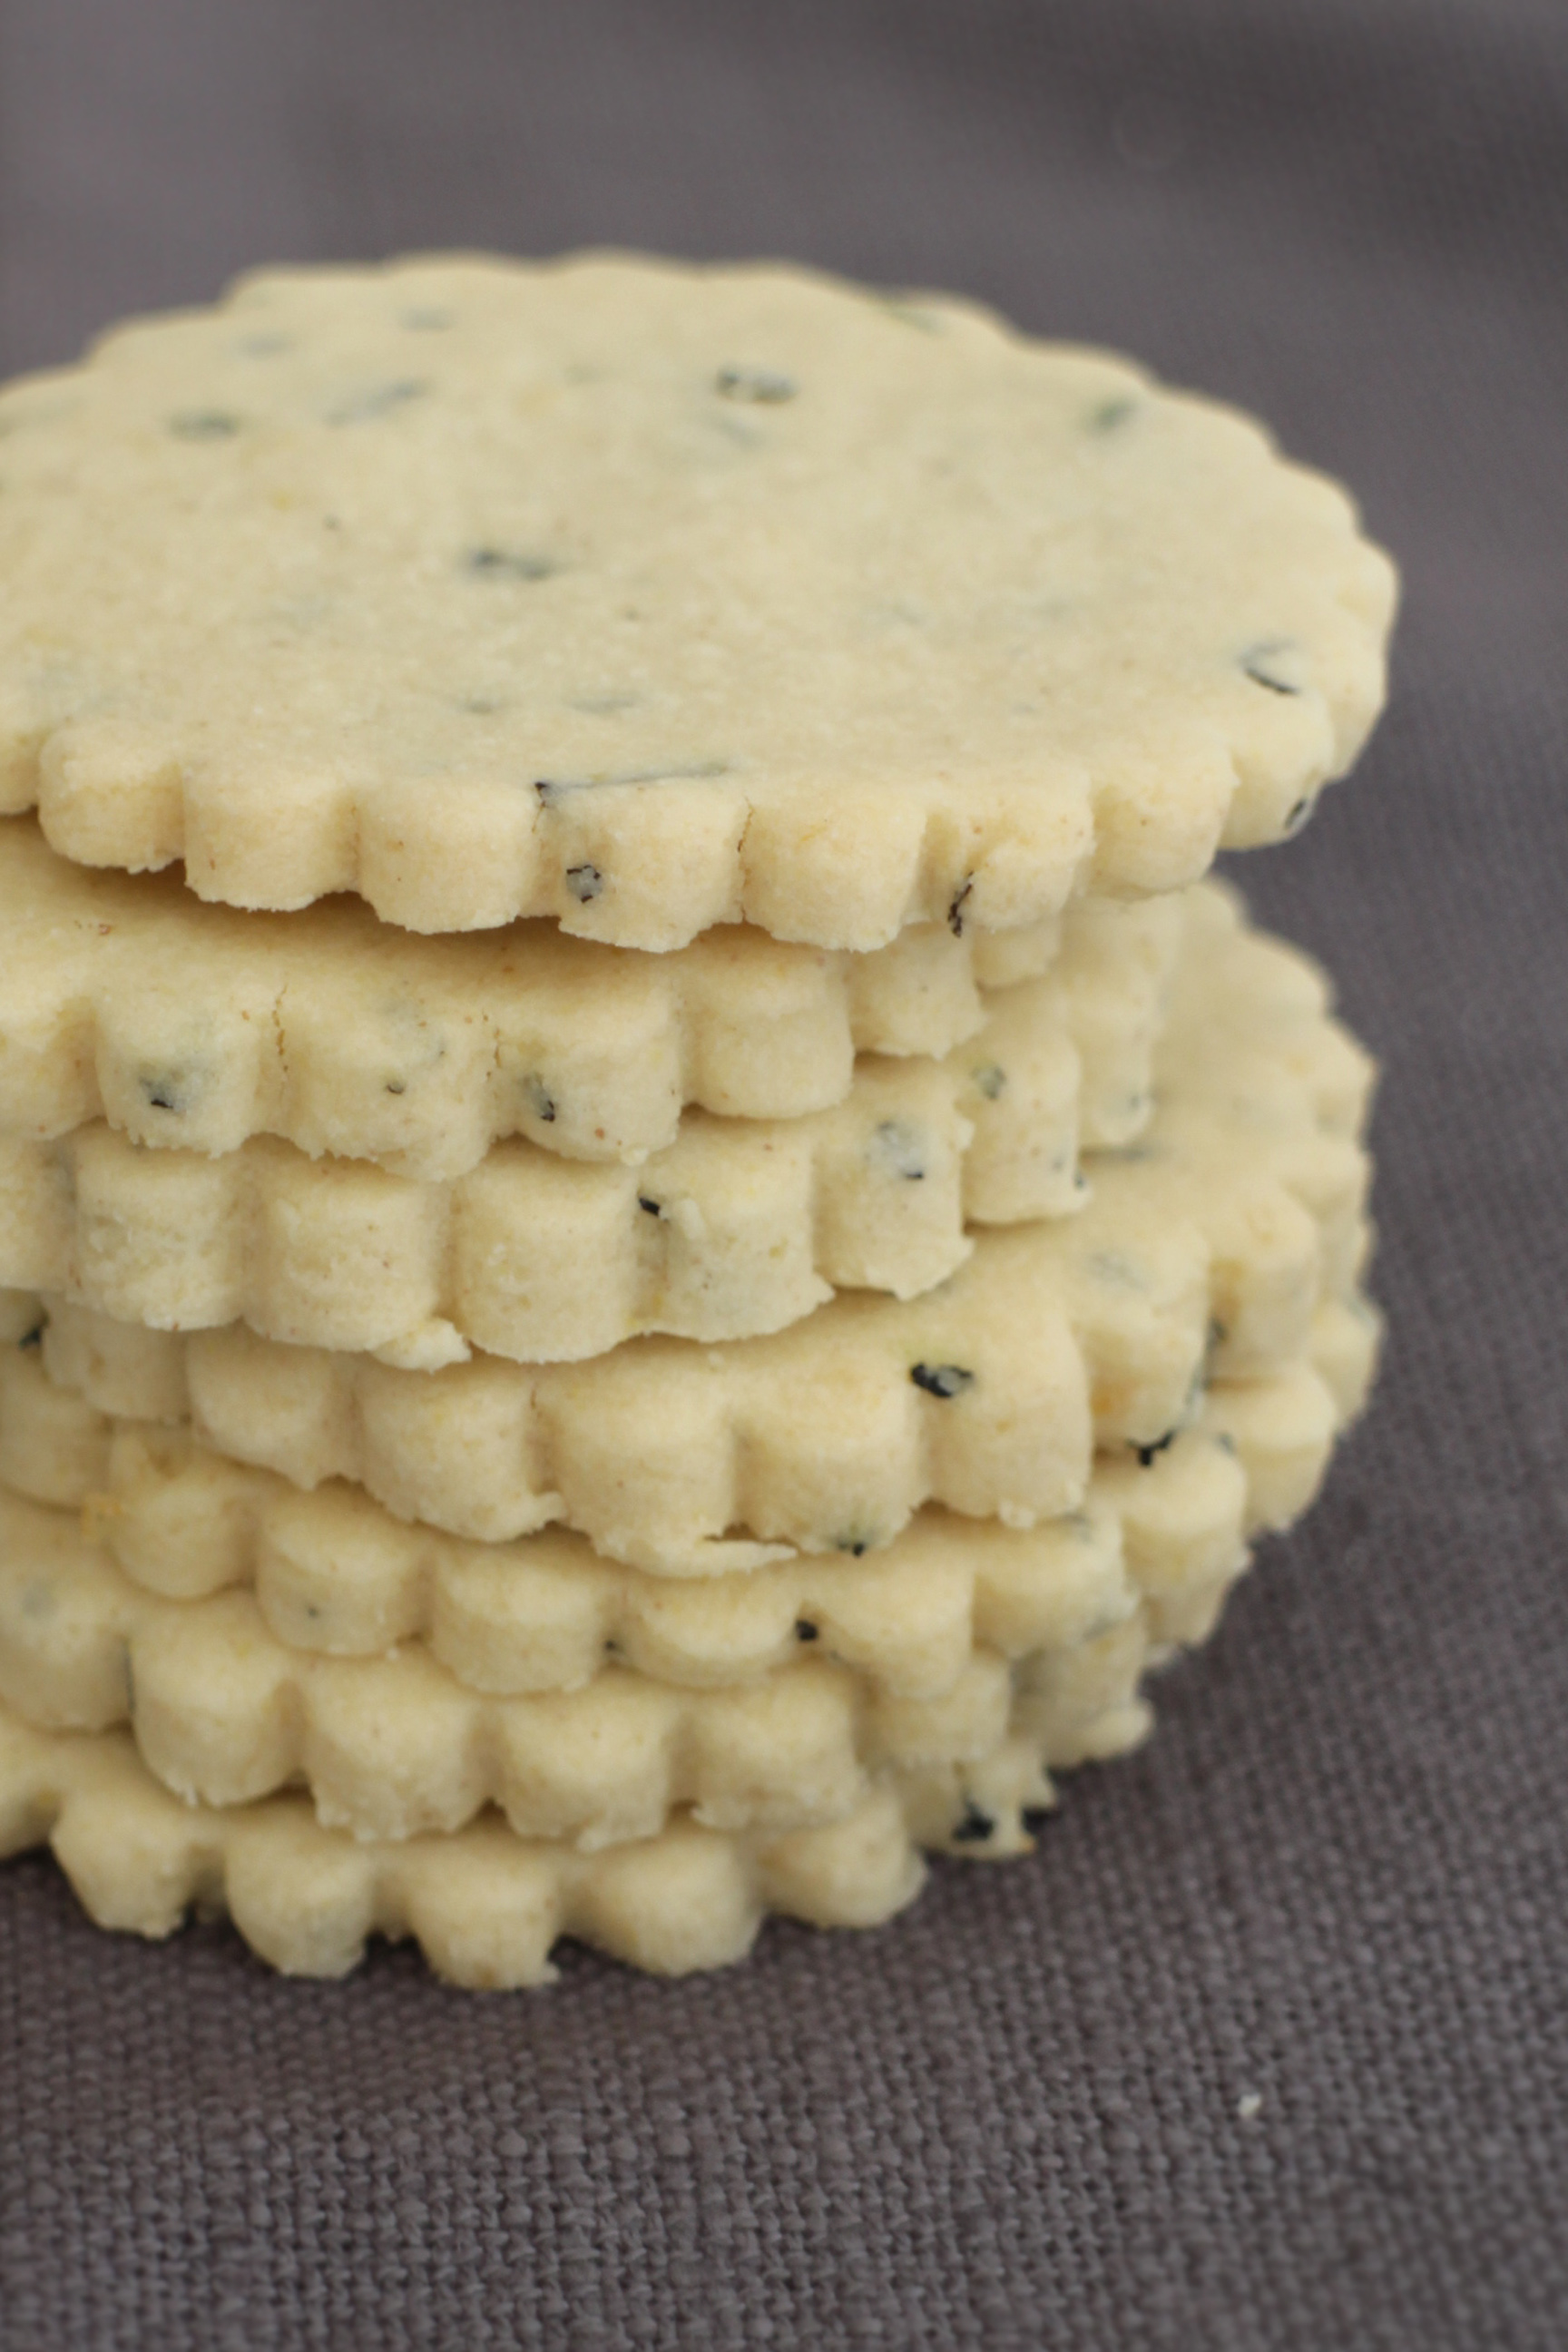
Using tea in these biscuits might not be to your taste. You don't have to put it in. I loved the speckled texture but it does add a floral note to the final biscuit. They would work beautifully with just lemon -- maybe with the zest of two lemons since it's your only flavour.

I love these little shortbread biscuits. They are light, have a beautiful snap and are perfect with a cup of tea. I have eaten almost the entire batch on my own!

Lemon & Earl Grey Shortbread (Vegan and Gluten Free)

adapted from Wallflower Girl's Vegan Chamomile & Lemon Shortbread

Ingredients

  • 200G DAIRY FREE PURE SUNFLOWER (or an alternative dairy-free butter)
  • 1 TSP VANILLA PASTE OR EXTRACT
  • 1 TBSP EARL GREY (loose tea)
  • ZEST OF 1 LEMON
  • 100G CASTER SUGAR
  • 300G GLUTEN-FREE FLOUR
  • 1 TBSP CORN FLOUR

Method

  1. Make the dough the day before you want to bake your biscuits
  2. Place your butter, vanilla, earl grey, lemon and sugar in a bowl and cream together -- around 5 minutes
  3. Stir in the gluten free flour and corn flour and gently mix until a dough is formed -- it will be a sticky dough
  4. Wrap in clingfilm and place in the freezer overnight
  5. When you're ready to bake them, preheat the oven to 170 degrees (fan) and line a baking tray with parchment
  6. Flour your surface well and place the dough on top, sprinkling the top of the dough with more flour
  7. Using your hands, pat the dough until it's around 0.5cm thick
  8. Flour your rolling pin and gently roll the surface just to make it smooth
  9. Using a cutter, cut out your shapes and gently move them to the baking tray
  10. Bake for 15 minutes
  11. Remove from the oven and gently transfer your biscuits from the baking tray to a cooling rack
  12. Allow to cool for 10 minutes and then enjoy :)
In Free From, Biscuits & Cookies Tags Shortbread, Lemon, Earl Grey Tea, Gluten Free, Vegan
Comment

Vegan Chocolate Puds

April 8, 2015 Nicola King

Hello, everyone! Huge apologies for my radio silence over the last week, but we went away for Easter and ended up staying away a little longer than planned. The week was spent out and about enjoying the sunshine and sea air with the boys and not so much time couched at home in the kitchen. But it didn't stop me planning and having arrived back late this afternoon, I planted two feet firmly in the kitchen to whip up my latest creation. If you're not a fan of Instagram or Facebook, here are a few of my Easter creations from the last week or so. We have indulged in way too much chocolate and cake!!

So whilst we were away, I succumbed to buying Deliciously Ella in the local supermarket. It sat there looking all shiny on the shelf and having been inundated with Ella's Instagram photos of her book launch and recipes, I fell hook, line and sinker! I think it's always interesting to understand the path that people take and I found Ella's story very uplifting and inspiring - and although left with little choice, I admire her determination to rise from the brink of hospitalisation and overnight transform her eating into a plant-based diet. The first recipe I resolved to try was the Avocado Chocolate Mousse.

The same day as I bought Ella's book, an e-mail pinged into my inbox from Jamie Oliver with an Eat Well This Easter message - and amongst his suggested eats were Vegan Chocolate Pots. Hmmm...which chocolate delight to try first. Or maybe both at the same time?

So I decided to have a little chocolate mousse-off with these two recipes. For sure, the easier of the two options was Jamie Oliver's Vegan Chocolate Pots. The main ingredients were dairy-free dark chocolate and tofu mixed with maple syrup and vanilla paste (the original recipe included zest of a lime - the supermarket had run out! - and dark rum - but I'm not fond of alcohol in puds). Ella's recipe was a little more complicated and required a few more ingredients and a bit more effort. First of all, I had to make Almond Butter which involved roasting almonds for 10 mins and then blitzing them in the food processor for fifteen minutes to create a creamy butter. Once I'd made this ingredient, I was then able to move on to the mousse itself which involved blitzing an avocado, bananas, Medjool dates, almond butter, cacao powder and maple syrup in the food processor. Easy as. And so, the verdict?

Well, I first taste tested them on the boys. Honestly, they weren't keen. I'd hoped blitzing lots of good food with chocolate flavour might persuade them that these were yummy chocolate puds. Then I tried it on hubby. I think we both agreed that the Jamie Oliver Chocolate Pots were the clear winner and also could pass as a "regular" chocolate mousse at a dinner party. Although for me there was still a clear taste of tofu which kind of detracted from it a little. Perhaps the rum would have softened this flavour and if you are a fan of alcohol fueled puds, I would definitely recommend giving this a go.

What I like about Ella's pud is that I feel seriously healthy eating it. I mean, avocadoes, bananas and dates plus its other goodies. Sadly the taste wasn't quite as enjoyable and I think this might have been down to one of two things: my avocado and bananas weren't overly ripe (and she does call for very ripe bananas) and I think the ripeness will definitely enhance this next time (note, I said next time so it can't have been that bad!); and then Jamie's recipe called for melted dark chocolate and I think this really added to the richness over the cacao.

But I'm comparing this to what I call a regular chocolate mousse (dairy-laiden and eggy) and what I have learned of late, is that you can't substitute and expect things to taste the same (we have a psoriasis sufferer in the family and I tried to make a beetroot spag bol - beetroot remains the work of the devil to me to this day - I couldn't make it through more than more mouthful!) There are many reasons for choosing different kinds of diets, but in my humble opinion it means learning to love different flavours and foods and not just trying to recreate past loves. I would definitely recommend giving these two a go!

Avocado Chocolate Mousse (adapted from Deliciously Ella) Makes 2 ramekins

Ingredients

  • 1 RIPE AVOCADO
  • 2 RIPE BANANAS
  • 6 MEDJOOL DATES, PITTED
  • 2 TBSP ALMOND BUTTER (see below)
  • 2½ TBSP RAW CACAO POWDER
  • DRIZZLE OF AGAVE NECTAR

Method

  1. To make the almond butter, turn on the oven to 180 degrees (fan) and roast 150g almonds (with skin) for 10 minutes
  2. Then pop them into the food processor with a sprinkling of salt and blitz for around 15-20 minutes
  3. Remove and set aside
  4. Peel the avocado, remove the stone and put it in the food processor with the other ingredients
  5. Add a splash of water and  drizzle of agave nectar and blitz until smooth (mine took around 10-15 minutes)
  6. Spoon into bowls and chill until ready to eat


Vegan Chocolate Pots (from Jamie Oliver) Makes 2 ramekins

Ingredients

  • 100G DAIRY-FREE DARK CHOCOLATE
  • 350G SILKEN TOFU
  • 80G MAPLE SYRUP (I RAN OUT AFTER 60G SO MADE THIS UP WITH AGAVE NECTAR)
  • ½TBSP VANILLA BEAN PASTE
  • OPTIONAL: ½ TBSP DARK RUM, SMALL PINCH OF DRIED CHILLI FLAKES, SMALL PINCH SEA SALT

Method

  1. Melt the chocolate in the microwave for around 1½ minutes (check after every 30 seconds) until melted and set aside
  2. Put the tofu in a tea towel and ring out the excess water, then add to the food processor with the remaining ingredients (minus the chocolate)
  3. Blitz for 2 minutes and then add the chocolate
  4. Blitz again until smooth
  5. Divide the mixture between two bowls and chill for at least 15 minutes in the fridge


In Free From, Puddings Tags Chocolate, Vegan, Dairy Free, Gluten Free
Comment

Raspberry Scones

March 10, 2015 Nicola King

I had the best start to the day today.  Not only was the sun shining on the school run this morning, promising the start of spring (am I tempting fate??) but when I arrived at school I was given the fantastic baking book Babycakes by a lovely friend. This book is from the NYC bakery of the same name and has achieved acclaim through being "vegan, gluten-free and (mostly) sugar-free" although not necessarily all at the same time - and has lots of celebrity endorsements for its vegan and healthier favourites.

Before I started this blog, I hadn't tried any Free From recipes before (gluten, dairy or vegan) or at least, I hadn't wittingly tried them. But I have friends and friends' children who have some dietary restrictions and I'm enjoying trying new ways of baking as well as tasting them for myself as I'd always assumed that Free From meant that there was something lacking. Oh, how wrong I was! Armed with my new book, I wanted to try out a new recipe immediately although some of them are going to require a little more product sourcing (I am putting Agave-Sweetened Brownie Gems on my baking list for the next few weeks when I've gathered the ingredients for it!) and so I opted for a simpler recipe whose ingredients I already had with the exception of the spelt flour, agave nectar and a punnet of raspberries - Raspberry Scones. Now these aren't gluten-free as they have spelt flour but they are vegan and therefore dairy-free. 

This is a very simple one-bowl recipe but the flavours are fantastic in them. There's a faint taste of coconut, then a sweetness from the Agave Nectar and a freshness from the raspberries which all work together incredibly well. My only criticism is that the batter was quite wet so even though I used an ice-cream scoop for portion control, they tended to spread into random (messier) shapes on the baking tray. However not everything fits into a neat circle! I did think that making them into muffins might make them tidier next time. And although the recipe calls them "scones", the texture of mine are a mix of cake and bread.

But it's great to know that they're a healthier alternative to the usual sweet treats the boys would want for pudding and one of the boys wolfed one down super-fast declaring it to be "very yummy", praise in its highest form from my younger son and it even featured in his daily news report to daddy at bedtime!

Raspberry Scones (Vegan & Dairy-Free) from Babycakes

Ingredients (Makes 8)

  • 2 CUPS (225G) WHOLE SPELT FLOUR (I got this from our local health food shop but you can get it from supermarkets)
  • 1 TBSP BAKING POWDER
  • ½ TSP SALT
  • 1/3 CUP (70ML) COCONUT OIL PLUS A LITTLE EXTRA FOR BRUSHING
  • 1/3 CUP (100ML) AGAVE NECTAR PLUS A LITTLE EXTRA FOR BRUSHING (again I got this from our local health food shop but then saw it in our local supermarket)
  • 1 TBSP VANILLA EXTRACT
  • 1/4 (59ML) CUP HOT WATER
  • 1 CUP (200G) FRESH RASPBERRIES

Method

  1. Pre-heat the over to 175 degrees and line a baking tray with parchment paper.
  2. In a medium bowl, mix together the flour, baking powder and salt.
  3. Add the oil, agave nectar and vanilla and stir together until a thick, dry batter has come together.
  4. Pour the hot water into the batter and combine.
  5. Using a rubber spatula, mix through the raspberries until they're just marbled through the mixture.
  6. Using a 1/3 cup ice-cream scoop, drop mounds of batter onto the baking tray leaving them 1 inch apart as they will spread. Lightly brush the top with coconut oil.
  7. Bake the scones for 14 minutes rotating them 180 degrees after 7 minutes.
  8. The finished scones should be golden brown and slightly firm. Remove them from the oven and brush the top with a little agave nectar.
  9. After 10 minutes, gently slide a spatula under each scone to remove them and tranfer them to a cooling rack to cool completely.


In Free From, Everyday Cakes Tags Vegan, Dairy Free, Raspberry
1 Comment

To subscribe, please enter your email address:

Delivered by FeedBurner

Yay for the weekend!! If you saw how I made pineapple flowers earlier this week, here they are adorning my very first Hummingbird cake. I am totally in love with them! I also added a few @edible_flowers to complement them and this makes the perfect w
I was so grateful to be #gifted some beautiful @cotswoldflour flour recently with a challenge to make something from my #bakingbucketlist and so I set about making a Nutella babka and scrolls with them. I’ve had a mixed love affair with bread m
I found the cutest miniature pineapple in the local petrol station co-op so decided to make these roasted pineapple flowers. I think they’re so pretty and remind me of lovely sunflowers. I thought they’d go well with a Hummingbird cake so
We had great fun baking this Malteser Millionaire’s Shortbread which is absolutely delicious! This was something the boys wanted to bake - who can resist a delicious shortbread base, topped with gooey caramel and then a final layer of swirled m
As the rain and clouds returned to our skies this weekend, we’ve been looking for comforting lockdown treats. These Blackberry & Star Anise Friands, dripping with sticky blackberry juice icing are the perfect choice 💗 The recipe is from Sw
You might have seen from my Stories this weekend that I made cinnamon buns. I don’t have the best track record with bread but I’m overcoming my inner fear! These buns were so delicious. It was an amalgamation of a few recipes but the base
  • Serendipity Bakes
    Coconut & Raspberry Friand Muffins
    May 29, 2019, 9:38 PM
  • Serendipity Bakes
    Thank you for sharing my photo of your delicious recipe 😋 @rkhooks Happy Sunday! https://t.co/niKamgfjvt
    Mar 3, 2019, 2:38 PM
  • Serendipity Bakes
    RT @BiscuiteersLtd: Our friends at @thewhitecompany asked us to design something special to celebrate their New York stores first birth… https://t.co/kTsMH57wRv
    Jun 28, 2018, 11:09 AM

Enter your email address:

Delivered by FeedBurner

Powered by Squarespace

Nicola King at Serendipity Bakes Follow my blog with Bloglovin Follow