

As the summer approaches, this is a beautiful cake to enjoy in the sunshine. A vanilla cake soaked with a homemade lilac syrup and topped with strawberries and mascarpone cream, it's both fresh and light and absolutely delicious!
Read moreStrawberry and Rhubarb Crumble Muffins

One of my favourite puddings ever is Fruit Crumble. It doesn't really matter that much what you pair the Crumble with (although my absolute favourite is apple and raspberry), it just needs as much flakey crumble as possible on the top (generally two to three times the amount regular recipes would suggest!) I always think of it being an autumnal-going-into-winter pud but I have a recipe for you that transforms it into a light, beautifully fresh cake that brings with it the sweetness and summery fruits that are just coming into season.

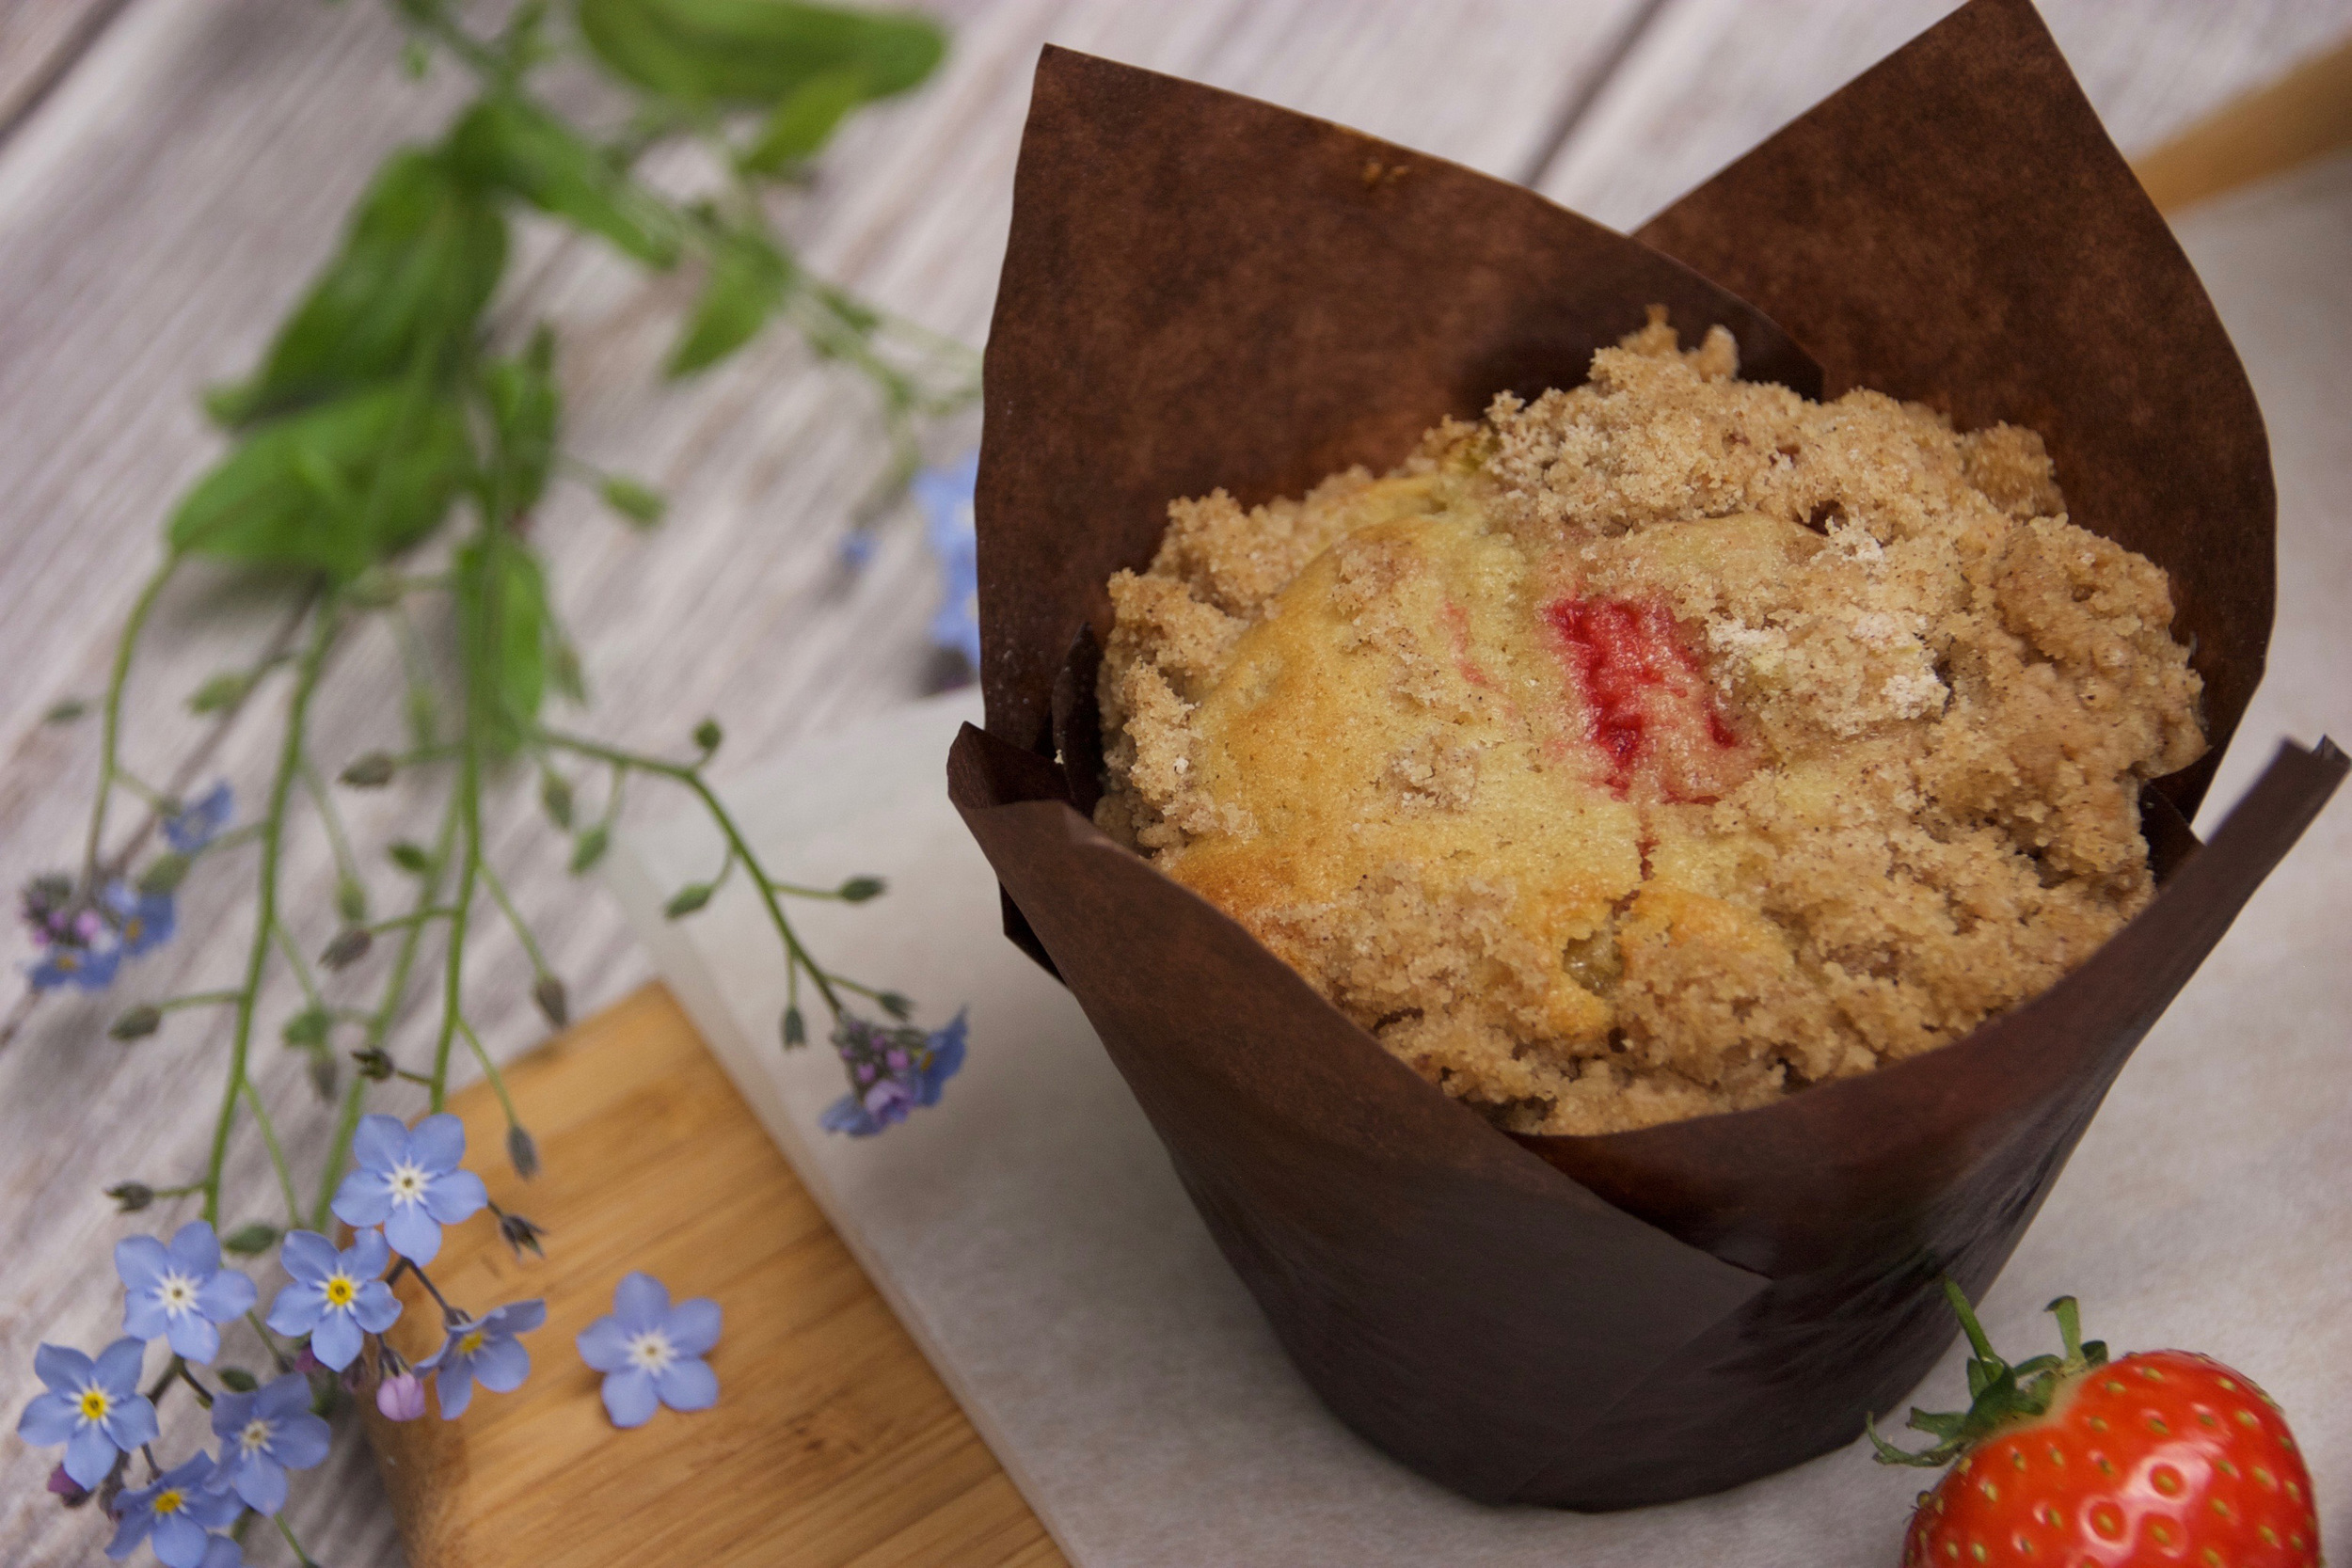
These Strawberry and Rhubarb Crumble Muffins are simply divine. Strawberries are so sweet at the moment and they add freshness and juice to the final cakes. The cakes themselves have a delicate crumb and with the moistness of the strawberries they are quite fragile. I tried making them straight in a muffin tin, but having a wrap around the outside really helps hold them together, although you could use cupcake papers instead. The idea for this came from my Apple and Rhubarb Crumble Cake which I was going to make the other day and then I decided I'd love to put some fruity strawberries into it instead. They are are stirred through the batter and then topped with rhubarb and finally the crumble.
The hardest part of making these muffins is the chopping! I suggest cutting up the fruit into very small pieces, particularly the rhubarb. And I always start making these by doing this job first. My recommendation is around four large strawberries for six muffins and one stick of rhubarb. Then I make them crumble -- you can either rub the butter into the flour and sugar with your fingers or blitz them in the food processor. The muffin batter itself is very simple. We cream the butter and brown sugar, then add the eggs and vanilla. Once they're all incorporated, sift the flour over the top, mix thoroughly and then finally stir through the milk and strawberries.

I use an ice cream scoop to fill my muffin cases and once the mixture is divided evenly amongst the cases, sprinkle the tops with rhubarb and then finally the crumble (and I like to completely cover the top of the muffin with the crumble layer, so you can't see any fruit peeking out). They should be baked for around 25 minutes and you can check them as you would with any other cake, by checking a skewer inserted in the middle comes out clean.

Once they're baked and out of oven, we leave them in the tin for around 10 minutes and then lift them out carefully to cool on a rack. I recommend leaving them in their wrappers for stability -- they do firm up as they get cooler but they are at their most delicious warm from the oven.
These muffins are perfect for coffee mornings, lunch or afternoon tea. They do have a sweet sugary hit from the crumble which might seem a bit over-indulgent for breakfast, but just amazing for brunch!
You could kid yourself that the fruit in them makes them healthy, but when something tastes this good, you should just enjoy it for what it is :)
Strawberry and Rhubarb Crumble Muffins
Makes 6 muffins

Crumble Ingredients
- 50G SELF-RAISING FLOUR
- 40G SOFT BROWN SUGAR
- 1/2 TSP CINNAMON
- PINCH OF SALT
- 40G BUTTER
Muffin Ingredients
- 100G BUTTER
- 100G SOFT BROWN SUGAR
- 2 EGGS
- 2 TSP VANILLA ESSENCE
- 175G SELF-RAISING FLOUR
- 2 TBSP MILK
- 4 LARGE STRAWBERRIES
- 1 STICK CHOPPED RHUBARB
Method
- Start by putting all the crumble ingredients in a bowl and rub the mixture with your fingertips until a fine crumble has formed and set this aside
- Preheat the oven to 170 degrees (fan)
- Line your muffin tin with paper cases
- Chop the rhubarb into small pieces and set aside
- Chop the strawberries into small pieces and set aside
- Cream the butter and sugar
- Beat in the eggs and vanilla
- Sift in the flour
- Fold in the strawberries and milk
- Spoon the batter into the prepared muffin wrappers
- Sprinkle the rhubarb over the top
- Scatter the crumble over the top, ensuring that no fruit can be seen
- Bake them for around 20-25 mins (you can test the muffin centres with a skewer to ensure they're cooked)
- Enjoy them warm from the oven for the best taste experience!
- If you're keeping some for another day, store them in an airtight container -- I always like to freshen up the muffins with around 10-15 seconds in the microwave :)
Rainbow Meringue Cake

It feels like a week where a bit of colour is needed to brighten up the day. Nothing shouts colour more than this stunning Rainbow Meringue Cake with its rainbow layers, gorgeous vanilla mascarpone cream and topped with strawberries, raspberries and pomegranate seeds.

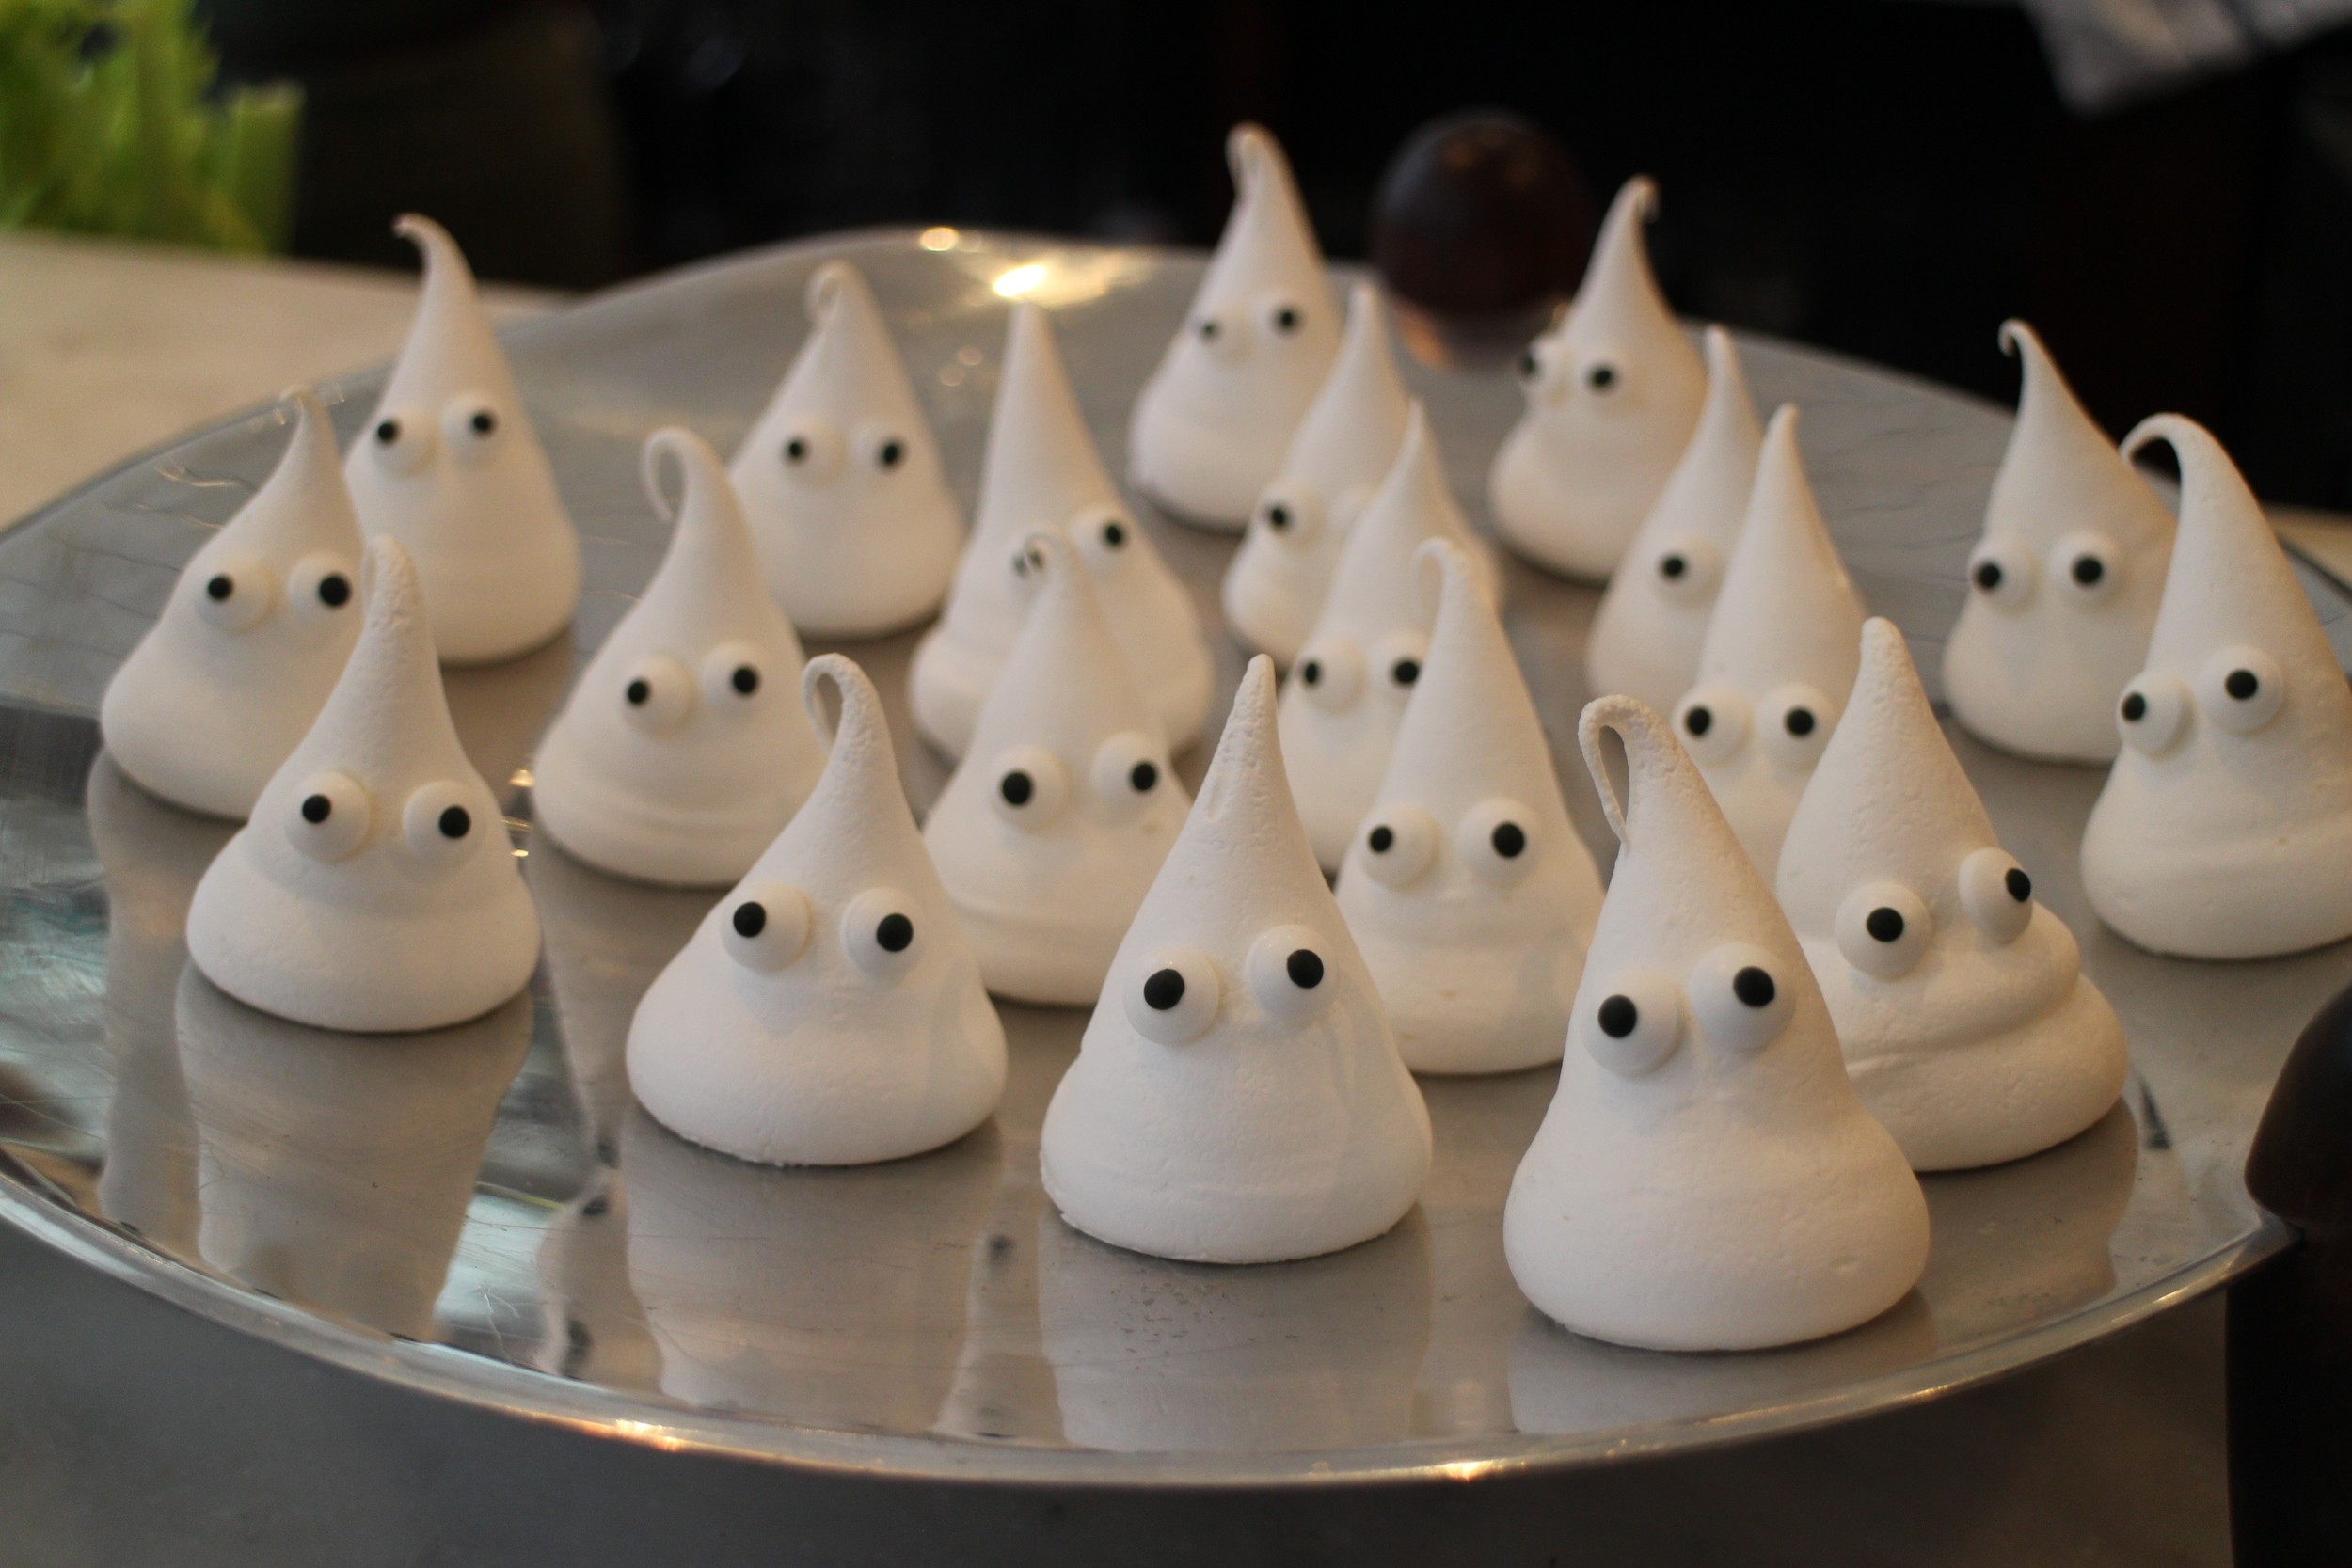
The idea for the rainbow meringue layers was taken from the Meringue Girls Cookbook. I am a HUGE fan of meringue, particularly macarons, and their little meringue kisses which I recently turned into little ghosts for a kids' birthday party, are the loveliest treats.
The meringue is straightforward using the Meringue Girls process. You need a couple of batches of their meringue mixture which is also the base of their kisses. It's simply oven-heated sugar added a spoonful at a time to egg white whipped to stiff peaks and then whisked for around 5 minutes until the sugar has dissolved.

The more fiddly bit is preparing the piping bags for the mixture and these need to be coated with thick food paste in the different rainbow colours. Did you ever use an acronym to remember the rainbow order? I can still be found muttering Richard Of York Gave Battle In Vain!! To achieve the different hues, I used Sugarflair Spectral Paste in these colours: Velvet Red, Yellow/Cream, Yellow Extra, Holly Green, Ice Blue and Purple. To apply them, the way that's easiest for me is to turn the piping bag inside out (I don't worry about the very tip of the icing bag as it will be snipped off and also gives us a little tag to hold onto when pulling the bag back through the right way). Once your bag is turned inside out, pop it over a wine bottle and then take your chosen food colour paste, painting the inside from tip to half-way down the bag with a thick coating of colour. If you leave the bag for too long after painting, you'll notice that the colour may start to separate so it's worth giving the bag a quick brush with a pastry brush to distribute the colour just before adding the meringue.

Then pull the bag back the right way so the food colour is on the inside. I then pop my bag into a measuring jug and fill it with a couple of scoops (I used an ice cream scoop) of meringue. Squidge the food colour into the meringue with your fingers and then snip off the end. Pipe the mixture onto a baking tray lined with greaseproof paper starting at the outside and working in. I found that I didn't have generous amount of meringue mixture for each one so had to use a spatula to smooth it and cover the whole circle. Be careful not to smooth the very outside of the circle with the deepest colour as this will show on the outside of your cake so you want a really vibrant colour.
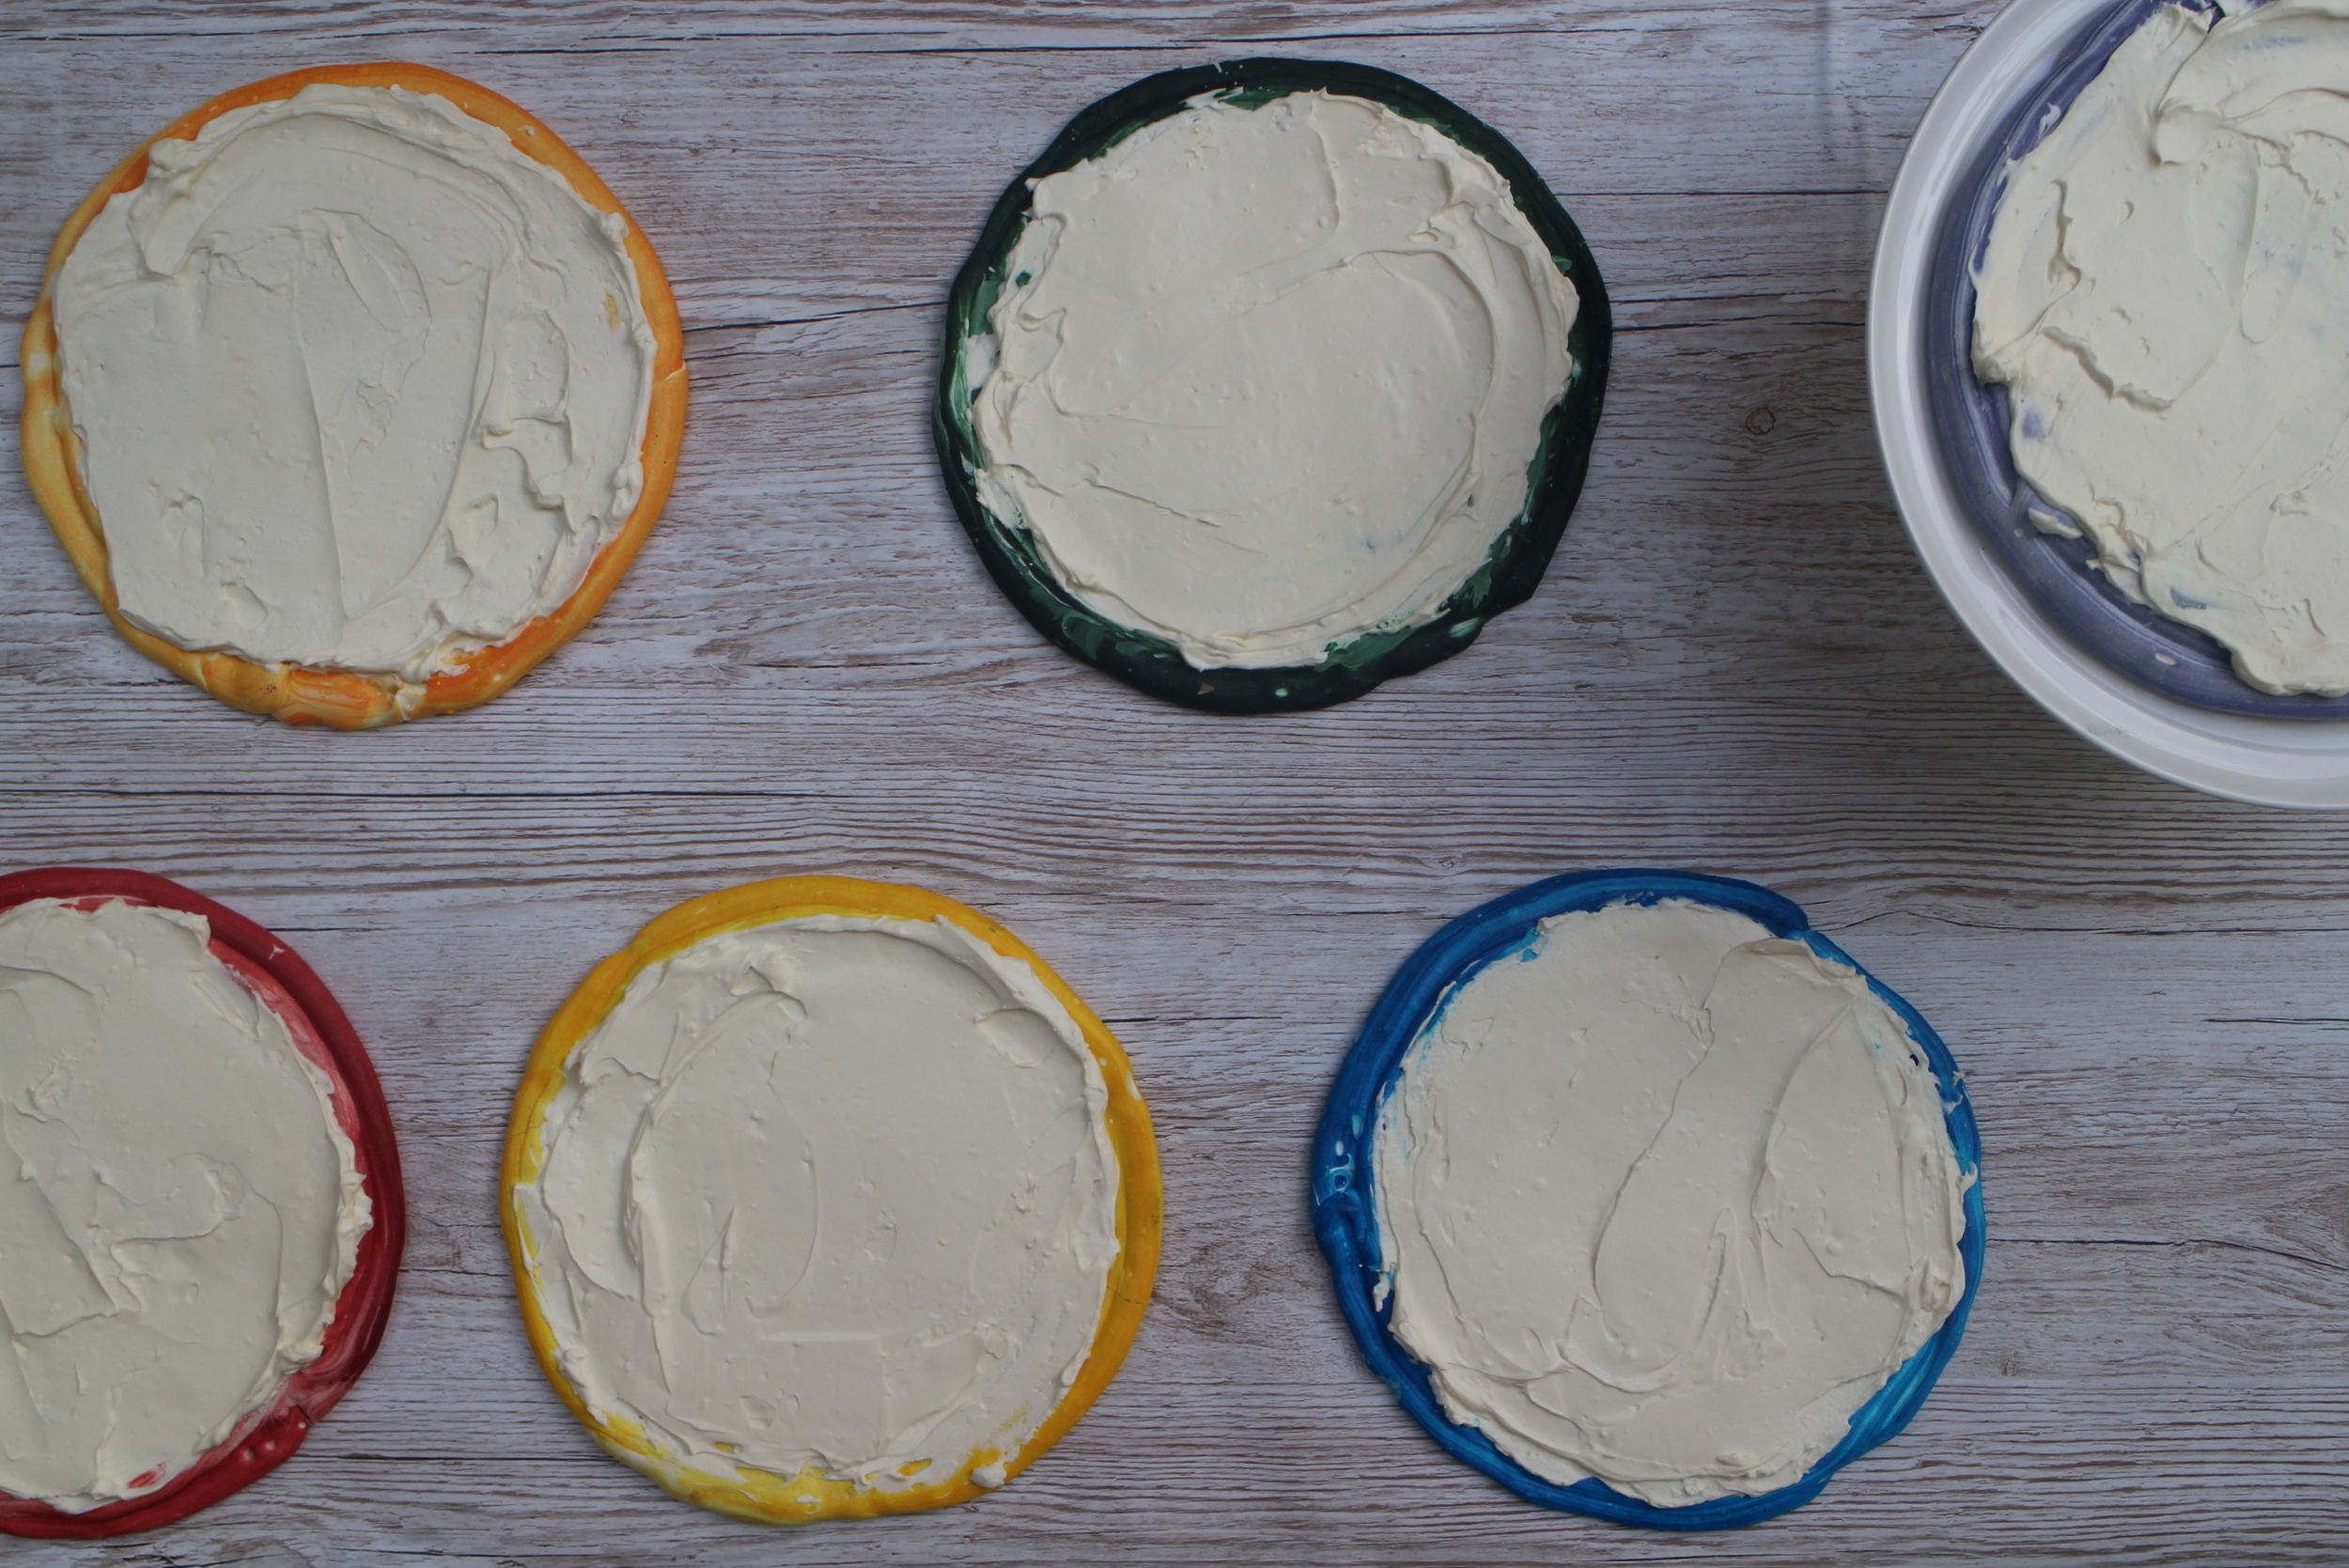
After baking and cooling, you're ready to assemble your cake. The cream does make the inside of the meringue soften and disintegrate a little, so it's best to assemble this as close to serving as you can. I decided to fill my cake with a vanilla mascarpone cream and then top it with beautiful strawberries, raspberries and pomegranate seed and a light dusting of icing sugar.

This cake is sweet and delicious and the cream is lovely and light.
It does take a little preparation but looks so bright and colourful, it would be a welcome addition to any party, dinner affair or just for fun.
Ours is just for fun. Can't wait to show the kids what they're having for pudding tonight :)
Rainbow Meringue Cake
Rainbow Meringue (from Meringue Girls Cookbook)

- 300G EGG WHITES (I use Two Chicks egg whites but you could also use around 10 medium eggs)
- 600G CASTER SUGAR
Vanilla Mascarpone Cream
- 500G MASCARPONE
- 460ML WHIPPING CREAM
- 4 TSP VANILLA EXTRACT (to taste)
- 140G CASTER SUGAR (to taste)
Topping
- PUNNET OF STRAWBERRIES
- PUNNET OF RASPBERRIES
- 1 POMEGRANATE
- ICING SUGAR (to dust)
Method
- Pre-heat the oven to 200 degrees
- The meringue is made in 2 batches so the first batch will make 3 meringue discs
- Line 3 baking trays with greaseproof paper and draw a 10 inch circle as a guide
- Line a roasting tray with greaseproof paper and then pour in 300g sugar, smoothing it to get it spread as evenly as possible
- Put the sugar in the oven for 5 mins
- Measure 150g egg white in a standing mixer and start by whisking is slowly
- Then increase the speed to medium for a couple of minutes and then increase it again to high speed until it's formed stiff peaks
- The sugar should be ready to come out of the oven and with the mixer turned up to high speed, it should be added a spoonful at a time to the egg white (around 30 seconds between each addition)
- When the sugar is all added, keep mixing for another 5 mins - it's ready when you can rub a bit of meringue between 2 fingers and can't feel the grains of sugar
- Prepare 3 icing bags by turning them inside out and popping each one over a wine bottle (or similar shape)
- Paint the icing bags thickly with food colour paste, ensuring a heavy coating from the tip down to half-way
- Turn the bags the right way around and then add 2 scoopfuls of meringue into each bag, squidging the colour into the meringue with your fingers
- Snip off the end and then pipe a 10cm circle on the prepared baking tray
- Bake for around 1 hour until the meringue lifts off the baking tray
- Leave to cool on the tray
- Repeat this process with the other half of the meringue ingredients and the remaining 3 colours
- When you're ready to assemble the cake, prepare the mascarpone cream
- Put all the cream ingredients into a bowl and mix for a couple of minutes until the cream is smooth and has soft peaks
- Spread the cream over each of the layers and then assemble in rainbow order
- Top with your favourite fruit and dust with a sprinkling of icing sugar :)
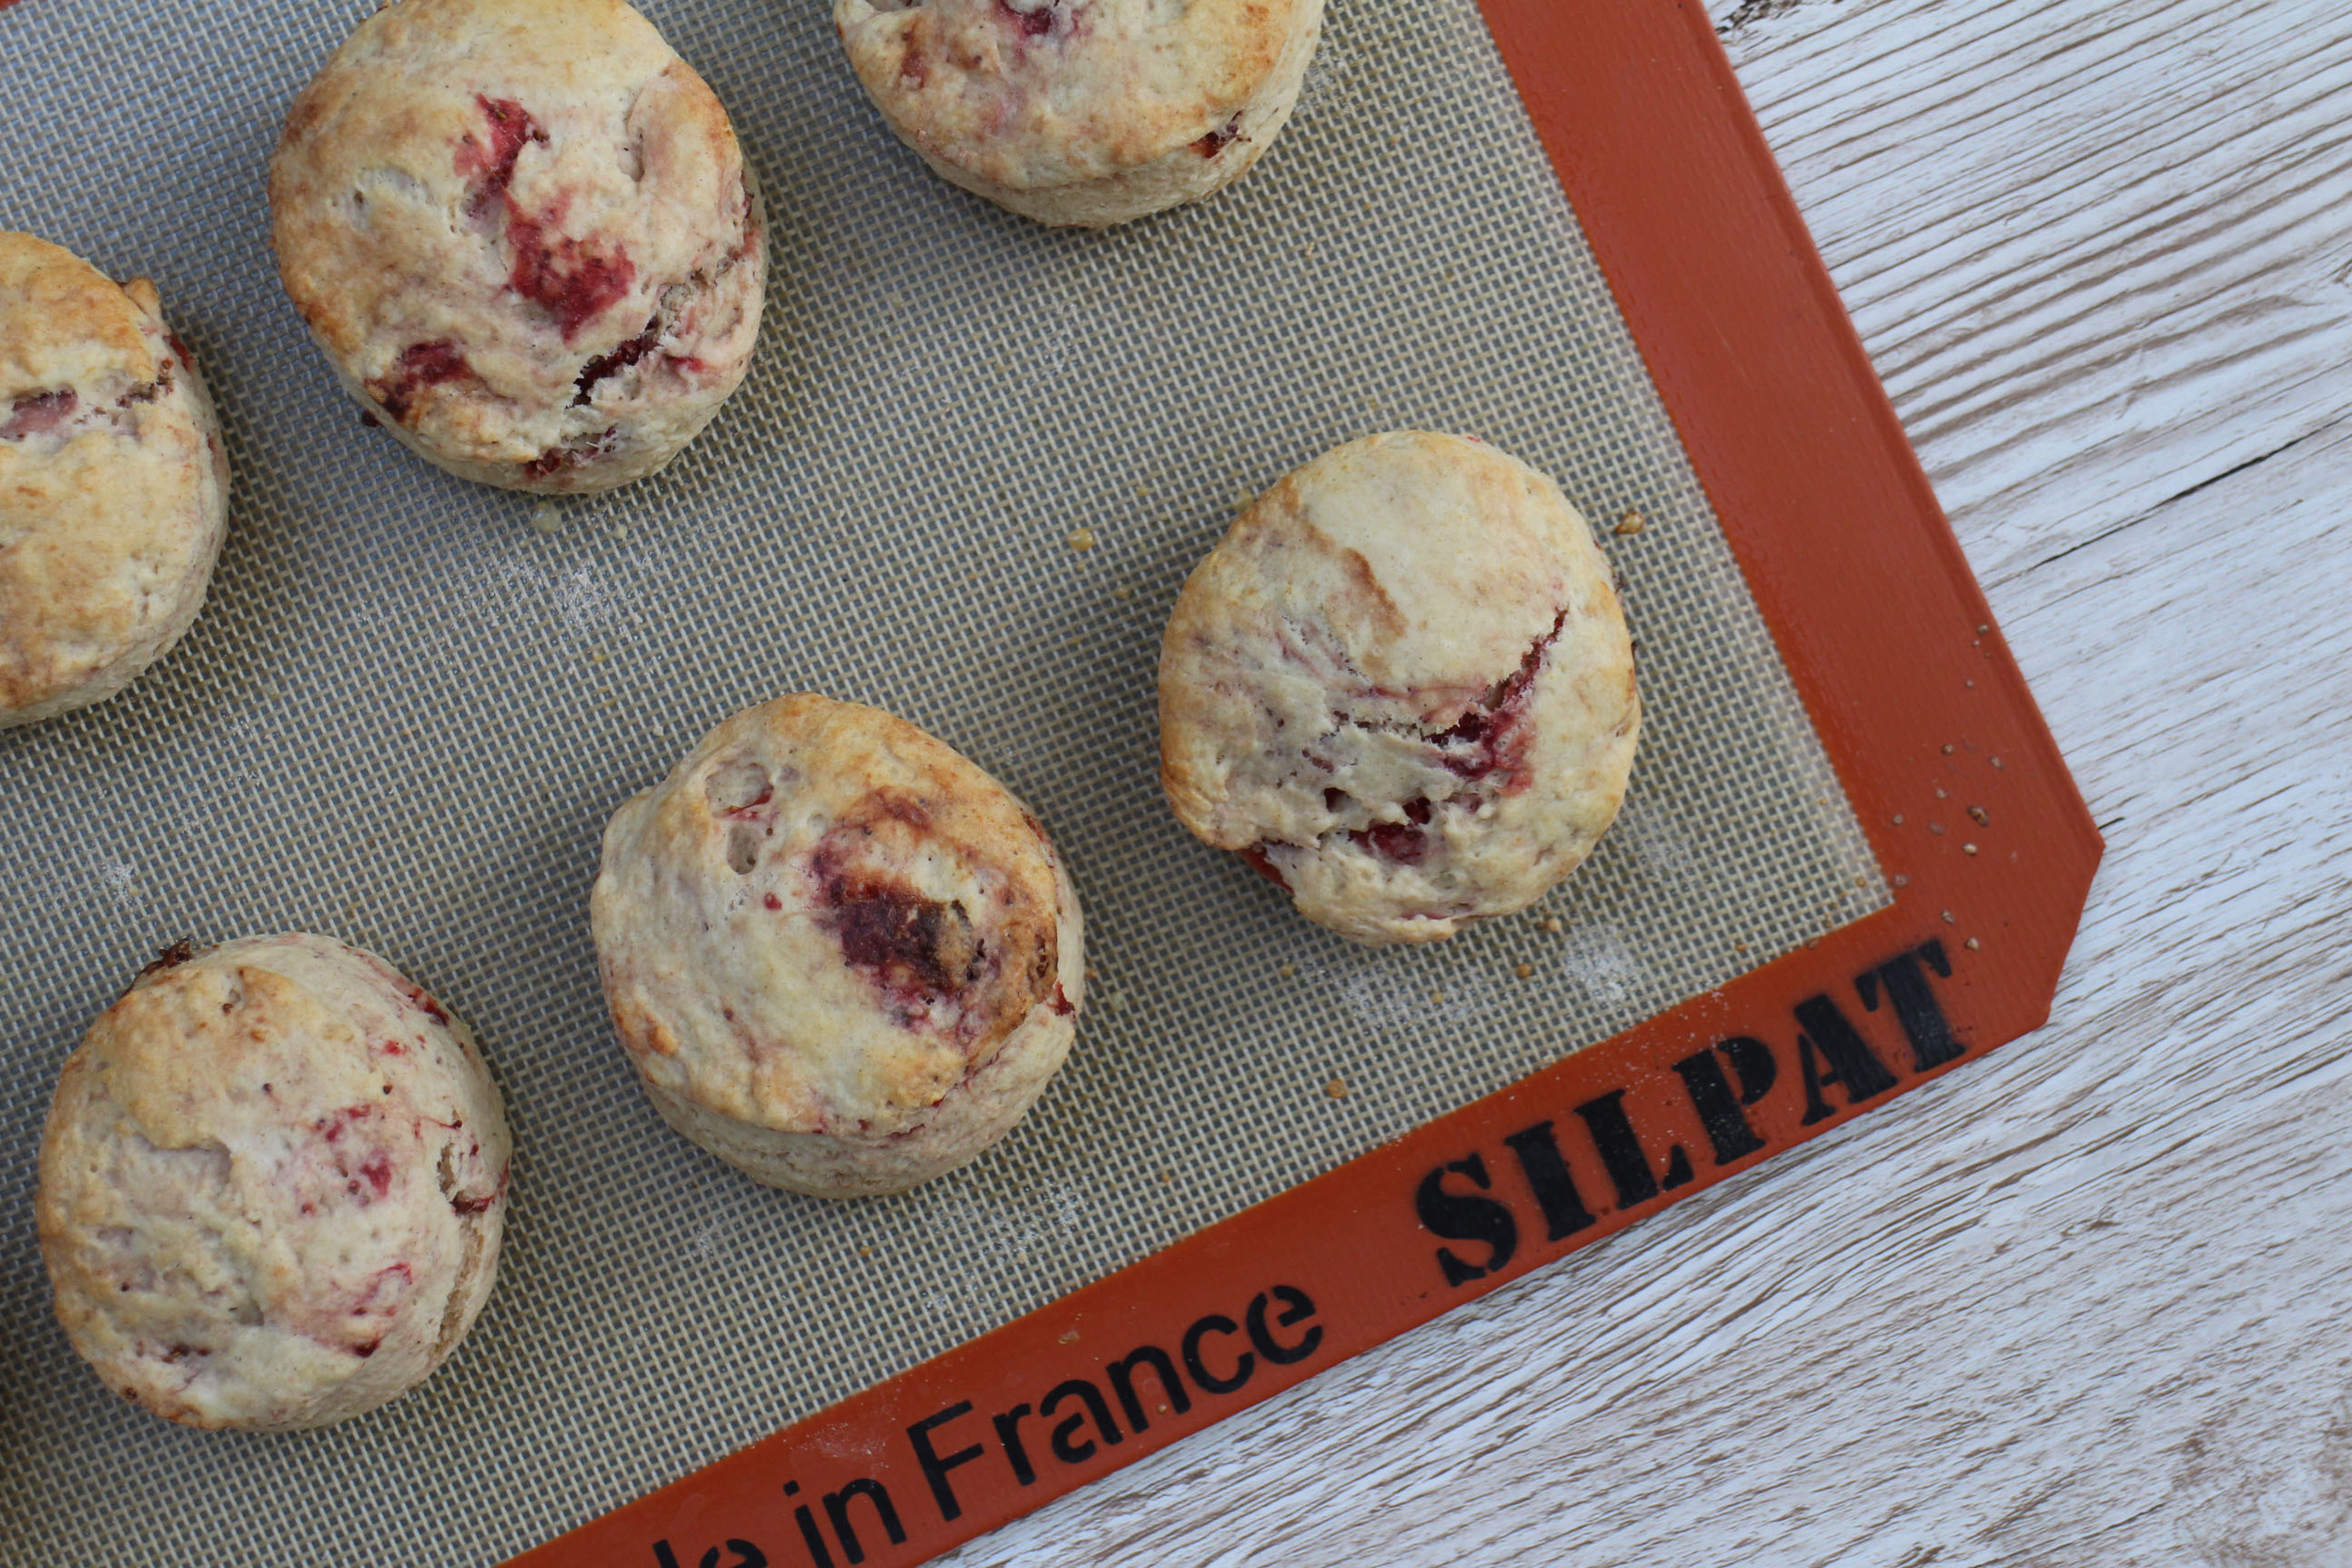
Roasted Strawberry & Black Pepper Scones
So I know it's autumn now, but can you forgive for me for trying to hold on to a little bit of summer? The sun has been shining this week and sometimes it was even warm enough to abandon the jumper :) So although cream teas and scones might conjure up dreams of warmer, lazier days in the garden, I can promise you they are just as delicious on cooler days tucked up inside when the leaves are turning golden brown.
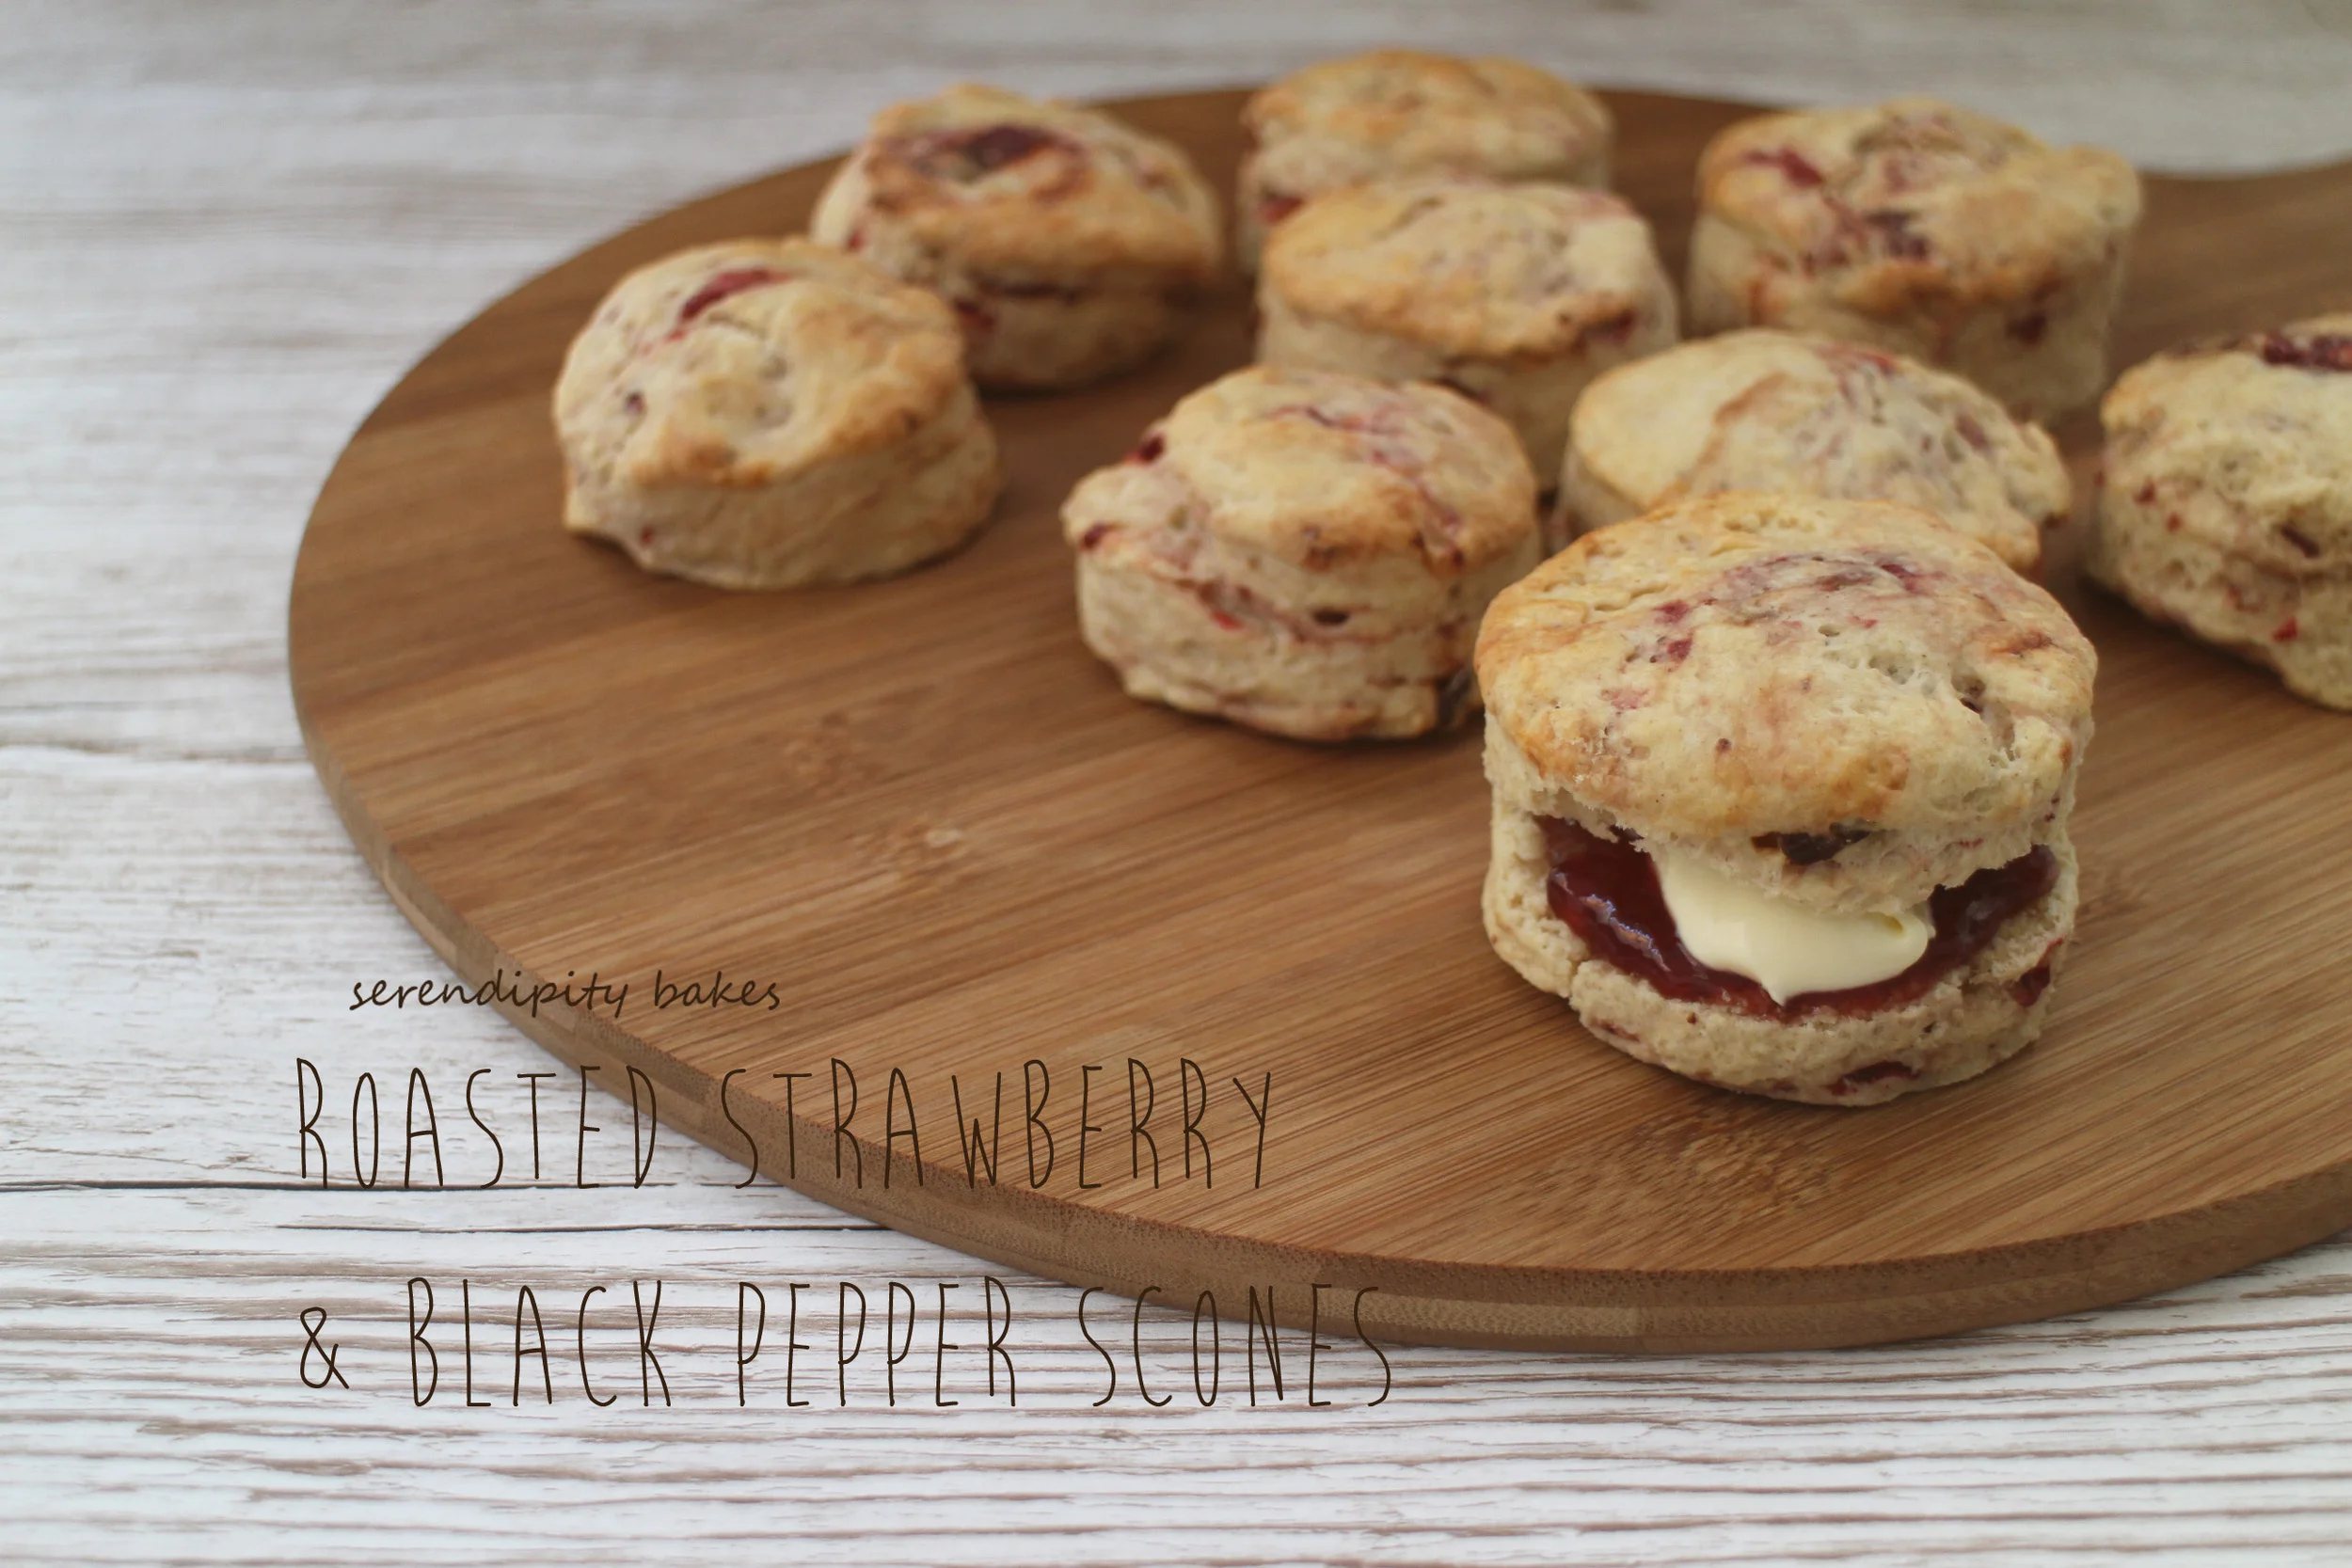
I don't usually watch the Hairy Bikers but this week I caught a little of an old show on TV where they were roasting strawberries with black pepper for scones. The roasted strawberries looked like little jewels adorning scone crowns and I couldn't resist making some for us.

The strawberries take an hour and a half to roast, so whilst the scones are relatively quick to make, you do need to start preparations a little earlier for these. You could always roast the strawberries the day before and get a head start on your baking. They are simple to prepare. The strawberries are hulled and cut in half and then sprinkled with two teaspoons of sugar and one teaspoon of freshly ground black pepper. Then roasted on a sheet of baking paper for an hour and a half. The juices run out and they get a little sticky on the paper but try to scrape all the goodness up as you don't want to lose a drop of this in your scones.


The scones are super simple to make. The butter should be added cold to the flour, sugar and salt and then rubbed in with your fingertips. Then add your roasted strawberries to the mix. Finally stir in the milk (I used whole milk) and combine until all the ingredients are well mixed.

Turn the mixture out onto a well floured surface, add a little more flour to the top and then pat down with your hand until the mixture is around 3cm deep (my scones were taller than the Hairy Biker scones on TV but I prefer them that way) I cut out rounds with a 68mm cutter, placed them on a baking tray lined with Silpat (or you can use baking paper) and then brushed the top with a little milk. Into the oven for around 18 minutes and they are ready to enjoy.
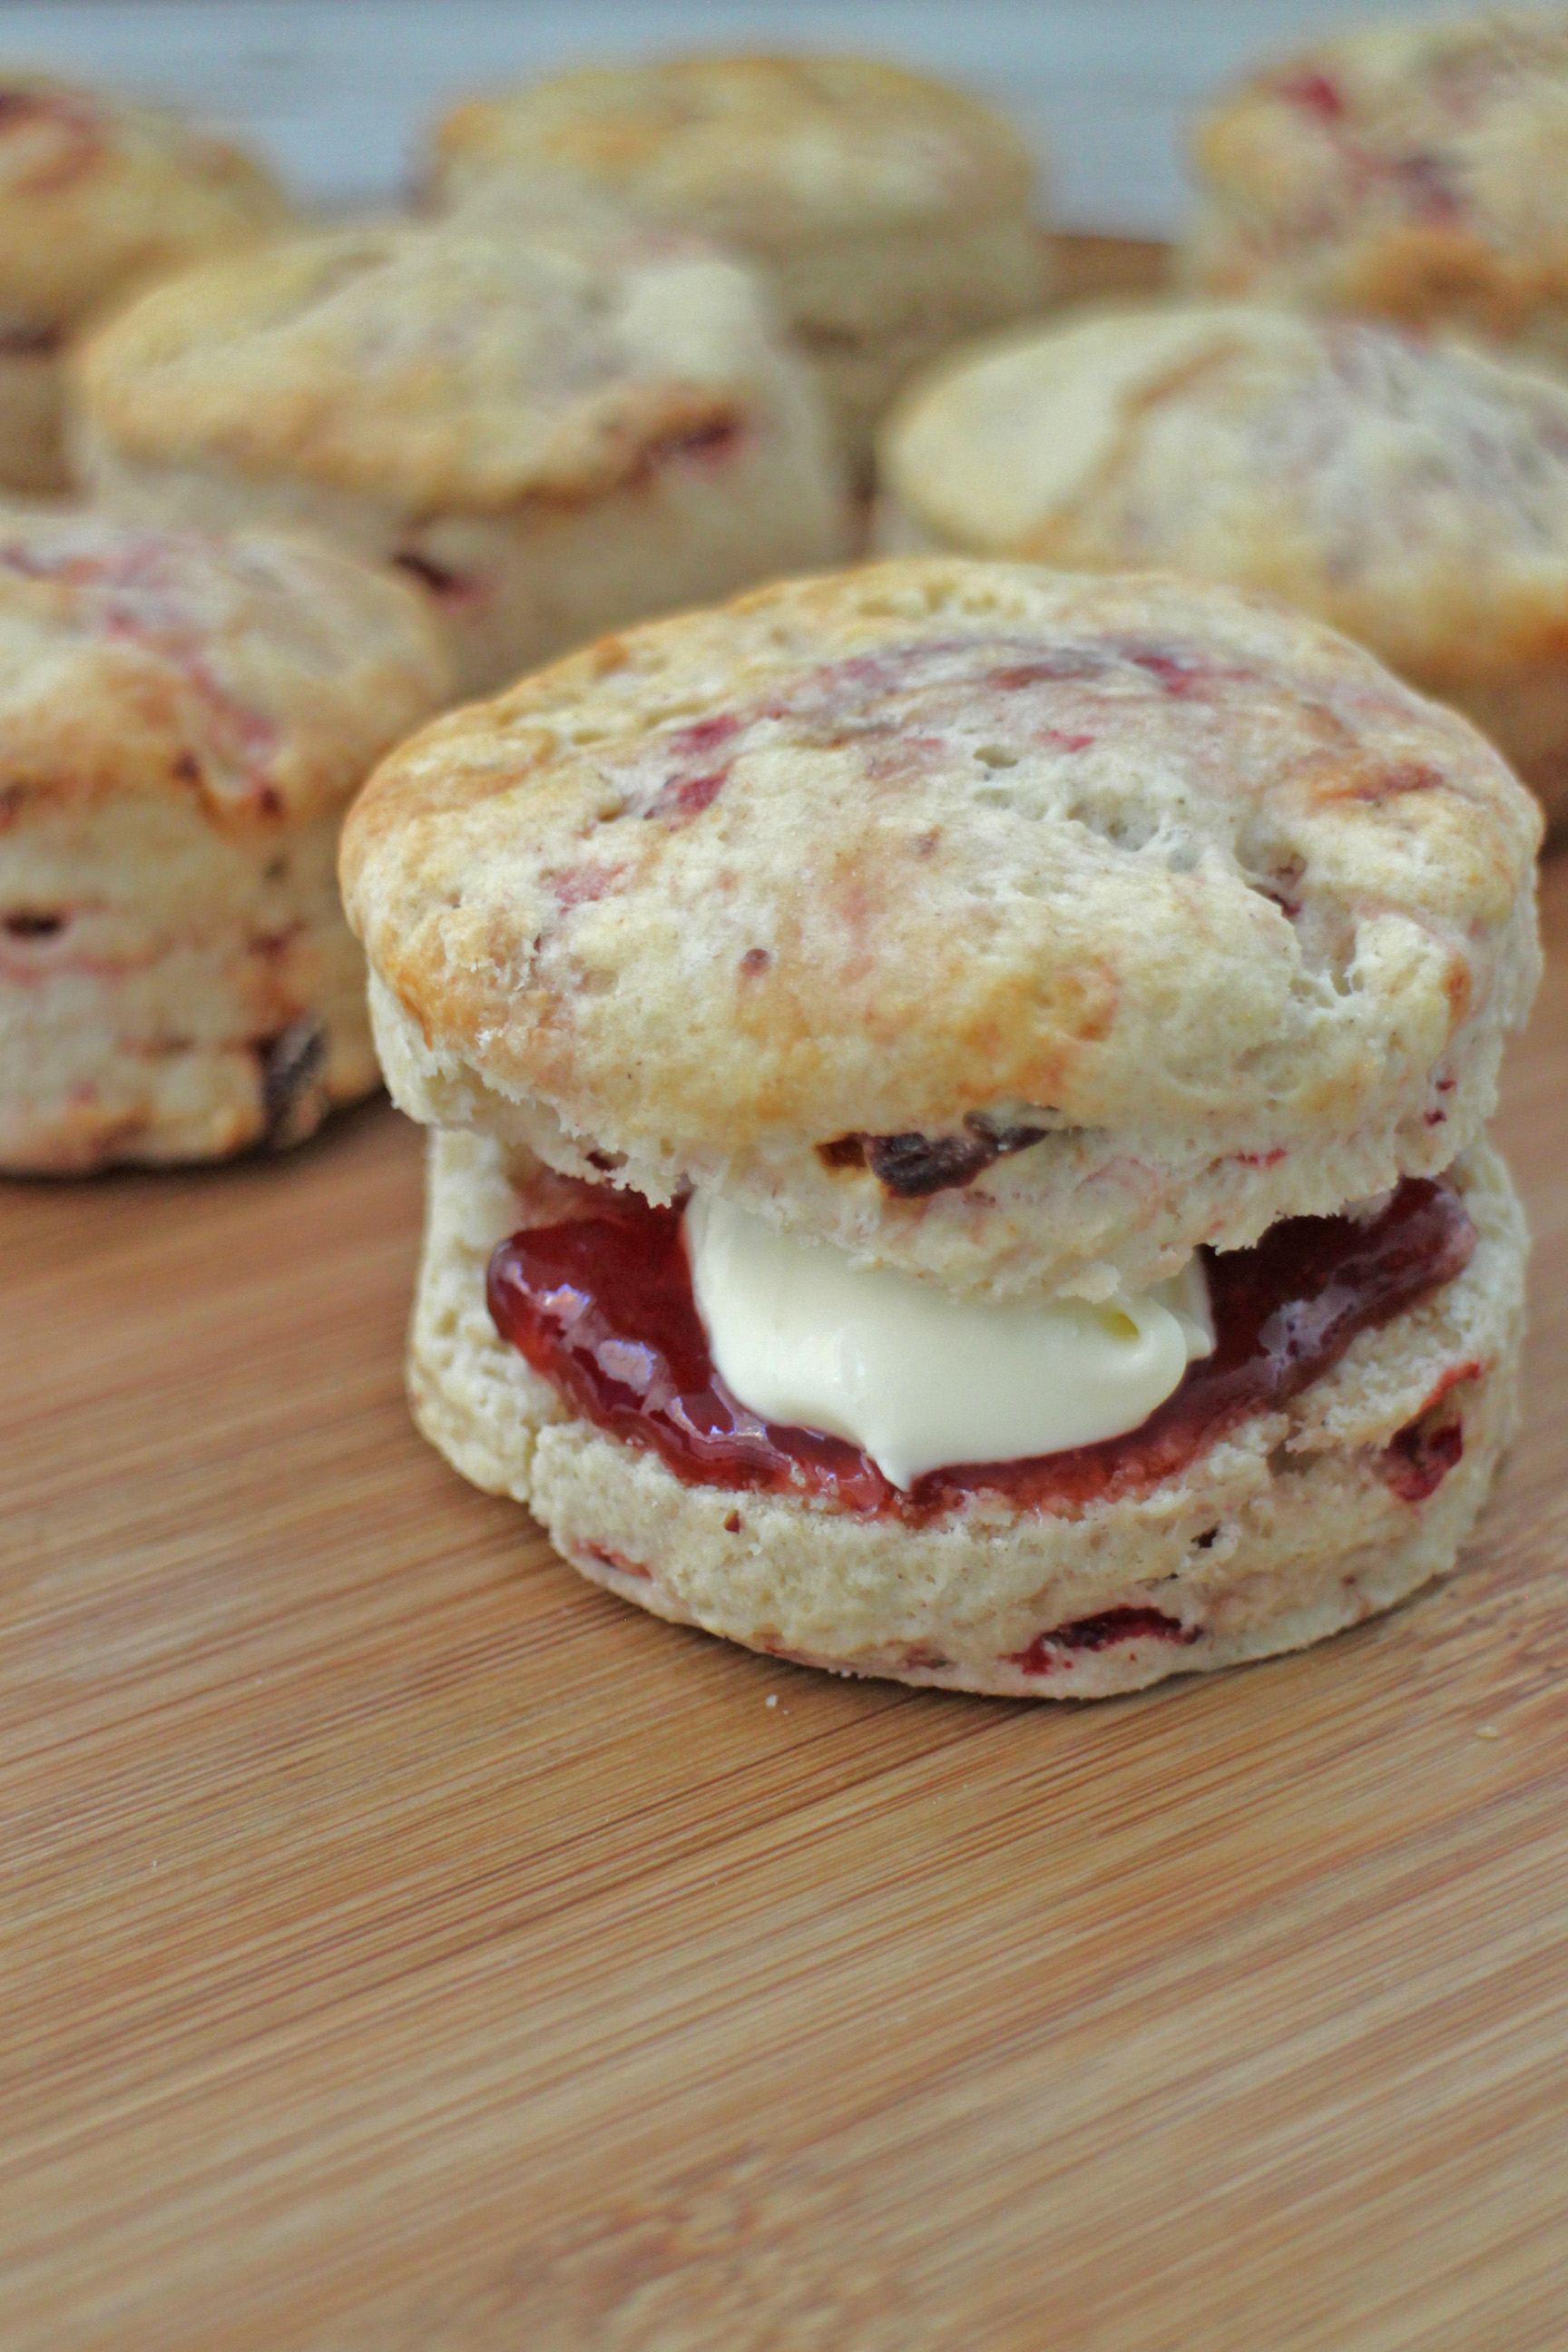
They are delicious warm from the oven and are nice without any other toppings. However, when topped with strawberry jam and clotted cream they are absolutely heavenly.
We are all partial to afternoon tea in this house and these were a lovely treat. I think the addition of the roasted strawberries not only looks more beautiful but the flavour adds a new dimension to them too. Well worth the effort of getting out your roasting tin :)
Roasted Strawberry and Black Pepper Scones Makes 15 (from the Hairy Bikers)
Roasted Strawberry Ingredients
- 300G STRAWBERRIES
- 2 TSP CASTER SUGAR
- 1 TSP FRESHLY GROUND PEPPER
Scone Ingredients
- 500g SELF-RAISING FLOUR (plus extra for dusting surfaces when rolling)
- 50G CASTER SUGAR
- ½ SALT
- 100G COLD BUTTER, CUT INTO SMALL CUBES
- 300ML FULL-FAT MILK (plus extra for brushing the top of the scones)
Method
- Preheat the oven to 120 degrees (fan)
- For the Roasted Strawberries, prepare them by hulling them and cutting each one in half
- Put them on a lined baking tray and then sprinkle them with the sugar and pepper
- Roast them for 1½ hours
- Scrape them off the baking paper and put to one side
- For the Scones, preheat the oven to 180 degrees (fan) and line two baking trays
- Place the flour, sugar and salt into a medium mixing bowl
- Add the cubed butter and rub into the dry mix with your fingertips until the flour mix looks like fine breadcrumbs (around 3 to 5 mins)
- Stir through the roasted strawberries
- Add half of the milk and start to combine with the flour mix
- Then add the other half and mix until all the ingredients are well-mixed and forms a dough
- Dust your work surface with flour and then turn out your dough on to here
- Put a little more flour on top and then knead gently until the dough all comes together
- Pat down with your hands or rolling pin until the dough is around 3cm thick
- Then cut out rounds with a 7cm cutter and place them onto the prepared baking trays
- Gather together the scraps of dough, re-roll them and cut out rounds, repeating until you've used all your dough (it should make around 15 scones)
- Brush the tops with a little milk
- Place them in the oven and cook for around 18 mins until they're risen and the tops are brown
- Slice them in half and serve with your favourite combination but I can especially recommend strawberry and clotted cream :)
Summer Fruit Crumble Galette

I have fond memories of fruit picking with my family when I was a child. Sunny days collecting strawberries and other fruit, quality control taste testing as much as went into the basket and returning for weighing with stained fingers and lips. Happy days! I've been wanting to take the boys fruit picking for so long and took the opportunity now that we're in Dorset for a few days.
I googled local fruit farms and found Sopley Farm near Christchurch - after a quick phone call just to make sure they still had plenty of fruit in season, we packed up and headed off there. It didn't disappoint. The staff were really friendly and we collected punnets of strawberries, raspberries and blackberries. Far too much really, but it's kind of addictive.

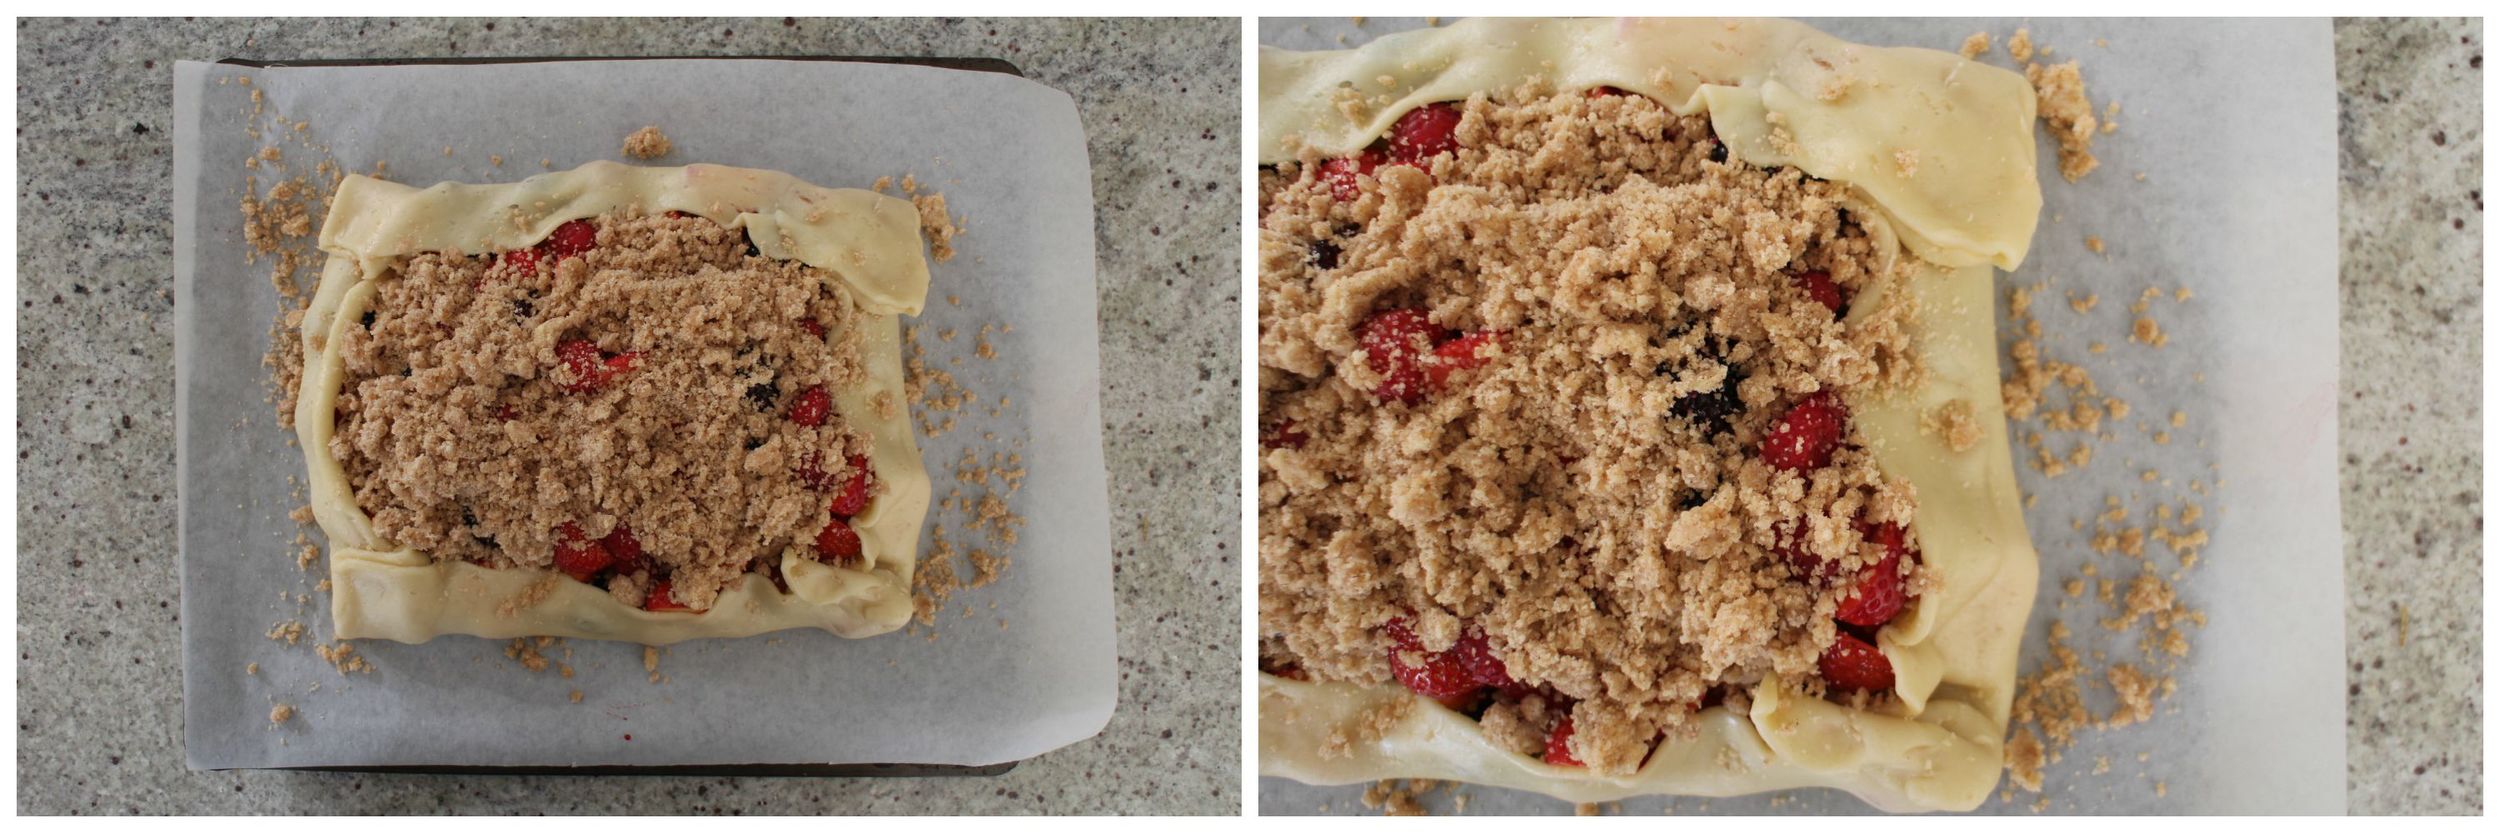
So with all our fruit wares and being in someone else's kitchen without my usual baking tins and equipment, I decided to make a free-form Summer Fruit Crumble Galette in the style of Donna Hays. I did cheat and buy some pre-made sweet shortcrust pastry but you can make your own if you prefer. The main fruits were strawberries and raspberries but I wanted to add in some blackberries too for some extra colour and we agreed that they added an additional dimension to the taste.

I love the sweet shortcrust pastry pairing with fruit, but what I really loved about this was the crumble topping which added extra texture and flavour and was seriously delicious. I am a big fan of crumble so you'll always finding my doubling any recipe quantities for my desserts.
This was delicious warm straight from the oven. The fruit was so juicy against the crispy shortcrust pastry and using such fresh ripe fruit meant that we didn't have to add any sugar to bring out the sweetness.
There are so many creations with such an abundance of fruit, but this is a really simple and delicious dish. I like the freeform style but what it lacks in straight sides, it definitely makes up in its wonderful flavours. A definite winner and gorgeous summer pud.
Summer Fruit Crumble Galette
Ingredients
- 320G SWEET SHORTCRUST PASTRY (I bought pre-made chilled pastry)
- 3 TBSP APRICOT JAM
- SELECTION OF FRUIT (add at your discretion but I used several handfuls of strawberries and raspberries with a scattering of blackberries)
- 60G BUTTER
- 3 TBSP GROUND ALMONDS
- 50G FLOUR
- 3 TBSP CASTER SUGAR
- 3/4 TSP GROUND CINNAMON
Method
- Preheat the oven to 180 degrees (fan)
- Prepare your fruit of choice and set aside
- Line a baking tray with greaseproof paper and unroll your pastry on to here (I didn't have to roll out my pastry any further but you're looking for it to be around 5mm thick)
- Spread the apricot jam over the base leaving a 5cm border around the pastry
- Pile your fruit over the jam
- Fold the edges of the pastry up over the fruit (you only have the 5cm border to do this with so it just forms a tray of sorts that the fruit sit in)
- Mix together the butter, ground almonds, flour, caster sugar and cinnamon with your fingertips to create a crumble
- Scatter the crumble across the top of the galette
- Bake in the oven for 25 minutes or until the pastry is golden brown and the fruit bubbling
- Serve with custard, cream or ice cream :)