• About
  • Blog
  • Recipe Index
  • Your Celebrations
  • Contact Me
Menu

Serendipity Bakes

Street Address
City, State, Zip
Phone Number

Your Custom Text Here

Serendipity Bakes

  • About
  • Blog
  • Recipe Index
  • Your Celebrations
  • Contact Me

Maple Syrup Monkey Bread

January 21, 2016 Nicola King

There are times when I wish our senses could transcend the written word. Like right now. If you could smell the warm, sweet, maple syrupy smell coming from my kitchen at this moment, you'd be in love. Just like me. And it doesn't just smell good - the taste is even better!

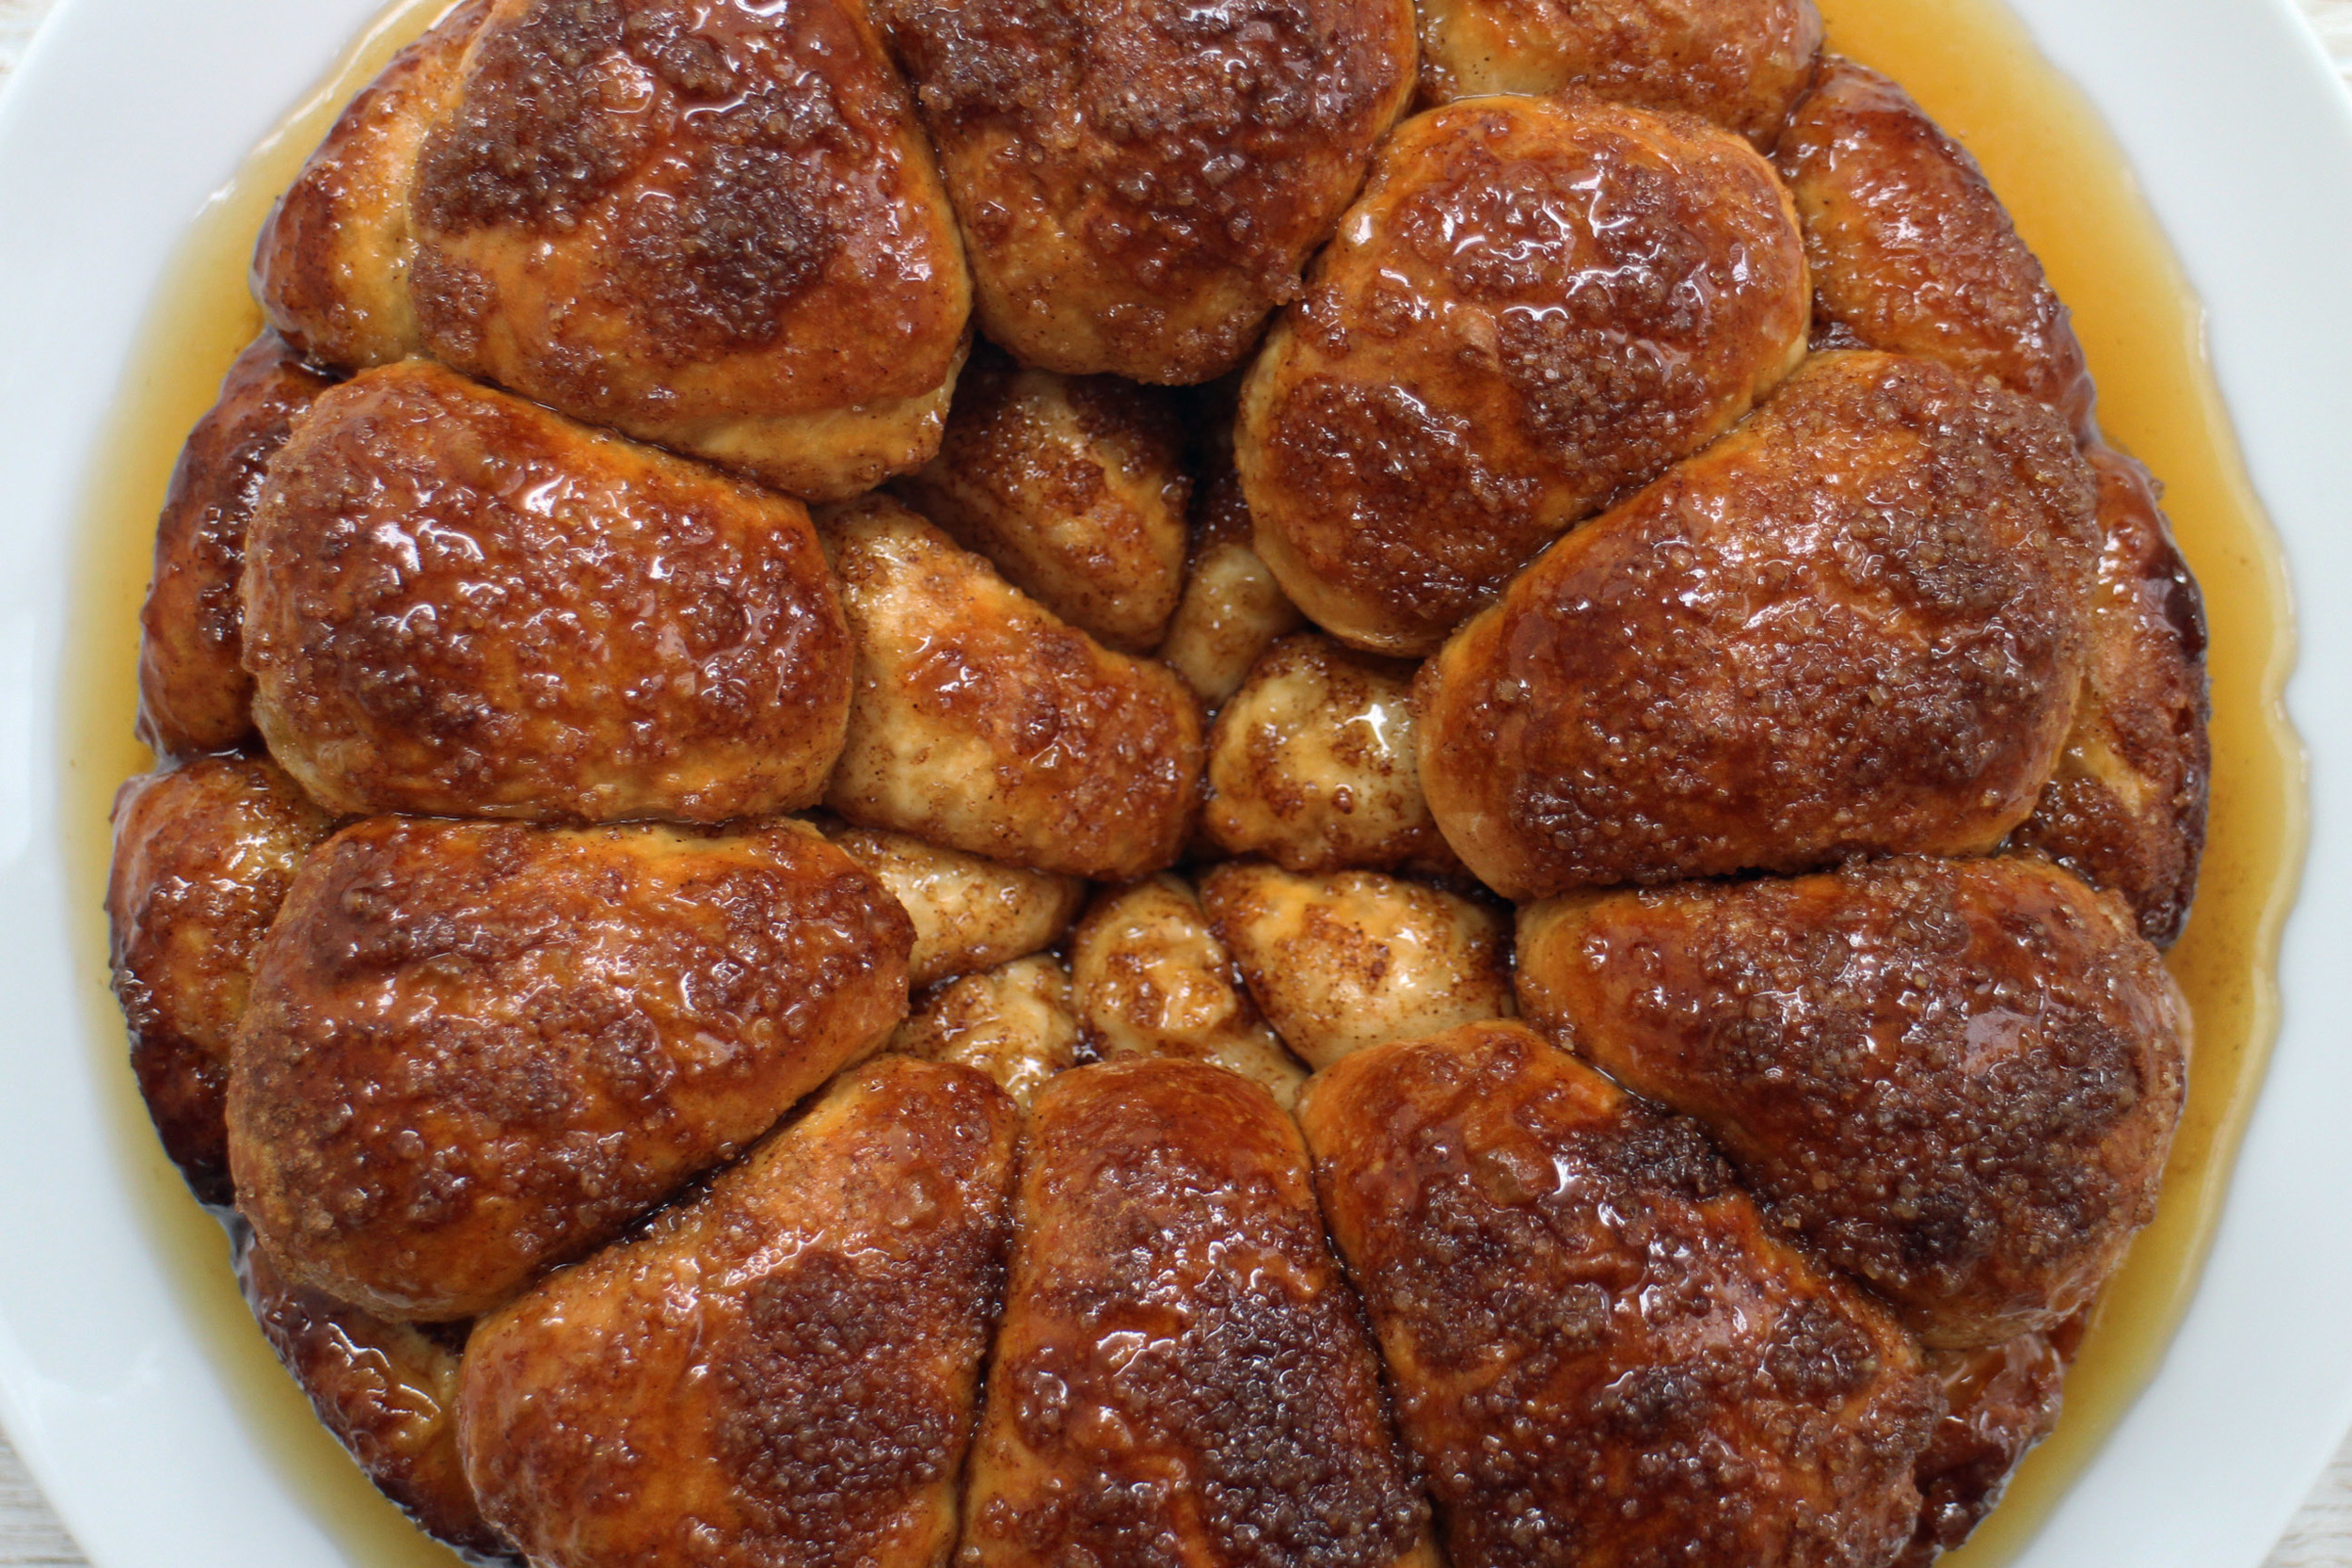
This Maple Syrup Monkey Bread is gorgeously squidgy. It has its first blanket of maple syrup when it's just out of the oven and then another one a few minutes later when it's turned out on the plate. I think mine looks like it's swimming in it :)

The recipe comes from James Martin's Sweet which I highly recommend if you're looking for lots of sweet delights to bake. I love James Martin and his recipes (whether from this book or his other savoury ones) always turn out brilliantly. They're easy to follow and always work. Win win. And there are lots of beautiful photos to inspire you!

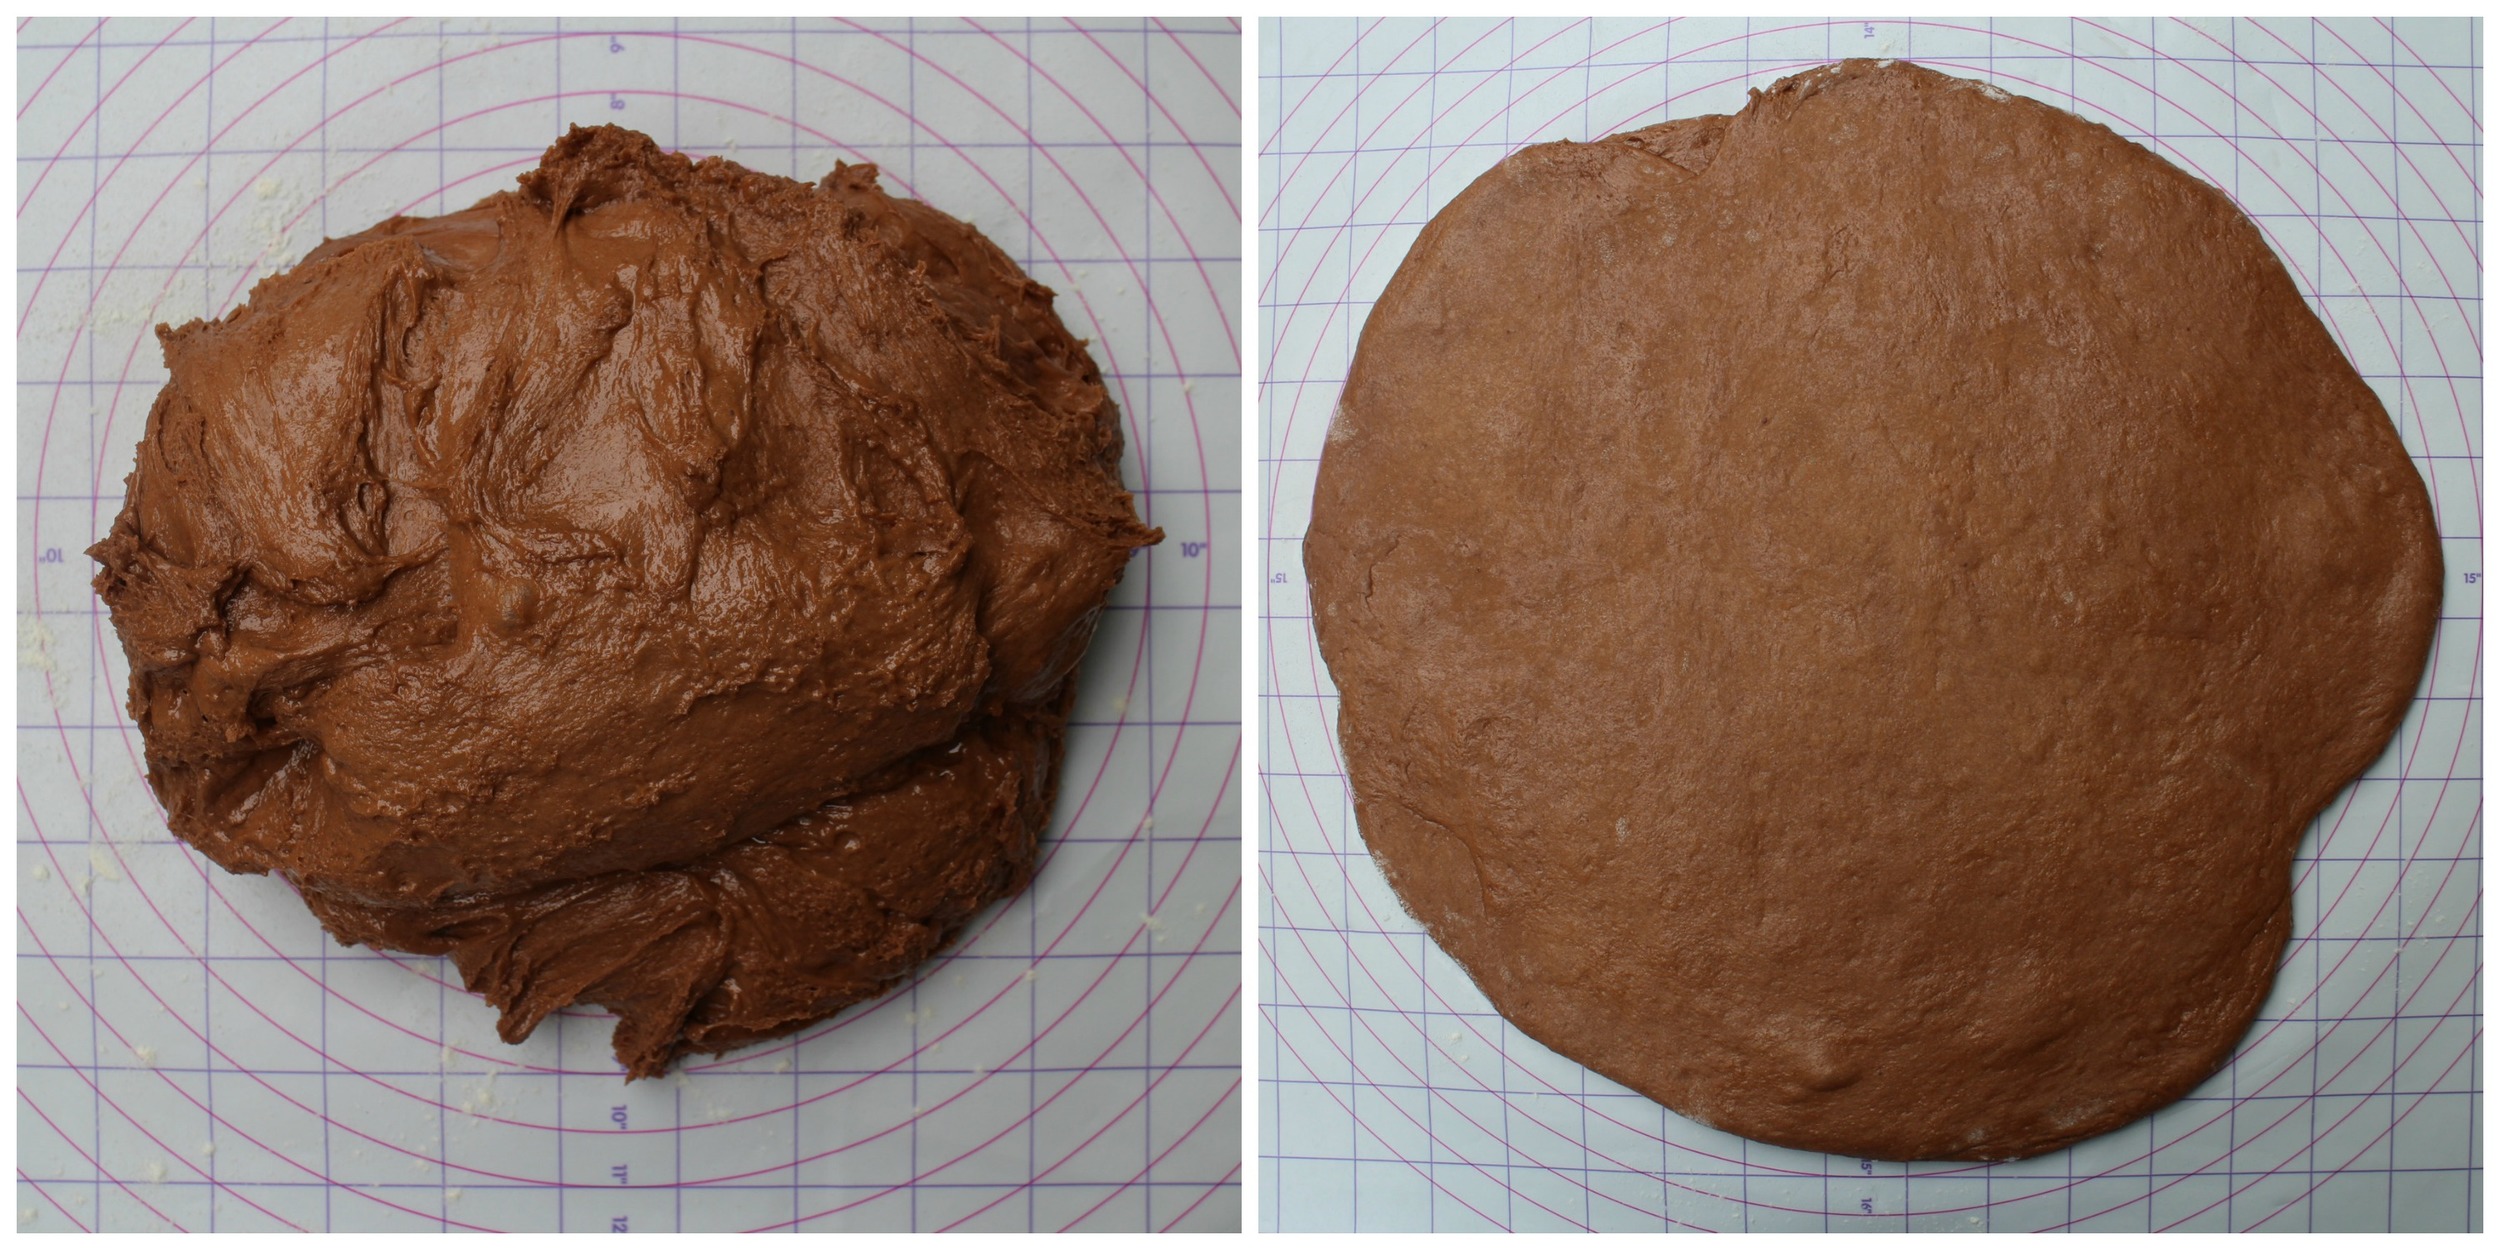
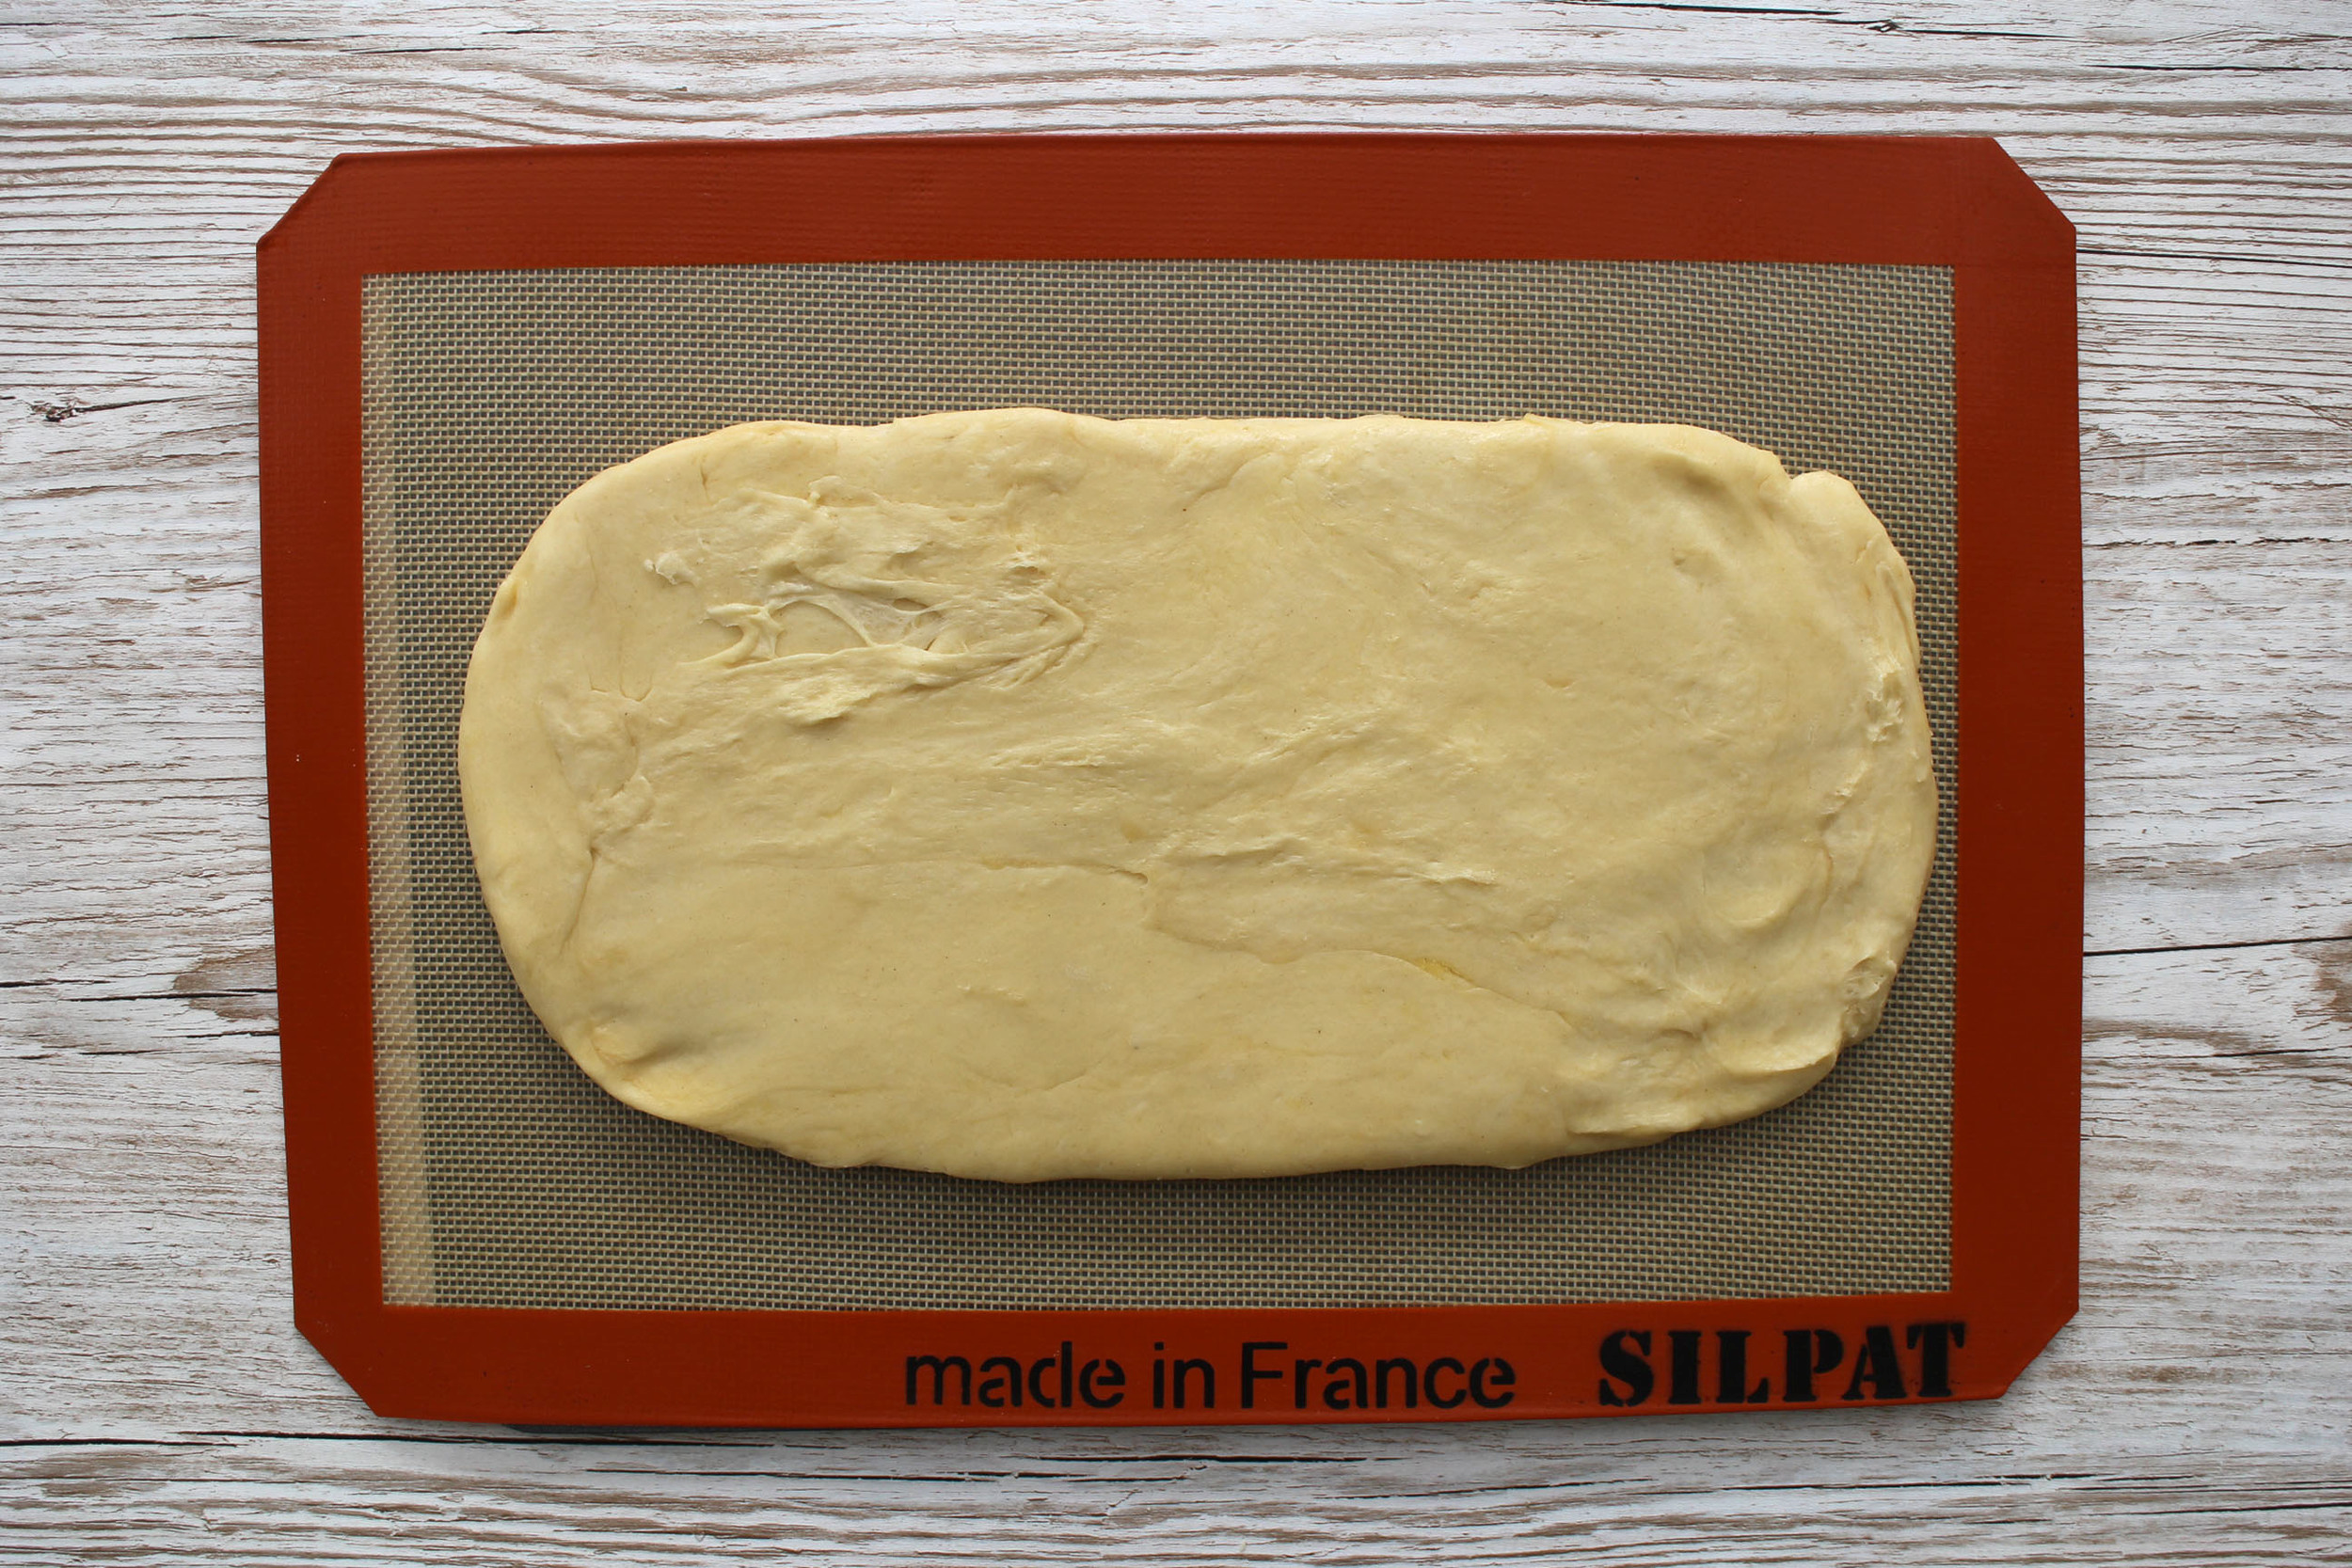
This is simple to make but, as with all bread, you do need a little patience for the proving. The dough itself is straightforward - the milk is warmed in a saucepan, the yeast is added and then it's mixed with breadcrumbs made from flour, sugar, salt and butter. I mixed the breadcrumbs by hand but then I used my standalone mixer and dough hook to combine all the ingredients. You can work the dough by hand if you don't have this equipment - it will just take you 15 minutes rather than the 5 minutes with the dough hook. But you get bonus points for giving your arm muscles a workout!

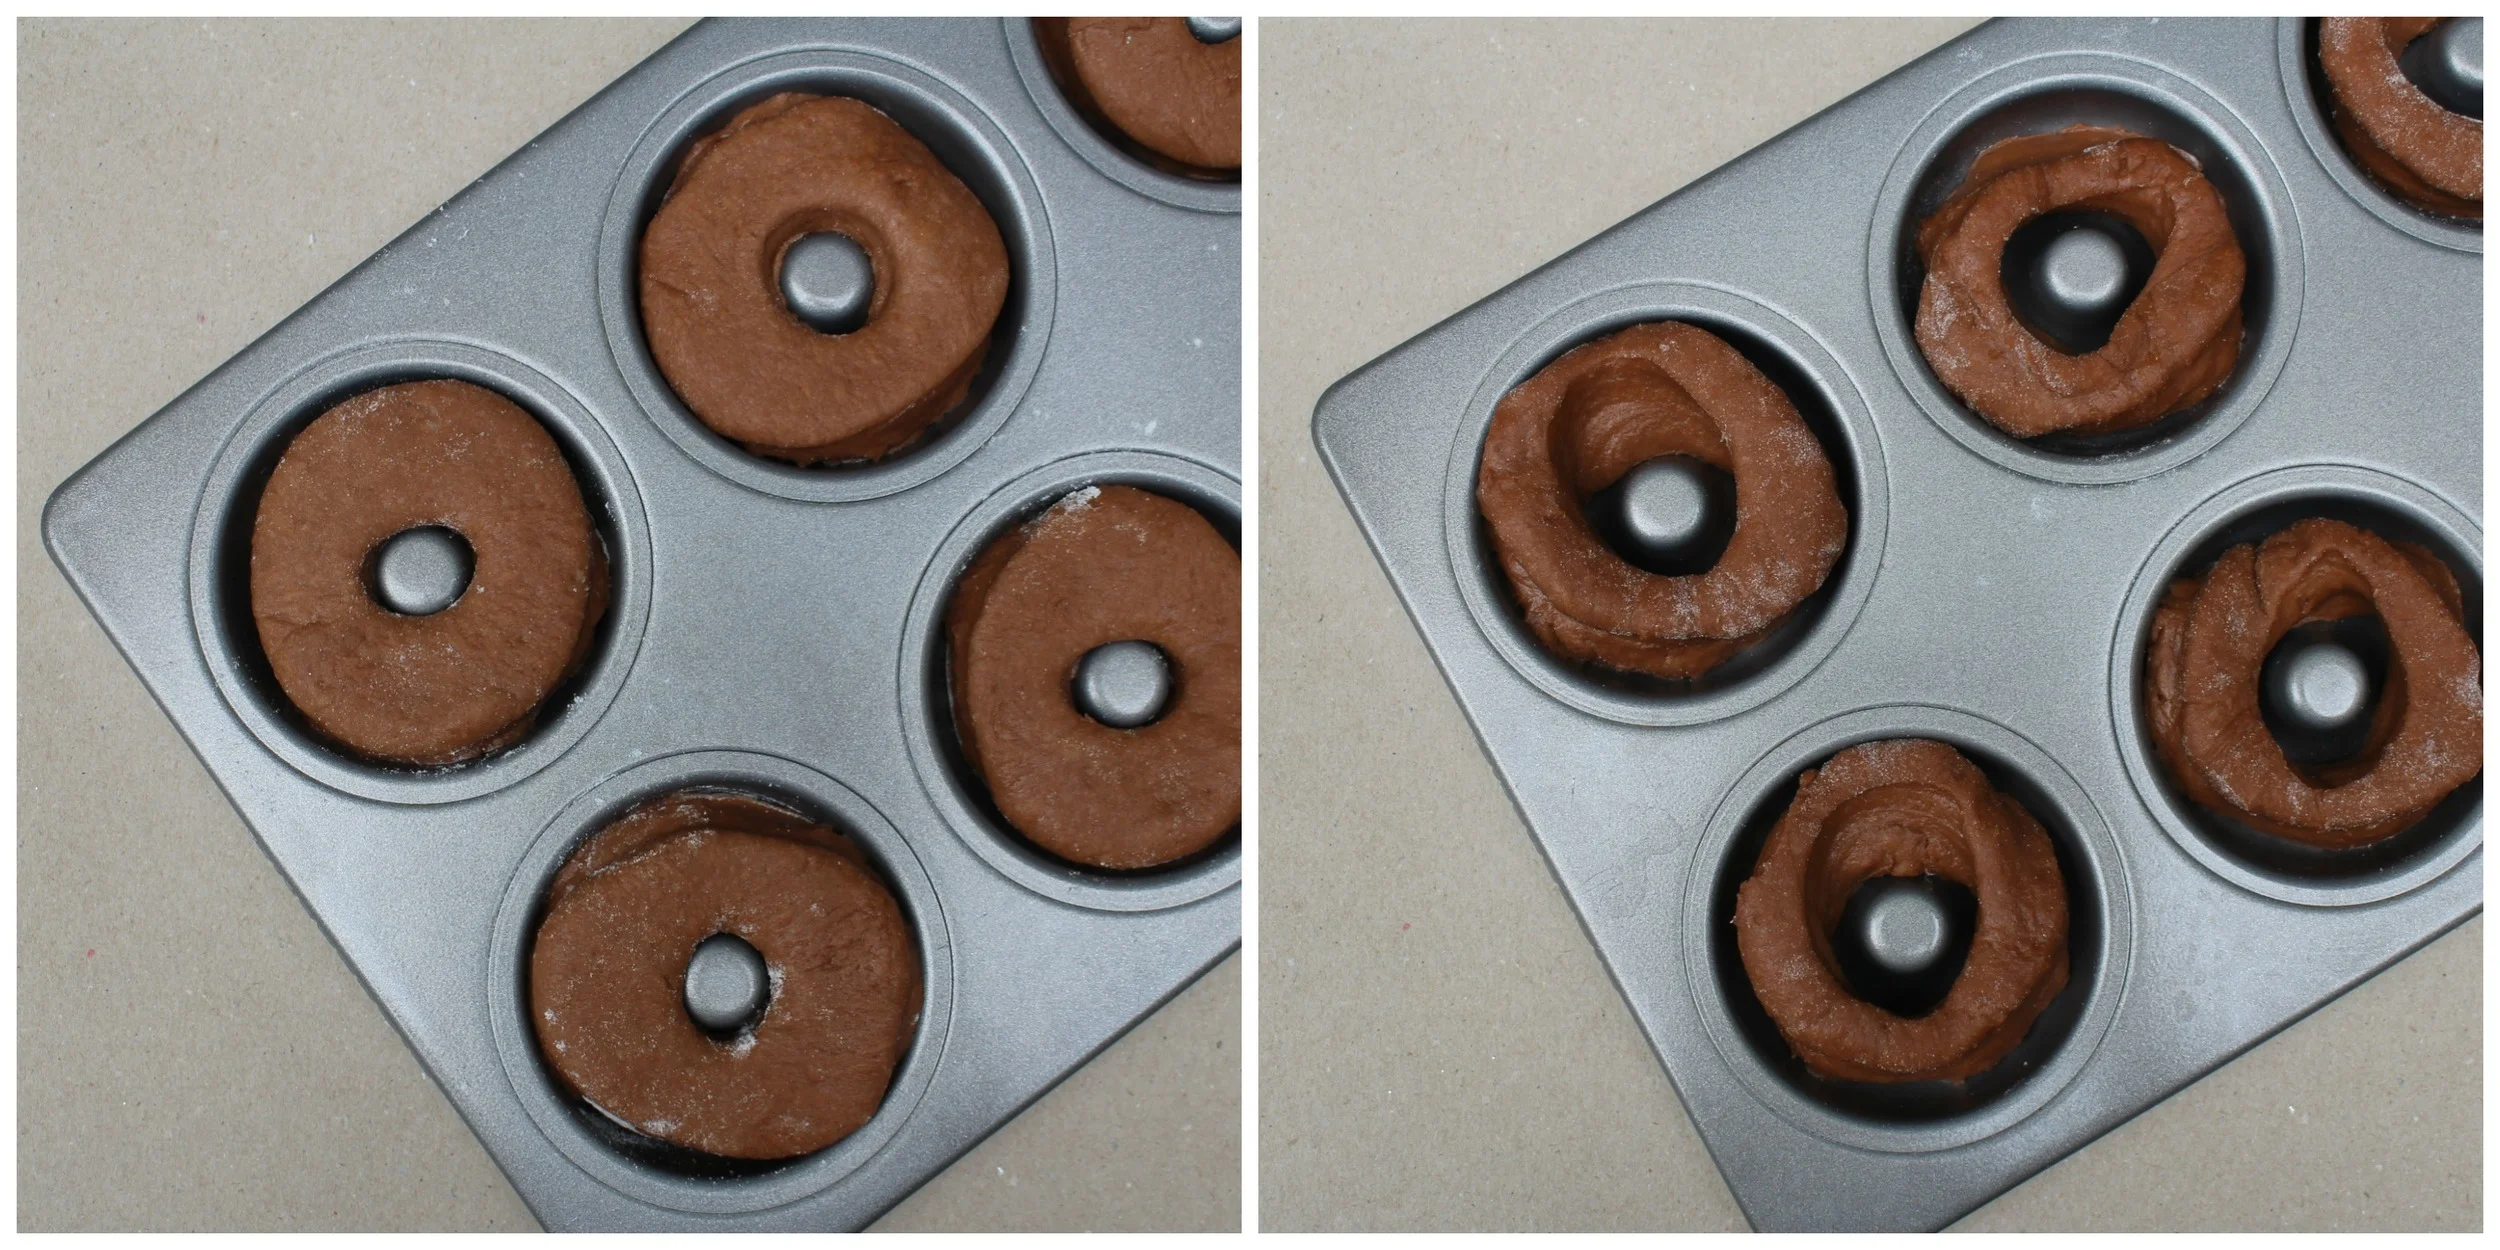
When the dough is tacky to the touch, it's put into a bowl, covered and left for around 2 hours in a warm place until doubled in size. When it's ready, butter a 23cm savarin mold. I didn't have one of these so I used an 8 inch cake tin. You're going to make 30-35 dough balls with your dough so weigh the dough and then work out how much each dough ball should weigh. I kept my scales to hand and weighed out each amount of dough and then formed it into little balls. Then each ball is dipped into melted butter and rolled in a mixture of demerara sugar and cinnamon. By the time I formed my last ball the sugar was a complete gunky mess, clumped together with the butter, but keep going. Then place the balls into your cake tin. My bottom row was 2 balls wide (leaving a hole in the middle as it would have with a savarin mold) and then 1 circle of balls on the top layer.

The dough is left to prove again, lightly covered with some oiled clingfilm, for around 45 minutes. I generally leave my dough to prove for the second time overnight which I did with this bake but you need to ensure that you don't leave it in too warm a place as the butter will melt. I found that happened a little with mine (it didn't affect the final outcome as far as I can tell) but I suggest you place it on a baking tray when proving otherwise you might get a sticky trail when you come to pick it up!

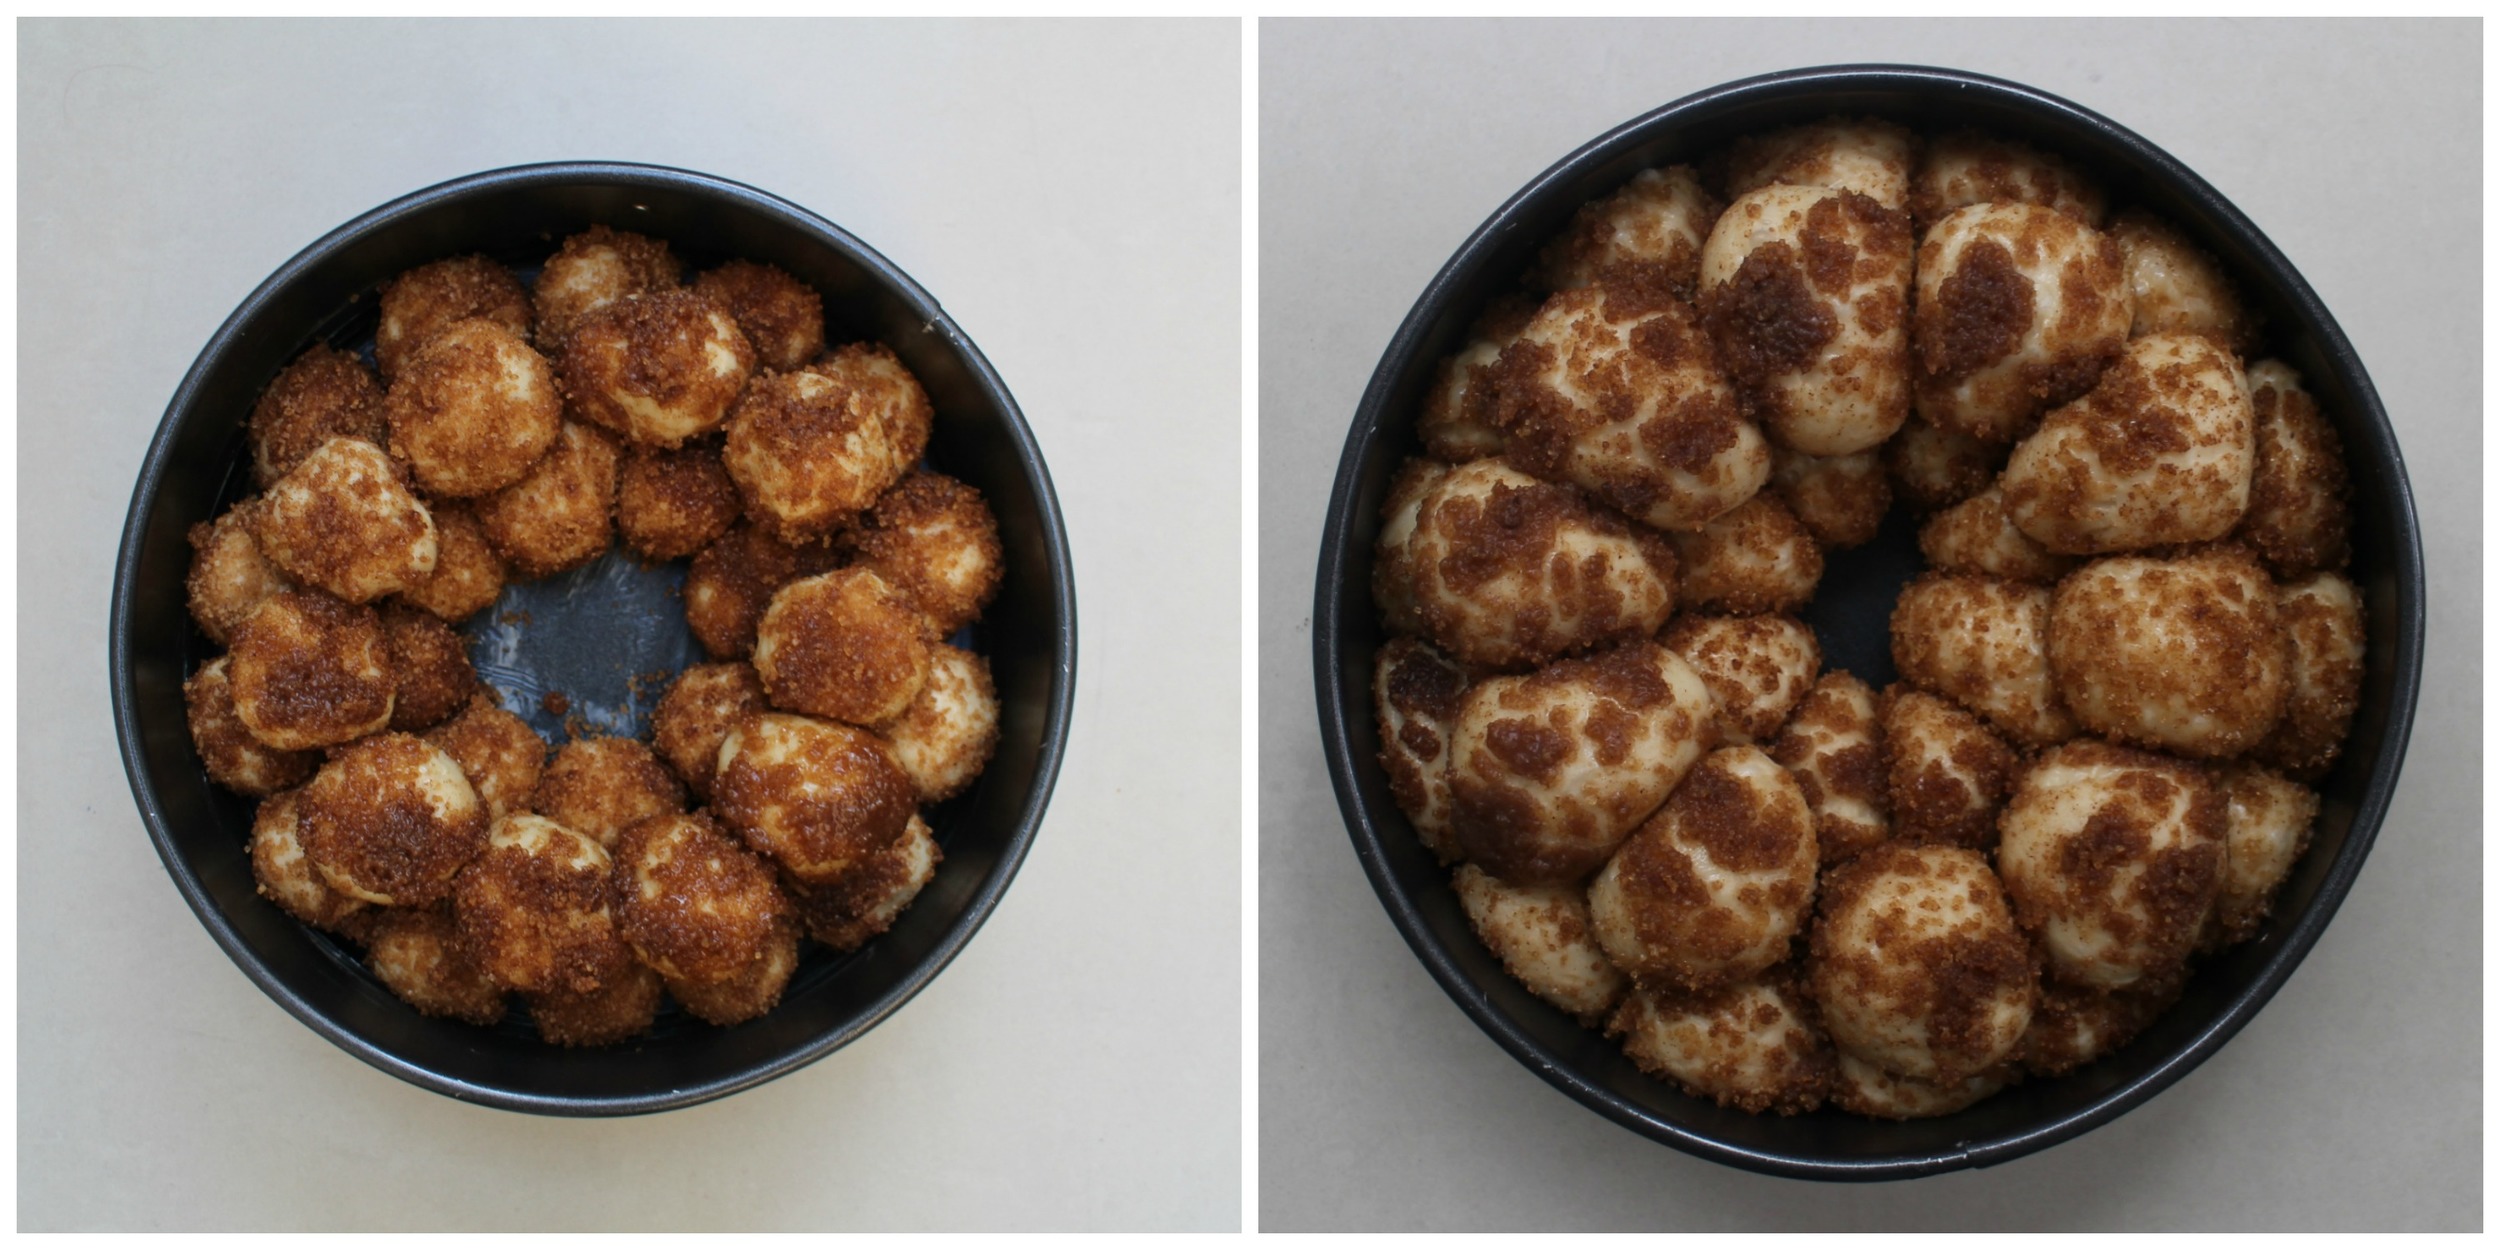
When you're ready to bake it, preheat the oven to 180 degrees. Bake it on the baking tray for around 25 minutes until it's golden brown. I did find that the the middle hole disappeared as it baked and because I wasn't using a savarin mold, the middle dough balls underneath aren't cooked quite as well as the outer ones, so a savarin mold is preferable if you have one to hand, but not absolutely necessary.

When it's out of the oven, it's coated with 100 ml of maple syrup, left for 2 minutes and then turned out on a plate. Mine was pretty sticky and did try to come apart when being lifted from the tin to plate but I managed to get it there in one piece. It's crucial that you remove it from its tin this quickly. Then it's bathed in another 100ml maple syrup.

It is a thing of beauty. Simply delicious and especially good straight from the oven. 

I'm looking forward to trying other variations of Monkey Bread but wanted to try this one first. We are firm maple syrup lovers in this house so I know it will be a big hit when the boys come home.

If there's any left by the time the boys come home ;-)

Maple Syrup Monkey Bread

from James Martin's Sweet

Ingredients

  • 300ML MILK
  • 500G STRONG BREAD FLOUR (plus extra for dusting)
  • 75G CASTER SUGAR
  • 5G FINE SEA SALT
  • 50G SOFTENED BUTTER (plus extra for greasing your tin)
  • 2 TSP FAST-ACTION DRIED YEAST
  • 200ML MAPLE SYRUP
  • 250G DEMERARA SUGAR
  • 1 TBSP CINNAMON
  • 200G MELTED BUTTER

Method

  1. Gently warm the milk in a saucepan until it's warm but not boiling
  2. Place the flour, sugar and salt in a standalone mixer with a dough hook and mix to combine
  3. Add the butter and mix together until you have the consistency of fine breadcrumbs - I did this by rubbing it between my fingertips
  4. Then sprinkle the yeast over the warmed milk and add to the breadcrumb mixture
  5. Mix together with a dough hook on your standalone mixer on a medium speed for around 5 minutes
  6. The dough should be soft, sticky and shiny and tacky to the touch but definitely not dry
  7. Place the dough in a bowl, cover with clingfilm and leave it to prove for 1-2 hours until it's risen, spongy and doubled in size
  8. Then butter your savarin mold (23cm) or cake tin (20cm)
  9. Turn out your dough onto a lightly floured surface and knead for 1 minute
  10. Weigh the dough and divide it by 35 and then make 35 dough balls of equal size
  11. Mix the demerara sugar and cinnamon in a bowl
  12. Dip each dough ball into the melted butter and then coat in the sugar mixture
  13. Place it in the mold/baking tin - I had enough for 2 circles (one inside the other) on the bottom of the tin, leaving a hole in the middle, and then another circle on top
  14. Cover with oiled clingfilm and leave to prove in a warm place (not too warm though otherwise the butter will melt) for 45 minutes until the dough is well risen - I left mine overnight
  15. When you're ready to bake them, preheat the oven to 180 degrees
  16. Bake for 25-30 minutes until the balls are golden brown
  17. Remove from the oven and immediately coat the balls with 100ml maple syrup
  18. After 2 minutes, remove the monkey bread from the tin and place onto a plate - it's important to do this now otherwise the bread will stick to the tin and be very difficult to remove without breaking
  19. Once on a plate, bathe the monkey bread in another 100ml maple syrup
  20. And enjoy (but not so much that you eat the entire thing in one sitting!!)


In Bread, Weekend Brunch Tags Monkey Bread, Maple Syrup, Bread, Cinnamon
Comment

Chocolate Doughnuts with Chocolate Ganache

October 23, 2015 Nicola King

It's Friday. It's half term. It couldn't have come sooner.

What better way to celebrate a week off together than with Chocolate Doughnuts. The boys had a playdate so I thought I'd make these doughnuts that I've had my eye on for a while. I made Pumpkin Doughnuts not long ago and both these and the chocolate ones are baked rather than deep fried (I will get to deep frying doughnuts at some point but these seem just that little bit healthier).

This recipe is adapted from one by Manuela Kjeilen who has the most fabulous blog called Passion 4 Baking. Think pink. Think retro kitchens. Think complete inspiration. I've looked through most of her recipes and there are so many things I'd love to make, but one bake that stuck in my mind was her doughnuts.

One of the main ingredients is Jell-o Instant Pudding Powder which is an American product that I dug out in the supermarket when I was in Canada over the summer. I adapted Manuela's Delicious Baked Vanilla Donuts recipe to make a chocolate version so I used the Chocolate Jell-o Pudding Powder in mine. It's fair to say that my baked doughnuts don't look that chocolatey and flavour-wise weren't that chocolatey either so after going to great lengths to get this pudding mix, I think cocoa powder would work well next time. But I'm pretty happy with the results from this first batch.

The doughnuts have yeast in them and their texture is very bread-like. They're left to prove twice which means they need a little longer to make but this really helps give them their fluffy texture. The first batch I made looked like Manuela's but I found that after they'd proved and been in the oven, they expanded so much that they almost joined together and the hole all but vanished. So the ones on the right below were my second batch which don't look as pretty pre-baking, but give the customary hole in the middle and much better post-baking look.

I would say that the doughnuts themselves don't have a huge amount of flavour (which I think would be enhanced by the addition of cocoa powder) so the toppings are really important and I decided to use a rich dark ganache and a helping of sprinkles. I love the flavour of the really rich chocolate ganache and the crunchy little non-appareils.

They take a little more time because of the proving but these are a fun little bake.

And if you're looking for ways to allay half term boredness, then kids would love to be chief decorators :)

Chocolate Doughnuts with Chocolate Ganache Makes 20 (adapted from Passion 4 Baking's Delicious Baked Vanilla Donuts)

Chocolate Doughnut Ingredients

  • 30G BUTTER, MELTED
  • 350ML WARM MILK
  • 7G FAST ACTION BREAD YEAST
  • 150G CASTER SUGAR
  • 1 PACKET JELL-O CHOCOLATE INSTANT PUDDING POWDER
  • PINCH OF SALT
  • 2 EGGS
  • 625G PLAIN FLOUR

Chocolate Ganache

  • 100g WHIPPING CREAM
  • 100G DARK CHOCOLATE, CHOPPED
  • SPRINKLES

Method

  1. Firstly, melt the butter and put aside
  2. Heat the milk so it's warm but not hot and place in a mixing bowl
  3. Sprinkle the yeast over the top
  4. Add the melted butter and mix together
  5. Add the sugar, instant pudding powder, salt and flour
  6. Mix these ingredients together with a dough hook until the ingredients are combined
  7. Add the flour and continue to mix with the dough hook until smooth and elastic (around 8-10 minutes)
  8. Turn the dough into a lightly greased bowl, cover and leave to double in size for around 1 hour
  9. Lightly flour a work surface and then roll out the dough until it's around 1 cm thick
  10. I used the Wilton Mini Doughnut Pan so found that a 6cm cutter and 3.5cm piping nozzle were the right sizes for this
  11. Put these doughnuts into the pan, cover with a clean cloth and leave for an hour
  12. Preheat the oven to 170 degrees (fan)
  13. Bake the doughnuts for around 8-10 mins until golden brown on the outside
  14. When ready, turn out the doughnuts onto a cooling rack
  15. Make the ganache by heating the cream until it's just boiling and then pour over the chocolate slowly
  16. Leave for few minutes and then stir together until all the chocolate lumps have disappeared
  17. Hold one of the doughnuts upside down and swirl it in a circular motion in the chocolate until you have an even coating on the top (use a spoon to help spread this if needed)
  18. Top with your favourite sprinkles :)


In Bread, Everyday Cakes Tags Doughnuts, Chocolate, Ganache, Sprinkles, Bread
Comment

Raspberry Swirl Brioche

September 18, 2015 Nicola King

So I loved the last, my first, brioche that I made. But I've read about other ways of proving this lovely sweet dough and wanted to try a different recipe. I saw a Pin for this lovely Raspberry Swirl Brioche from Hint Of Vanilla which drew me in and although it has more stages than my last brioche, I knew I wanted to try this one next.

This recipe uses very exact quantities of ingredients, in particular the eggs which need to be weighed. The first addition was around 2 eggs. The mixing of initial ingredients is all very straightforward, but then it came to full gluten development (* this is when you stretch a little dough between 2 fingers and it should be so elastic that you can see through it without it breaking) I wasn't sure how long this would take and it actually took around 15 - 20 minutes in a mixer with the dough hook to get there. This heats up the mixture so after the final egg addition, I measured the temperature and it was 25 degrees (needs to be less than 27 degrees).

The fermenting was again pretty straightforward and then I transferred the dough to the fridge. The recipe suggest between 1 and 12 hours - I left mine for around 1.5 hours. When it came out of the fridge it's rolled into a rectangle and covered with a gorgeous Raspberry Smear. Now this smear is absolutely delicious. A raspberry flavoured butter that is rich and creamy. Megan made her smear with powdered raspberry and since I didn't have any of this I used a tube of freeze-dried raspberries that I blitzed in the food processor (then sieving the powder to remove the remaining raspberry seeds) and mixed this with butter, sugar and lemon juice. I also didn't have vanilla sugar so I just used regular caster sugar.

Then it came to the plaiting. I was to leave 2 inches at the top (which I measured!) but I think I should have cut it a little higher as I didn't get the raspberry ribbons successfully through that part; and also I should have plaited it much tighter as Megan's raspberry ribbons are really visible and mine not so much. When it proves again for the final time, Megan suggest 1.5 - 2 hours until it's doubled in size. I check mine after a few hours and it hadn't risen too much so I left it overnight and it had a lovely rise by the morning. I also see the added benefit of this is that you can bake it fresh for breakfast and eat it warm from the oven. Yum :)

I also forgot to glaze the brioche with egg wash before going in the oven. Doh! (or should that be *dough*!!) I didn't get the usual lovely shiny top customary of a brioche but I will not forget my egg wash next time! Also a warning that you do really need to let it cool a little before trying to get it out of the tray. If mine (tin-less) looks a little misshapen it's because I decided I needed it out of the tin the moment it was from the oven which also meant it collapsed a little...

This brioche was absolutely delicious. So delicious that I'm thinking of making another one this week. Hmmm...what flavour combinations to try next? Or maybe just a plain simple brioche that everyone can dress as they like. The possibilities are endless.

In my quest to perfect my bread-making, I am going to keep reading up on brioche recipes but this one is definitely a keeper :)

Raspberry Swirl Brioche (from Hint Of Vanilla)

Brioche Dough

  • 335G BREAD FLOUR
  • 9G SALT
  • 50G SUGAR
  • 4G INSTANT DRIED YEAST
  • 78G WHOLE MILK AT ROOM TEMPERATURE
  • 135G EGGS AT ROOM TEMPERATURE
  • 2G VANILLA EXTRACT
  • 170G UNSALTED BUTTER (this needs to be softened slightly so it's pliable, but if it's too soft you should refrigerate it again)

 Raspberry Smear

  • 100g UNSALTED BUTTER AT ROOM TEMPERATURE
  • 7G RASPBERRY POWDER (I used a tube of freeze dried raspberries that I blitzed in the blender although this only made 5g raspberry powder)
  • 30G VANILLA SUGAR (or regular caster sugar)
  • ½ LEMON, JUICED

Brioche Method

  1. Combine the flour, salt, sugar, and yeast in a bowl
  2. In a mixer, combine the milk, vanilla extract and 117 g of the eggs and stir to combine
  3. Pour the dry ingredients on top and mix on low speed until just incorporated
  4. Add 1/3 of the butter and switch the mixer to medium speed
  5. Ensure the butter is fully incorporated and add the next 1/3 butter
  6. Repeat with the final 1/3 butter
  7. Continue to mix until full gluten development is achieved*
  8. Add the remaining 18g of egg and mix until just incorporated (keep the remaining egg for the egg wash before baking)
  9. Check the temperature doesn't exceed 27 degrees (insert a thermometer in the middle and check this)
  10. Remove the dough and place on a lightly floured surface, cover it with plastic wrap and leave it to ferment for 45 mins
  11. Transfer the dough to a baking tray lined with silpat or greaseproof paper, wrap it with plastic wrap and refrigerate for 1 - 12 hours.
  12. To make the Raspberry Smear, mix all the ingredients together until you get a smooth pinkish butter
  13. Grease a bread tin
  14. Roll out the brioche into a rectangle 12 inches by 6 inches, keeping it all as straight as possible
  15. Cover the whole surface with the Raspberry Smear
  16. Tightly roll the brioche from the long side and trim both ends
  17. Cut the dough in half along the length leaving around 2 inches at one end
  18. Twist the two lengths so the cut sides are facing up
  19. Gently braid the dough by putting the left-hand one over the right, then keep repeating until you get to the end of the dough and press the end together
  20. Carefully tuck the ends of the loaf under and put it in the bread tin
  21. Cover with plastic wrap and let it prove the bread for 1.5 - 2 hours until doubled in size (or leave overnight) in a cool place
  22. When you're ready to bake it, preheat the oven to 170 degrees celsius
  23. Brush the top of the brioche with eggwash
  24. Bake the loaf for 16 minutes then lower the temperature to 160 degrees and bake for around 30 minutes until the loaf is golden all over
  25. Remove from the oven and let it cool for 10 minutes
  26. Transfer to a cooling rack and let it cool completely
  27. Try not to eat it all at once!!
In Bread, Weekend Brunch Tags Bread, Raspberry
Comment

Swedish Cinnamon Buns

May 13, 2015 Nicola King

I've never had much success making dough. So many people tell me it's really easy, but for some reason, mine never seems to work out that well. I love eating it, so I guess I'm just going to have to knuckle down and practice a lot to get good at creating it too! I found this pin on Pinterest from Cakelets and Doilies with these gorgeous Swedish Cinnamon Buns. Belle's blog is full of delicious bakes that look simply stunning. And I LOVE cinnamon buns! Win, win. I've put aside my fear of yeast to give these little buns of delight a go.

The recipe is very straightforward and instructions clear. I really like each little bun in its own wrapper, but this would also work if you popped them into a round baking tin and cooked them together as a pull-apart round. The biggest skill you need to learn is patience whilst the dough proves twice, but it's definitely worth the wait. I was a little concerned about the cardamom as I'm not a huge fan especially when you get a bite of one in a curry. However the cardamom enhances the flavour of the milk without being overwhelming so it's definitely worth keeping this in. Even though I had my trusty tape measure to hand, my buns were a little uneven in size but that's just more practice needed and doesn't affect the taste of them at all. They are definitely best served warm and for me,  are enhanced by the addition of maple syrup soaked through to keep them a little more moist.

These really are delicious and I'm delighted to say this is my most successful yeast bake EVER. Yay! Can't wait to try them out on the boys later :)

Swedish Cinnamon Buns Makes 12 (from Cakelets & Doilies)

Bun Ingredients

  • 300ML WHOLE MILK (I used semi-skimmed milk as this was what I had to hand)
  • ¼ TSP GROUND CARDAMOM
  • 50G BUTTER, CHOPPED
  • 425G PLAIN FLOUR
  • 7G FAST ACTION YEAST
  • 60G CASTER SUGAR
  • ¼ TSP SALT
  • 1 EGG, BEATEN LIGHTLY 

Filling Ingredients

  • 75G BUTTER
  • 50G DARK BROWN SUGAR
  • 2 TSP CINNAMON
  • ½ TSP SALT 

Topping Ingredients

  • 1 EGG, BEATEN LIGHTLY
  • SLIVERED ALMONDS

Method

  1. First of all, to make the buns, put the milk and cardamom in the small saucepan and heat it until it's almost but not quite boiling
  2. Remove from the heat and stir in the butter, then leave to infuse until it's just warm
  3. Put all the dry ingredients into a mixer fitted with a dough hook and then add the milk and egg
  4. Combine all the ingredients with the dough hook on a slow speed for around 10 mins (the dough should be pulling away from the sides of the bowl by now)
  5. Lightly grease your hands and a bowl - shape the dough into a ball and place it in the bowl, then cover it with clingfilm
  6. The dough should be left somewhere warm and draught-free and you want it to double in size which should take around 30 mins to an hour (mine took around 45 mins)
  7. Press the dough with your fingertip and your finger should leave a slight indentation when it's ready
  8. Now make the filling, by melting the butter and then setting the bowl aside
  9. Combine the dark sugar, cinnamon and salt in a separate bowl
  10. When the dough is ready, punch the middle of it to deflate the dough and then cover it again with clingfilm and leave it for 5 mins
  11. Then roll the dough out on a lightly floured surface to make a rectangle roughly 60cm x 25cm
  12. Brush the dough with butter and then evenly sprinkle the sugar mixture over the top
  13. Roll the dough from the long end tightly like a swiss roll and you should end up with  very long sausage shape where the seam is underneath
  14. Cut off the ends and discard
  15. Cut the roll into 12 equal slices
  16. Put 12 muffin wrapper into a cupcake | muffin  tin and then pop a slice into each one, side up so you can see the swirl of the cinnamon on the top
  17. Cover the muffin tin loosely with clingfilm and proof for the second time, again until the dough has doubled in size which should take another 30 mins to an hour
  18. Press the dough with your fingertip and your finger should leave a slight indentation when it's ready
  19. Heat the oven to 180 degrees (fan)
  20. Brush the top of each cinnamon bun with the beaten egg and then the slivered almonds
  21. Bake for 25 mins or until golden brown
  22. Enjoy with a drizzle of maple syrup :)
In Bread Tags Bread, Cinnamon, Weekend Brunch
Comment

To subscribe, please enter your email address:

Delivered by FeedBurner

Yay for the weekend!! If you saw how I made pineapple flowers earlier this week, here they are adorning my very first Hummingbird cake. I am totally in love with them! I also added a few @edible_flowers to complement them and this makes the perfect w
I was so grateful to be #gifted some beautiful @cotswoldflour flour recently with a challenge to make something from my #bakingbucketlist and so I set about making a Nutella babka and scrolls with them. I’ve had a mixed love affair with bread m
I found the cutest miniature pineapple in the local petrol station co-op so decided to make these roasted pineapple flowers. I think they’re so pretty and remind me of lovely sunflowers. I thought they’d go well with a Hummingbird cake so
We had great fun baking this Malteser Millionaire’s Shortbread which is absolutely delicious! This was something the boys wanted to bake - who can resist a delicious shortbread base, topped with gooey caramel and then a final layer of swirled m
As the rain and clouds returned to our skies this weekend, we’ve been looking for comforting lockdown treats. These Blackberry & Star Anise Friands, dripping with sticky blackberry juice icing are the perfect choice 💗 The recipe is from Sw
You might have seen from my Stories this weekend that I made cinnamon buns. I don’t have the best track record with bread but I’m overcoming my inner fear! These buns were so delicious. It was an amalgamation of a few recipes but the base
  • Serendipity Bakes
    Coconut & Raspberry Friand Muffins
    May 29, 2019, 9:38 PM
  • Serendipity Bakes
    Thank you for sharing my photo of your delicious recipe 😋 @rkhooks Happy Sunday! https://t.co/niKamgfjvt
    Mar 3, 2019, 2:38 PM
  • Serendipity Bakes
    RT @BiscuiteersLtd: Our friends at @thewhitecompany asked us to design something special to celebrate their New York stores first birth… https://t.co/kTsMH57wRv
    Jun 28, 2018, 11:09 AM

Enter your email address:

Delivered by FeedBurner

Powered by Squarespace

Nicola King at Serendipity Bakes Follow my blog with Bloglovin Follow