• About
  • Blog
  • Recipe Index
  • Your Celebrations
  • Contact Me
Menu

Serendipity Bakes

Street Address
City, State, Zip
Phone Number

Your Custom Text Here

Serendipity Bakes

  • About
  • Blog
  • Recipe Index
  • Your Celebrations
  • Contact Me

Chocolate Celebration Cake

January 15, 2016 Nicola King

So this has been a busy week of baking and not much time to blog post so I am definitely playing catch-up - and we’re only half-way through January! I don’t often blog about my celebration cakes but I had lots of fun with different techniques for this cake so I thought I would share some of the elements that went into making it.

This was made for the husband of a dear friend and I usually make cakes covered in fondant for them. But this time we decided to go for something a bit different and this chocolate ganache drip cake was born. I made a 7 inch Chocolate Truffle Torte, split it into 3 layers and then filled and covered it with Chocolate Ganache Buttercream before adding a Chocolate Ganache drip. This is not for the chocolate faint-hearted as within its celebratory exterior, 725g dark chocolate lurks within – but I’m a firm believer that birthday cake calories definitely don’t count ;-)

Katherine Sabbath is the queen of these drip cakes with an array of fabulous colours. There is a great blog post of Katherine’s tips for styling these drip cakes from Delish here including some mini video footage that I love referring to when making these cakes.

So when you come to decorate the cake, you can use whatever comes to hand. Maracons, chocolate bark, sweeties and chocolates you have in the house, pretzels – the list goes on. As this was a special birthday cake, I wanted to make three decorations that were in keeping with the brown and gold theme. Sugar Glass, Meringue Bark and Honeycomb.
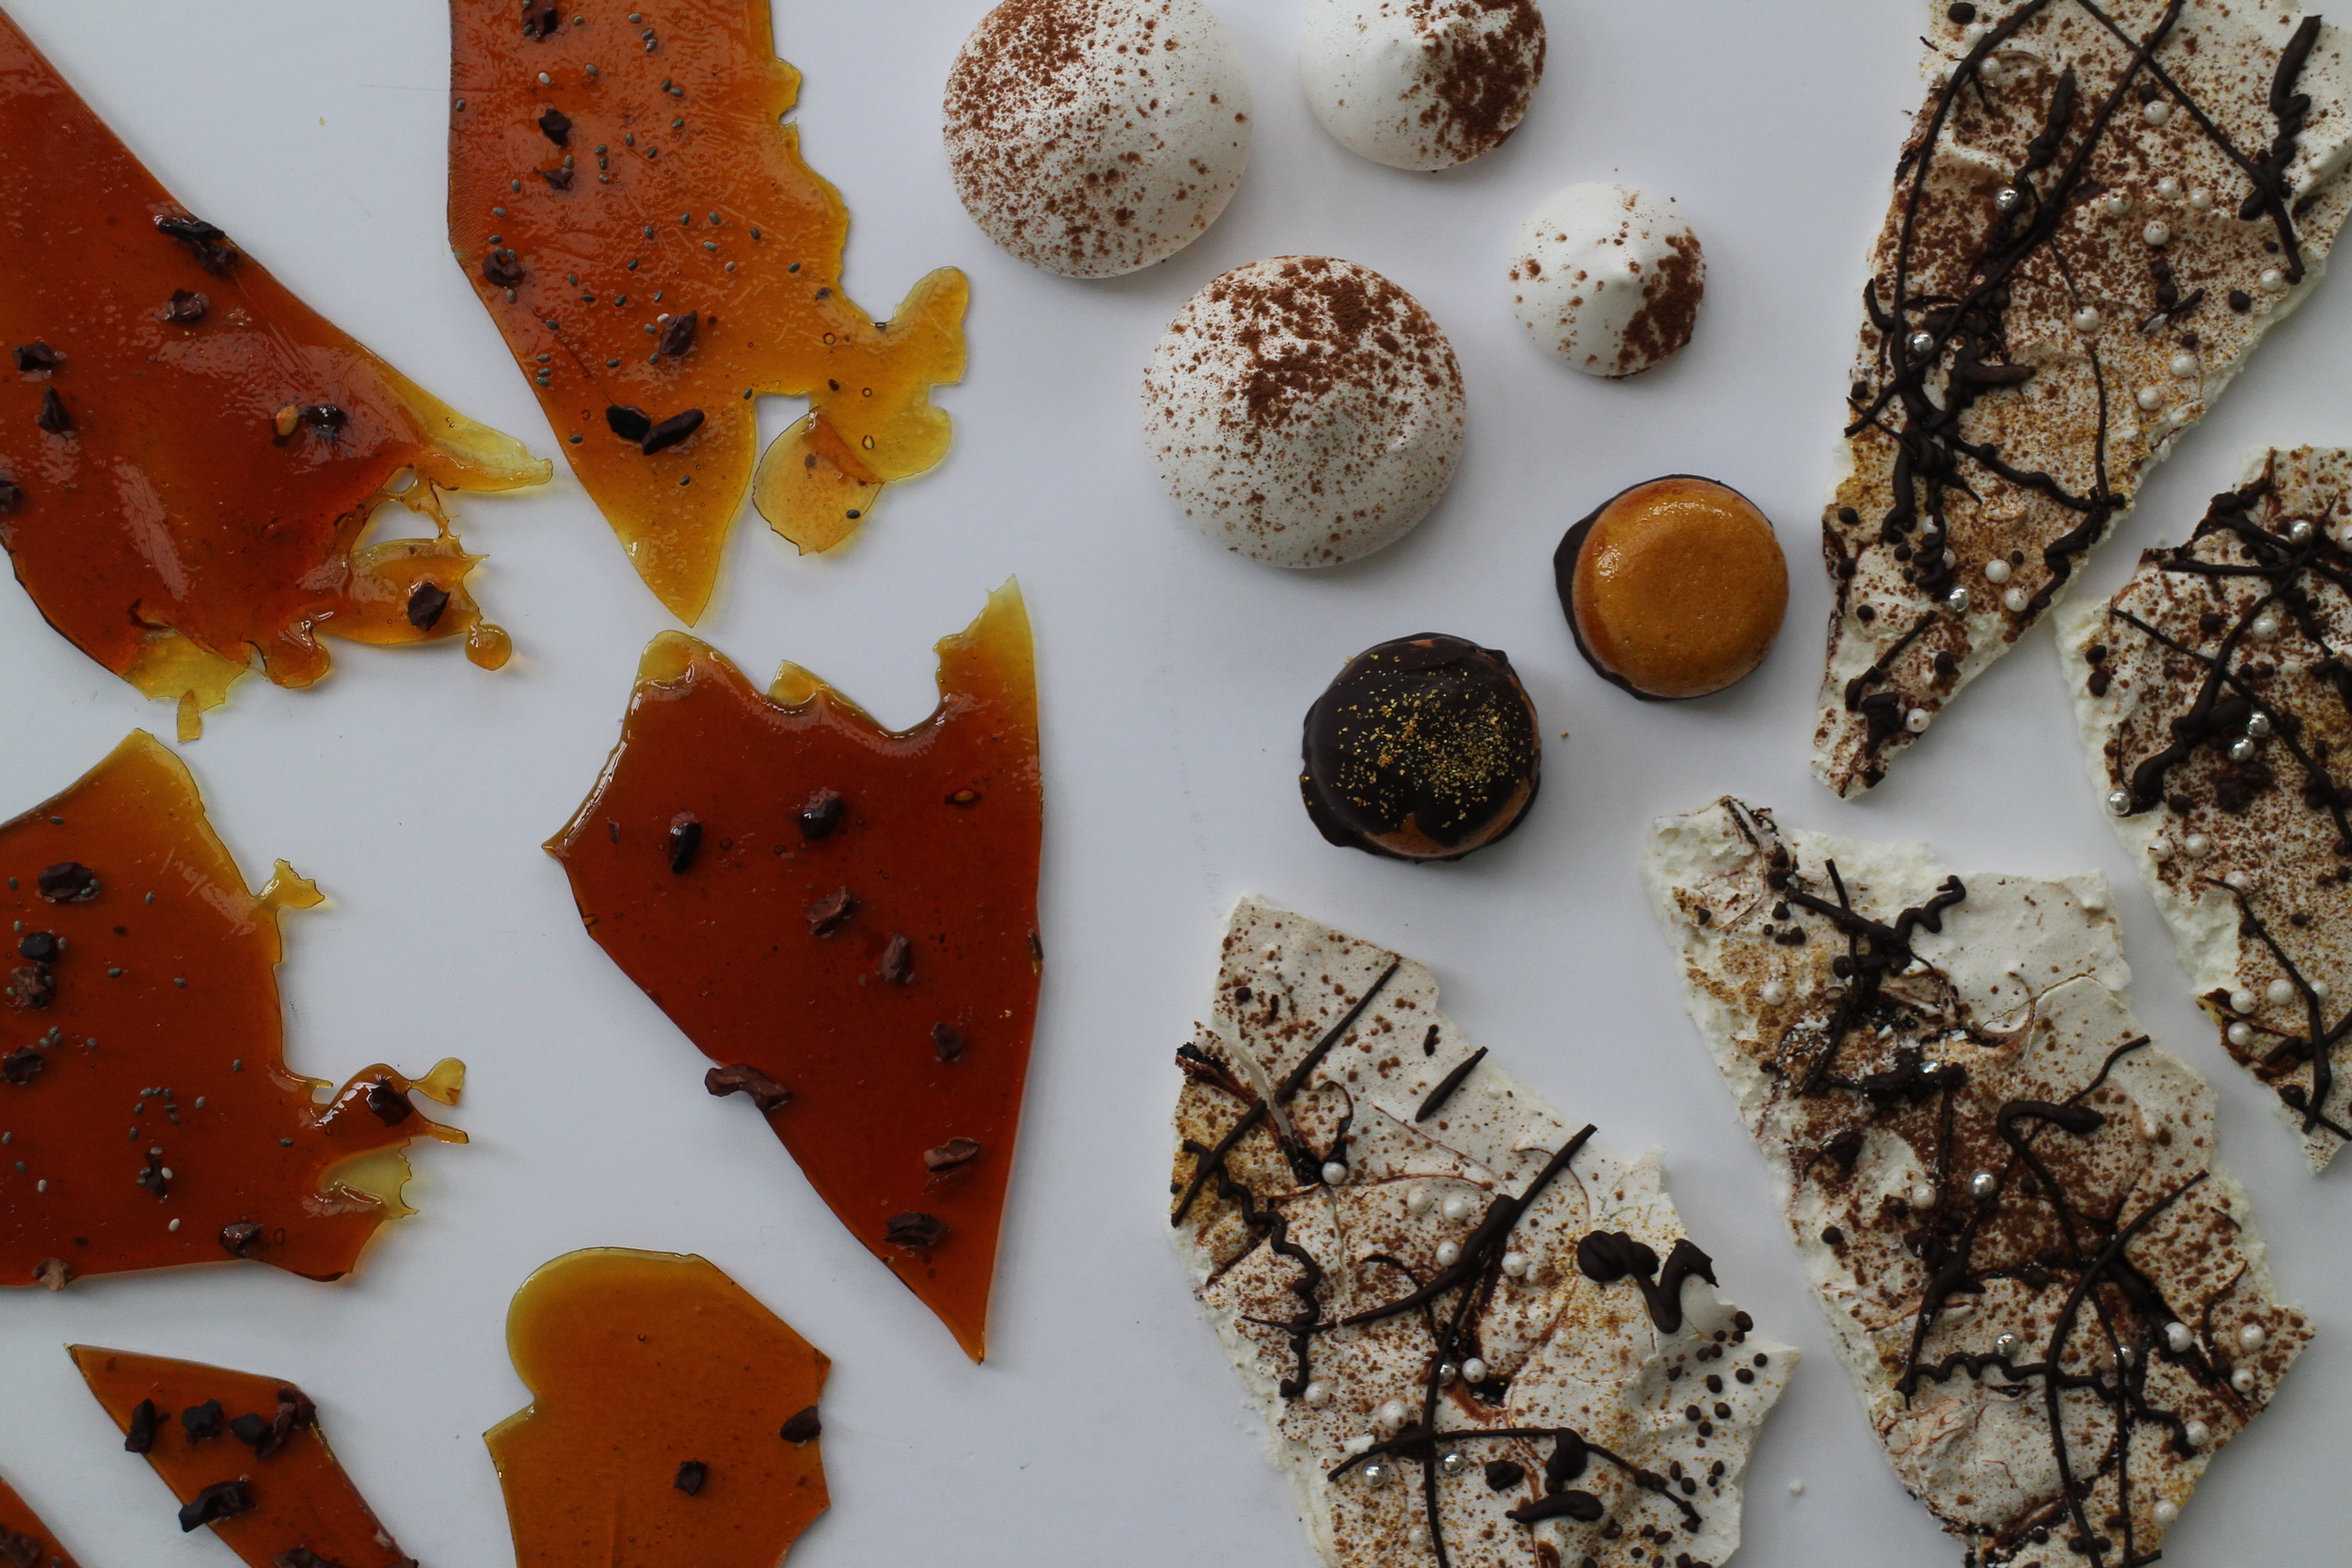
Sugar Glass


The glass is made from sugar and cocoa nibs. It’s very easy to make with just these two ingredients.

Ingredients

  • 200G CASTER SUGAR
  • 2 TBSP COCOA NIBS (or any other toppings you think would look good in the glass)

Method

  1.  Melt 200g caster sugar in a saucepan over a low heat
  2. By the time all this sugar has melted, it should have turned a lovely caramel colour and be time to take it off the stove
  3. Poured this on a baking tray lined with silpat and spread it out with a spatula - this is the time to create swirly edges that will be really interesting when you come to break it into shards
  4.  Pop it in the fridge and let it set
  5. Once set, break it into different shaped shards

Note: once set and out of the fridge, it can go a bit sticky in room temperature so break it up straight from the fridge and store it covered and in a cool place.

Honeycomb

Crunchies remain one of my favourite chocolate bars - and I was so excited the first time I made honeycomb. I've had my share of misses now with the temperature of honeycomb (making delicious toffee in the process!) so now I always use a thermometer and don't chance getting the state of readiness wrong by the colour alone.

I usually make a block of honeycomb and then break it up and coat it with chocolate. This time I wanted to see if I could made shaped honeycomb sweets by pouring it into molds. Due to the speed of the stage when the bicarb is added and then getting it into the tin, I had time to take 6 teaspoons of the honeycomb and get them into the molds. By the time I got the remaining mix into the bigger tin, it was deflated. It still tasted good when it was set but had lost its volume. I wasn't too concerned about this as I wanted to blitz the honeycomb to make a fine crumb that could be sprinkled across the cake.

Ingredients

  • 200G CASTER SUGAR
  • 100G GOLDEN SYRUP
  • 2 TSP BICARBONATE OF SODA

Method

  1. Grease the tin and line it with baking parchment
  2. Heat the caster sugar and golden syrup over a low heat until the sugar has dissolved (around 10 minutes) - it can be stirred at this stage but no stirring as soon as the sugar has dissolved!
  3. Pop in a candy thermometer and heat the sugar to 160 degrees celcius
  4. When the temperature's reached , remove it from the heat and quickly stir in the bicarb until it's fully mixed in
  5. At this stage, I scooped out 6 teaspoons of the honeycomb and put them into a silicone candy mold (each cavity had 1 teaspoon) - if you're just making one block, then pour it all into the prepared baking tin
  6. Leave to set at room temperature
  7. Once set, this can be broken up into pieces
  8. To cover with chocolate, melt the chocolate in the microwave, removing it when the chocolate is almost but not quite melted and then stir until melted completely
  9. Dip the honeycomb pieces into the honeycomb or fully immerse them using a fork and then leave to set on a piece of baking parchment
  10. To make the honeycomb dust to sprinkle on the top of the cake, take some honeycomb (without chocolate) and blitz it in the food processor until you reach your desired level of consistency

Meringue Bark

from the Meringue Girls Everything Sweet

I love meringue. My very favourite treat is macarons but I love how versatile meringue is in creating edible prettiness. I saw this in the Meringue Girls Everything Sweet and wanted to try Meringue Bark rather than Chocolate Bark. It’s the same recipe as their kisses, just treated a little differently.

Ingredients

  • 150G CASTER SUGAR
  • 75G EGG WHITES (I use Two Chicks)
  • DECORATION (these can be customised to your favourite sweeties and toppings)
    • For example, Cocoa Powder, Pearl Balls, Silver Nonpareils, Chocolate Covered Popping Candy, Melted Dark Chocolate

Method

  1. Pre-heat the oven to 200 degrees (fan)
  2. Line a baking tray with greaseproof paper and spread out the sugar evening across it
  3. Bake for 7 minutes in the oven
  4. In the meantime, whisk the egg whites in a standalone mixer, slowly at first and then increasing the speed – you want the egg whites to reach stiff peak at the same time as the sugar’s 7 minutes in the oven is up
  5. Put the mixer on full speed and add the hot sugar a spoonful at a time, allowing each spoonful to be fully incorporated and return to stiff peak before adding the next one
  6. When all the sugar has been added, mix for at least 5 minutes until you can rub a little of the meringue between your thumb and forefinger and it no longer feels grainy
  7. Turn the oven down to 100 degrees (fan)
  8. If you’re making meringue kisses, put your mixture into a piping bag and pipe rounds onto a lined baking tray, pulling up at the end to create a little peak
  9. These should take around 40 minutes in the oven and are ready when the meringue can be removed cleanly from the baking paper
  10. If you’re making meringue bark, spread the meringue out over a lined baking tray until it’s 0.5cm deep.
  11. Add any decorations you like right now – I used a sprinkling of cocoa powder, pearl balls, silver nonpareils and chocolate covered popping candy
  12. Bake for 1 hour until the meringue bark can be lifted cleanly from the baking tray
  13. When it’s cool, drizzle melted dark chocolate across the bark
  14. When the chocolate has set, break the meringue into shards of different sizes


In Celebrations Tags Chocolate, Ganache, Drip Cake, Celebration, Birthday, Meringue, Sugar Glass, Honeycomb
Comment

Tanks and Rugby

June 7, 2015 Nicola King

Every cake I make challenges me in a new way. I sometimes needs to remind myself that I'm pretty new to celebration cakes (and making them for other people) and could maybe be a bit easier on myself. But the internet now is rich with amazing cakes and creations which inspire me, but make me want to create something equally magnificent.

This week I had the opportunity of making a Rugby World Cup Cake for a 7 year old where the brief included a replica rugby ball and having the logos of all the teams from the World Cup 2015 featured in the design. I found Cake Toppers who specialise in making edible cake toppers from your supplied images which worked very well for the logos. I produced an A3 sheet of logos and then cut down the images by hand to feature them on the cake and board. The rugby ball was made from rice crispy treats (rice crispies, butter and marshmallows mixed together and moulded into shape), then covered in fondant and decorated by hand with a mixture of cut-out letters, edible pens and coloured fondant. I was really happy with the result. The base board was the largest one that I could find which was 20 inches so it was a big board and a big cake!

The other cake I made was a Survival themed cake for a shared party of three boys. They wanted a tiered cake with a model tank on top and their names on dog tags. I'll come on to talk about the challenges with making camouflage fondant (!) but this had a hand-painted bottom tier and an airbrushed top tier - and I'm still completely in love with my Dinky Doodle airbrush and the finish that airbrushing gives a cake. The tank was made from rice crispy treats covered with fondant and then airbrushed. I found some cute letter stamps in Hobbycraft and I thought the font would work really well for this so it's always worth checking out other departments as you can find lots of little treasures, often with a lower price tag than anything connected with baking fetches these days.

So as well as every cake challenging me, it's always a first time for something. This week was first time I've made two celebration cakes in one week.

So what's it taught me?

Well, for one thing planning is key. The more you can get done earlier on in the week, the better for when you come to make the cake. I was extremely thankful that I made the rice crispy models (rugby ball and tank) ahead of time and finished the rugby ball before even starting on making the cakes themselves.

If you try something and it doesn't work, keep persevering until you get it right. Camouflage fondant seemed so straightforward in principle (and I even found a great pin on Pinterest for how to make it) but it didn't work (twice) and when I sat looking at the bottom tier at 10pm the night before pick-up, it was clear that it spectacularly DIDN'T work. Time to rip off the fondant, re-frost the cake, set it, re-cover it and then paint the camouflage design by hand. I was so happy that I made the call! The image below shows the first way I tried to make this (pre-rolling) and the second one was my hand-painted finish.

And finally, I see cake makers often working through the night and think to myself that I couldn't do that - I love my sleep too much. But the truth is that if you're going to take on multiple cakes that need delivering on the same day, sometimes you're going to have to work through the night to get them done. I actually found my groove dancing around the kitchen at 1am, 2am, 3am finishing details (although late night decorating is clearly not good when your manage to airbrush your kitchen green as well as your cakes and stain your children's feet green the next morning when they come down to breakfast!) 

I have a few weeks coming up where I need to produce two cakes so this has been a great induction into the process. It's taught me how much can be achieved and a little more about the process that goes into making multiple cakes. I know some cake artists can produce four or five cakes a week - you amaze me, people! 

Hope you've all had a wonderful weekend - whether enjoying your own birthday parties or just the sunshine :)


In Celebrations, Techniques Tags Cake, Birthday, Rugby, Tanks
Comment

Happy Minion Birthday Cake

May 16, 2015 Nicola King

I love minions! I mean, who doesn't love the little yellow bundles of fun and they're such a happy choice for a children's birthday cake. I had a request for a small (!) birthday cake this week and I promise, I promise, it did start out small! It was for a joint birthday with 3 other boys so they didn't need a huge cake and so I thought hmmm, a 7 inch cake would be perfect. Not too big, not too small. But then I had to make two times the 7 inch cake to get the height and when it was buttercreamed and covered in fondant, it was pretty large. Um, over 2½ kg fondant on this one. And that's a 12 inch board. Maybe not quite as small as I had originally planned!

I'm playing with the best way to cover cakes at the moment and have been experimenting with airbrushing them (starting off with my Darth Vader cake last week). The reason for this is that you're then only covering a light external layer with food colouring and not right the way through the fondant itself as these vibrant colours (like the black of Darth Vader and the yellow of the Minion) need a lot of additional colour to get the richness. Although after I'd knocked over my bottle of yellow airbrush paint for the second time, I was cursing my choice - although this was then tempered by the therapeutic airbrushing so all was well in the end.

The cake itself is vanilla cake with raspberry jam and butter cream and contains two 7 inch cakes stacked with a board half-way through. The base board was covered with fondant, then impressed with a woodgrain effect and handpainted with airbrush paint (I find the Culpitt brand works well for this), finished off with some washi tape.

I really love this cake. But then it's hard not to love a minion :)

In Celebrations Tags Cake, Vanilla, Birthday, Minions
Comment

May The Force Be With You!

May 9, 2015 Nicola King

I always love making cakes for friends and this weekend had the pleasure of making the birthday cakes and cookies for a very special family friend. I asked him a while ago what he'd like and he told me that the theme had to be Star Wars. So I asked him who was his favourite character. He said all of them! We decided that cupcakes of different characters would be the way to go - cupcakes are so easy for a kid's birthday party as they're ready-made helpings and there's no waiting for the cake to be served -but it would also be good to have a cutting cake and that should be Darth Vadar. The challenge was set!

The cupcake toppers took a day to make and I made them two days out. I looked for photos of the Star Wars cast and then I created rough sketches of the characters I wanted to include and then turned those that needed it, into templates to cut around the fondant. The fondant was stiffened with some tylose powder which helps them keep their shape. The chosen cupcake flavour was vanilla with vanilla buttercream and this was made one day out and then topped immediately with the fondant topper.

Also made one day out, the Darth Vader cake was chocolate cake with chocolate buttercream covered in sugarpaste. The cake was made of one 8 inch cake and two 6 inch cakes which were carved up to create the cake shape. I used cake to create the pattern on the face and then accentuated it with some extra sugarpaste around the brow, eyes and nose; then covered the whole lot with a large layer of white sugarpaste.  I made a party cake a couple of years ago for my son which I covered with pre-coloured blue fondant - and then one of the class mums told me that it turned her child's poo green! That thought has stayed with me ever since :) So I decided that I would cover Darth Vader with white fondant and give my birthday present its maiden outing to use my Dinky Doodle Airbrush to spray the cake black. So it still has black food colouring but only on the very surface of the cake and not through the fondant. And I had a great time with my new airbrush! It was 11.30pm and it was difficult not to get trigger happy with the spraying. I left the cake to dry overnight and in the morning it had dried a much deeper and matte colour.

Finally, also one day out, I made some cookies for the party bags which were vanilla cookies (recipe here) with a layer of fondant over the top. The cutters are from Lakeland and are really effective. I always give C-3P0 a spray of gold lustre just to bring out the shine. Then they were presented in a party bag sealed with some pretty washi tape.

So after a brilliant climbing party tiring the boys out, we went to the pub for lunch and finished off with lots of birthday cake. And there was a LOT of it. So when the boys finished their cupcakes and wanted chocolate cake, there was plenty to go around. And plenty to take home afterwards. But I think that's one of the perks of being the birthday boy - taking the leftovers home and enjoying it for the next few days :)

In Celebrations Tags Cupcakes, Birthday, Star Wars
Comment

Digby Dog 70th Birthday Cake

May 2, 2015 Nicola King

This week, I had the pleasure of making a 70th birthday cake. It's always lovely to be part of people's special celebrations and be invited to make a cake for them. The brief for this one was a 9 inch vanilla sponge with vanilla buttercream and raspberry jam to include Digby dog, water, flowers, "Mum" and "70". Hmmm...what a challenge!

I first set about making Digby and the flowers out of gumpaste to allow them time to dry. And I decided that the top of the cake would be removeable, allowing the birthday girl to keep her model of Digby. Here are some work in progress shots of Digby and one of the flowers, the David Austen rose.

I do love making sugar flowers. Although it can take a little while to wait for the different parts to dry, there's something very satisfying (for me) when the flower comes together. Digby was more of a challenge, that's for sure, but it's nice to feature something that means a lot to the person and bring it alive on a cake. I didn't take a photo, but he even has a little name tag with "Digby" stamped on it.

The cake itself wasn't the largest cake I've made and covered but it's still a lot of cake! Three layers of vanilla sponge (soaked with sugar syrup) filled with jam and vanilla buttercream, coated in buttercream and covered in fondant. Delicious! Sometimes the simplest flavours are the best :)

Here are a few more photos of the finished cake. Hope you like it!


In Celebrations Tags Birthday, Digby Dog, Sugar Work
Comment

Harry Potter Cupcakes

January 25, 2015 Nicola King

This weekend we've enjoyed an early birthday party for one of my sons that he shared with a few of his friends from school.  Thirty of the most energetic six year olds (and younger) gathered for madness and mayhem.  I've kind of (unwittingly) introduced a tradition in our household for three celebration cakes for every birthday (one for the party, one to take into school and one for tea on the big day itself).  It's quite a challenge!  Especially coming up with three cake designs that have male street cred!  As there were going to be four (!) party cakes, we decided that I'd make cupcakes as they're so much easier to hand out whilst the big cakes were being cut up.

This year, it's all about Harry Potter.  We're reading each of the books before he's allowed to watch the film and he LOVES it.  So he challenged me with designing a set of cupcakes that reflected the most memorable things and for us they were: Harry, Ron, Hermione, snitch, firebolt, book of spells, sorting hat, Harry's glasses and wand and his scarf.  It was great fun creating them.  And the hardest bit?  Crazily it was creating the base board which was covered with sugarpaste, impressed with woodgrain and then painted with (edible) brown airbrush paint.  But I really wanted something to set off  the cupcakes so it was completely worth it.

The cupcakes were chocolate with chocolate buttercream (my most favourite recipe is the Primrose Bakery chocolate cupcakes) and the toppers were completely edible, made from sugarpaste.  Any painted features were added with Sugarflair Edible Tints mixed with a little vodka.  Although they did take a little time to create, the toppers were made earlier in the week and then added to cupcakes made fresh on the day so it felt relatively easy!

And the biggest reward for all the hard work is just looking at their little faces as the cakes are presented to the room with candles and the pride on my little boy's face that they were his birthday cupcakes, designed just for him.

I was just glad that I didn't have to do any of the tidying up :)

In Cupcakes, Celebrations Tags Birthday, Harry Potter, Cupcakes
Comment

To subscribe, please enter your email address:

Delivered by FeedBurner

Yay for the weekend!! If you saw how I made pineapple flowers earlier this week, here they are adorning my very first Hummingbird cake. I am totally in love with them! I also added a few @edible_flowers to complement them and this makes the perfect w
I was so grateful to be #gifted some beautiful @cotswoldflour flour recently with a challenge to make something from my #bakingbucketlist and so I set about making a Nutella babka and scrolls with them. I’ve had a mixed love affair with bread m
I found the cutest miniature pineapple in the local petrol station co-op so decided to make these roasted pineapple flowers. I think they’re so pretty and remind me of lovely sunflowers. I thought they’d go well with a Hummingbird cake so
We had great fun baking this Malteser Millionaire’s Shortbread which is absolutely delicious! This was something the boys wanted to bake - who can resist a delicious shortbread base, topped with gooey caramel and then a final layer of swirled m
As the rain and clouds returned to our skies this weekend, we’ve been looking for comforting lockdown treats. These Blackberry & Star Anise Friands, dripping with sticky blackberry juice icing are the perfect choice 💗 The recipe is from Sw
You might have seen from my Stories this weekend that I made cinnamon buns. I don’t have the best track record with bread but I’m overcoming my inner fear! These buns were so delicious. It was an amalgamation of a few recipes but the base
  • Serendipity Bakes
    Coconut & Raspberry Friand Muffins
    May 29, 2019, 9:38 PM
  • Serendipity Bakes
    Thank you for sharing my photo of your delicious recipe 😋 @rkhooks Happy Sunday! https://t.co/niKamgfjvt
    Mar 3, 2019, 2:38 PM
  • Serendipity Bakes
    RT @BiscuiteersLtd: Our friends at @thewhitecompany asked us to design something special to celebrate their New York stores first birth… https://t.co/kTsMH57wRv
    Jun 28, 2018, 11:09 AM

Enter your email address:

Delivered by FeedBurner

Powered by Squarespace

Nicola King at Serendipity Bakes Follow my blog with Bloglovin Follow