• About
  • Blog
  • Recipe Index
  • Your Celebrations
  • Contact Me
Menu

Serendipity Bakes

Street Address
City, State, Zip
Phone Number

Your Custom Text Here

Serendipity Bakes

  • About
  • Blog
  • Recipe Index
  • Your Celebrations
  • Contact Me

Through The Lens: Borough Market

March 9, 2016 Nicola King

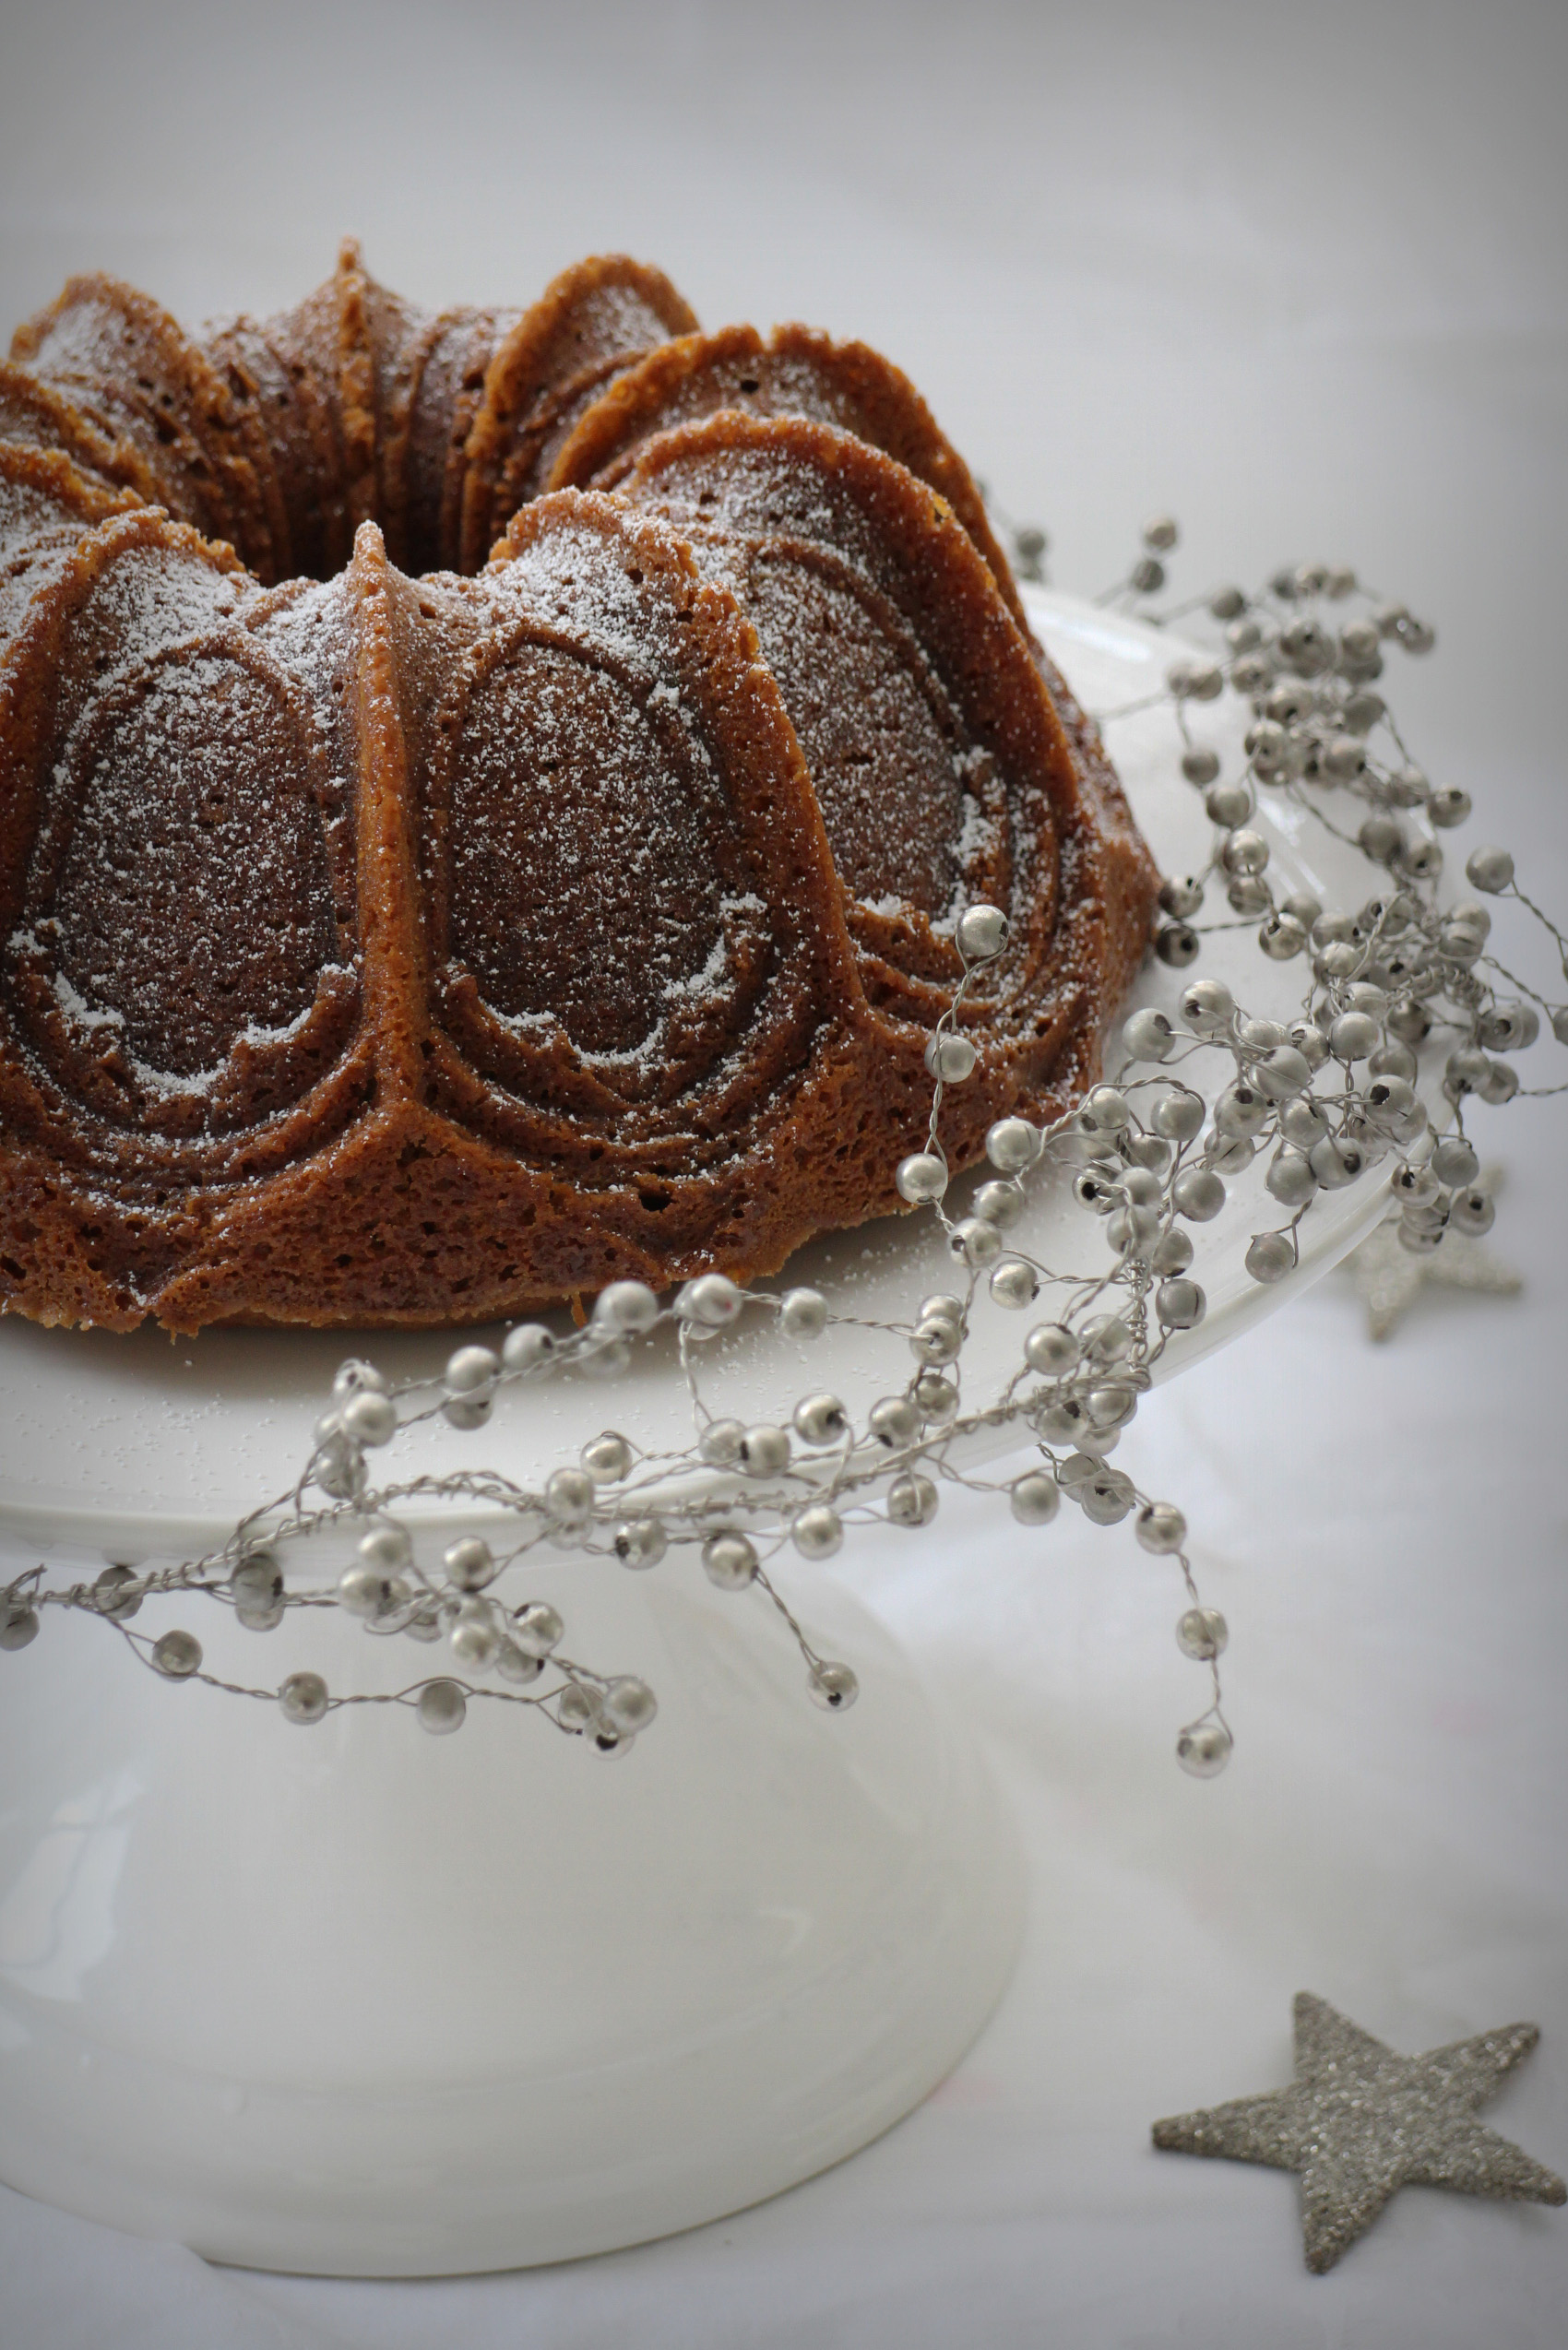
Hi there! This is a different kind of a post (as in it's not about baking and recipes) but one I wanted to capture for you as it's most definitely about food and the best quality of it. For many years, I've loved photography. There are 3 main photographers that have totally inspired me over the last 15 years or so -- my fabulous sister-in-law, Luci Harrison, our amazing wedding photographer, Johannes Van Kan, and an awesome children's photographer that captured our children in their early years, Maria Murray.

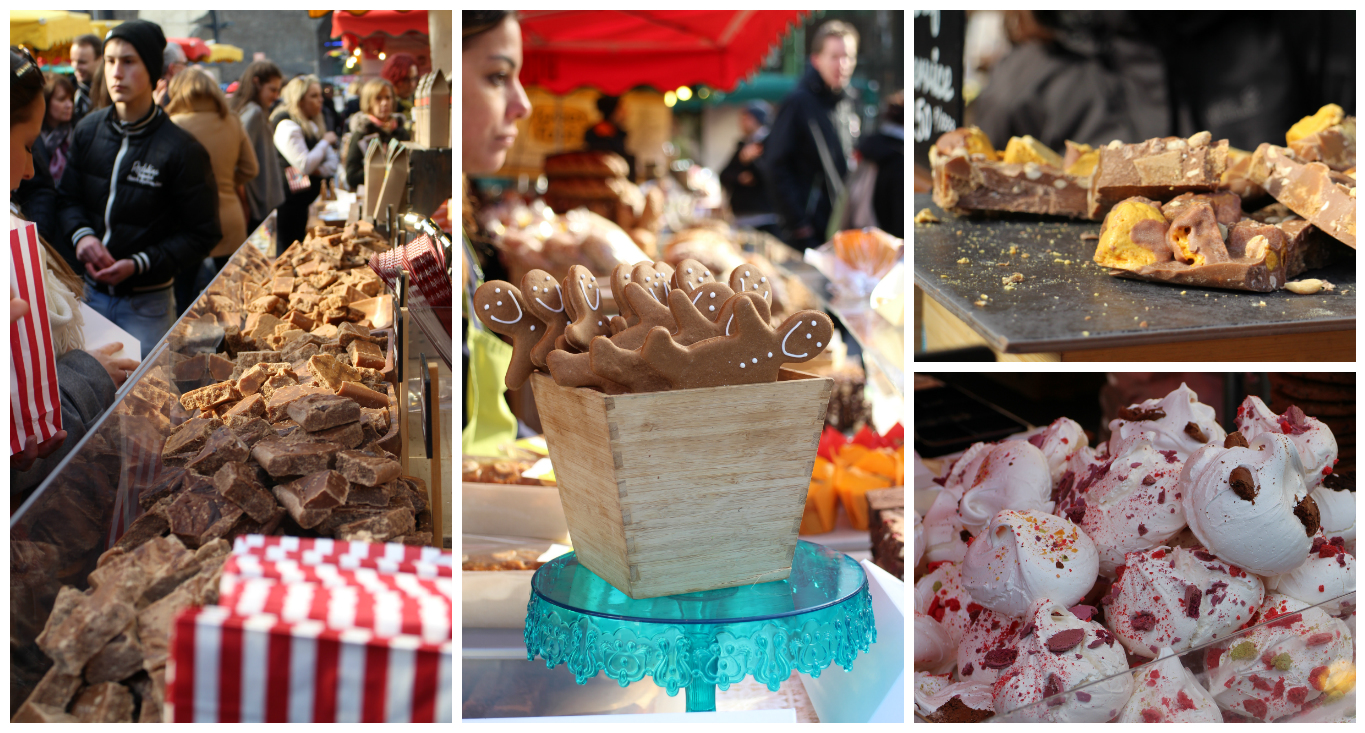
Since starting this blog, I've had the opportunity to take a LOT of photos of food. Many that I'm proud of, many that I know I could do better -- but I'm always looking for inspiration. Last week, one of my oldest and dearest school friends and I set off armed with cameras and headed for Borough Market to capture the bustling market, stall holders and amazing and unique food. And taste testing was an absolute must! I wanted to share some of the photos of our adventures - and give you a few recommendations for our favourite stalls along the way. And I hope through these photos you can enjoy this amazing place and perhaps plan in a visit of your very own :)

So I'm not even going to save the best to last -- this was hands down our best find of the day. Khanom Krok served us the most delicious Mini Sweet Coconut Pancakes. Crispy on the outside and gooey on the inside, we got ours fresh from the pan and they were amazing. Well worth a visit just for these!

We had elevenses perched on the bar stools of Rabot 1745, one of Hotel Chocolat's restaurants. Amazing Caramel Hot Chocolate and fresh from the oven Chocolate Orange Scones with Salted Butter and Chocolate Ganache. I think my friend's face says it all! Even on a Friday morning, it was bustling with people so if you fancy indulging in a fresh bake and array of unusually favoured drinks, I'd get there early to beat the rush.

The stalls there are beautifully merchandised. The stall holders definitely take a huge amount of pride in their food and displaying it to the world. Une Normande à Londres was definitely my favourite shop for the way they showed off their beautiful array of les fromages and les saucissons.

There's plenty to taste test as you're wandering around as each stall is keen to show off their delicious food and draw you into buying some to take home. Tartufaia Truffles had the most fabulous scented truffles to invest in -- I couldn't be persuaded into the Truffle Honey but the Black Truffle Oil was certainly delicious!

Thanks for reading and I hope you found some inspiration in these photos. I can't wait to try to recreate some of the recipes at home and plan in a return visit -- we certainly left there with full bellies and met some of the loveliest people there along the way. Definitely worth a trip - and if you visit it yourself, I'd love to hear which was your favourite food discovery 💕

In Through The Lens Tags Borough Market, Food Photography
2 Comments

Lemon & Earl Grey Shortbread

March 3, 2016 Nicola King

Although our winter has been pretty mild, there's a biting wind and we tend to get torrential rain one minute (usually just before the school run is about to start!) and glorious sunshine the next. I'm definitely in need of a little bit of comfort and so it'a been a biscuit sort of week in our house.

I went to wholesale earlier in the week and came back with a big box of beautiful lemons. They are the sign that spring is on its way and are brightening up my kitchen daily. I have dinner plans for the weekend with them, but I had a biscuit plan today.

My quest for dairy free alternatives is ever on my mind and I wanted to have a go at dairy free shortbread -- and why not make it gluten free too? I'm always a huge fan of lemon so my shortbread biscuits were to be lemon and I decided to pair them with earl grey tea. Now I'm not an earl grey tea drinker but I thought it would be interesting to try.

The dairy free alternative I used was Dairy Free Pure Sunflower which was an experiment as I found it at the supermarket and hadn't used it before. The flour was Gluten Free Plain Flour and I also added in some Corn Flour too. The dough is easy to make. The butter, vanilla essence, earl grey, lemon zest and sugar are creamed together in a bowl for around 5 minutes. Then the flour and cornflour are stirred in and mixed gently to form a dough. This is a sticky dough. I popped it in the freezer overnight and it came out of freezer soft the next day so don't worry if yours has this consistency.

The surface should be well-floured and a little more flour sprinkled on top of your dough before rolling it. I found it easier to pat down the dough with my hand until it was the thickness I was looking for (0.5cm) and then a quick roll with rolling pin just to smooth the surface. Once you have used your cutter to great effect (I used a 6cm cutter), gently move each cookie to a lined baking tray. They don't spread much during baking so you don't need to leave too much space between each biscuit.

Then bake them at 170 degrees (fan) for 15 minutes. They don't change much in colour or go golden brown like other biscuits might. You should remove them from the oven and gently move each one on to a cooling tray with a spatula and allow to cool.

Using tea in these biscuits might not be to your taste. You don't have to put it in. I loved the speckled texture but it does add a floral note to the final biscuit. They would work beautifully with just lemon -- maybe with the zest of two lemons since it's your only flavour.

I love these little shortbread biscuits. They are light, have a beautiful snap and are perfect with a cup of tea. I have eaten almost the entire batch on my own!

Lemon & Earl Grey Shortbread (Vegan and Gluten Free)

adapted from Wallflower Girl's Vegan Chamomile & Lemon Shortbread

Ingredients

  • 200G DAIRY FREE PURE SUNFLOWER (or an alternative dairy-free butter)
  • 1 TSP VANILLA PASTE OR EXTRACT
  • 1 TBSP EARL GREY (loose tea)
  • ZEST OF 1 LEMON
  • 100G CASTER SUGAR
  • 300G GLUTEN-FREE FLOUR
  • 1 TBSP CORN FLOUR

Method

  1. Make the dough the day before you want to bake your biscuits
  2. Place your butter, vanilla, earl grey, lemon and sugar in a bowl and cream together -- around 5 minutes
  3. Stir in the gluten free flour and corn flour and gently mix until a dough is formed -- it will be a sticky dough
  4. Wrap in clingfilm and place in the freezer overnight
  5. When you're ready to bake them, preheat the oven to 170 degrees (fan) and line a baking tray with parchment
  6. Flour your surface well and place the dough on top, sprinkling the top of the dough with more flour
  7. Using your hands, pat the dough until it's around 0.5cm thick
  8. Flour your rolling pin and gently roll the surface just to make it smooth
  9. Using a cutter, cut out your shapes and gently move them to the baking tray
  10. Bake for 15 minutes
  11. Remove from the oven and gently transfer your biscuits from the baking tray to a cooling rack
  12. Allow to cool for 10 minutes and then enjoy :)
In Free From, Biscuits & Cookies Tags Shortbread, Lemon, Earl Grey Tea, Gluten Free, Vegan
Comment

Broccoli and Ricotta Crustless Quiche

February 26, 2016 Nicola King

Do you ever walk into a cafe and see the wonderful display of cakes and muffins and think, "I could make that?" I'm always wondering how I could make the things I see every day and have been wanting to try crustless quiches for some time. So today I got to rustling them up for my lunch. Think of them as a crustless quiche or eggy muffin -- they're a cross between the two, I think.

They can be made with the ingredients you yourself love or whatever you have to hand. I wanted to make mine from broccoli, ricotta and feta as the main flavours. The mixture takes ten minutes to make and then they bake for thirty minutes in the oven so are super quick to turn around. They are perfect for a simple supper served with a salad or a lingering brunch with friends. I was so in love with them, I just ate two, but sssshhh -- just our little secret!

Experiments often don't work out the way you want the first time, but these are perfectly delicious. I only made three but have scaled up the mixture below to make six. You can make as many as you like but work with one egg per muffin and scale accordingly. I started by cutting the broccoli into tiny florets and put them in the base of the muffin holes -- when they're cut so small they cook perfectly and come out lovely and tender. Then the egg mixture is made with egg and ricotta, whisked until they're smooth and then seasoned with a little salt and pepper to taste. On top of the broccoli, I put some crumbled feta and the poured over the egg mixture. Then on the surface of them, I gently placed a few more pieces of feta and a couple of dollops more of ricotta -- and sprinkled them with chives. They bake for thirty minutes and arrive from the oven all lofty and puffed up. They quickly deflate which is no problem as these are quiches and not soufflés and I served mine warm from the oven.

I'm often eating scraps for lunch whilst everyone is away at school and work and it's sometimes difficult to feel inspired.

When these are so simple to make and with so few ingredients, it's not difficult to give yourself a treat now and again, is it? 

Broccoli and Feta Crustless Quiche

Makes 6 muffin quiches

Ingredients

  • 6 EGGS
  • 270G RICOTTA CHEESE
  • 180G FETA CHEESE
  • 120G BROCCOLI (broken into tiny florets)
  • CHIVES (chopped, to taste)
  • SALT & PEPPER (to taste)

Method

  1. Preheat the oven to 170 degrees (fan)
  2. Whisk the eggs and 240g of the ricotta in a bowl until smooth -- place the remaining ricotta to one side
  3. Season with salt and pepper
  4. Place the small pieces of broccoli in the bottom of each muffin hole
  5. Crumble 120g of the feta evenly in each muffin hole on top of the broccoli -- place the remaining 60g to one side
  6. Pour the egg mixture evenly into muffin cavity
  7. Gently place the remaining ricotta and feta on the surface of each muffin
  8. Place gently into the oven and bake for 30 minutes
  9. The muffins should be golden brown and well risen
  10. Eat immediately :)
In Simple Suppers, Weekend Brunch, Free From Tags Quiche, Gluten Free, Feta, Ricotta
3 Comments

Marshmallow Teacakes

February 23, 2016 Nicola King

We had a fab week off for half term and all too soon the boys are back to school. After a busy week of baking in the week before half term, last week was all about spending quality time with my boys and catching up with friends. My eldest son had his 8th birthday (where, of where did those years go?) and I had a couple of fun projects to celebrate his big day -- Star Wars cookies for his classmates and a bright drippy cake for the big day (his celebration cake comes in a few weeks time!) Then some cupcakes for my gran to share with her new friends after moving into a new care home and finding life at 92 after living in her own place until now, a little challenging.

Last week, my friend dug out a rather fetching party photo of me from way back when featuring tea cakes (don't ask!) and said that her hubby had made the Peyton & Byrne ones for her once - and that they were delicious! I think her kitchen took a bit of a beating (we are talking about biscuits, marshmallow and melted chocolate) but it was totally worth it. I said I needed the recipe.

Do you remember the Tunnocks Tea Cakes that come wrapped in foil? I haven't had one since I was a kid and I don't know whether they've been available all this time or made a retro comeback but they are alive and well. So today I made the Peyton & Byrne Marshmallow Teacakes which were simply divine and had everything good about them that you'll remember from the Tunnocks ones - but especially yummy since they are fresh and squidgy and gooey and covered in melted milk chocolate. They have three stages but are simple to make.

The recipe makes twelve teacakes but our expanding waistlines are requiring a little more restraint of late so I halved the recipe and just made six. I've featured the recipe for twelve but you can alter the quantities to make as many as you like. First of all you need to make the biscuits. They are very simple although you do need to keep scraping down the side of the bowl to ensure that you mix it thoroughly. I then weighed out the mixture to make each one the same size. When they came from the oven, they were a little larger than I expected but I addressed that later -- keep reading!

As the biscuits cooled, I moved onto the marshmallow. All the ingredients are whisked over a saucepan of simmering water until frothy and slightly opaque. The recipe says that this should take 10-15 minutes, although mine was ready in 5 minutes so keep an eye on the texture. I then whisked the mixture with an electric hand mixer for a further 5 minutes until the marshmallow held its shape. It does set up relatively quickly so you want to move onto the next stage straightaway. I was a bit disappointed with the amount of marshmallow I had and would have been happy with twice the amount -- maybe that's just me! When I piped it on to the biscuits, I had to do this sparingly and there was quite a large ridge left around the outside of the biscuit. I didn't think this would look good once the chocolate was covering it so I decided to cut the biscuits smaller, using the outside of the marshmallow as a guide. It was a bit messy but I was much happier with the shape left.

Finally, on to the melted chocolate. Melted chocolate is dangerous in my kitchen because I love the stuff. Especially the melted Belgian milk chocolate variety that I used here. You melt half the chocolate first and then remove from the heat -- then adding the remaining chocolate and leaving 7 minutes before stirring it. This is a way of tempering the chocolate so it doesn't bloom when it sets and go dull and streaky. I have to say that mine were a little dull and streaky but that might be because I played around it with it too long when covering my little biscuits. Pop your biscuits onto a cooling rack with something underneath to catch your chocolate drips -- and get pouring! So much fun :) You need to try to make sure all the sides are completely covered but don't worry if not - they will just look a little more rustic but taste the same amount of deliciousness.

The final stage is to wait. An hour is needed for them to set. But it is hugely tempting to taste test them early! I let mine set for around 15 minutes and then lifted them with a palette knife, cleaning the drips from underneath, and put them onto a sheet lined with greaseproof paper to set.

Perhaps it will disappoint you to know that these need to be eaten the day they're made. All of them. It's a hardship but someone has to do it. 

We're currently sat looking at an empty plate.

It's totally worth making these from scratch and you won't be disappointed.

Marshmallow Teacakes

from Peyton & Byrne's British Baking

Biscuit Ingredients

  • 110G PLAIN FLOUR
  • 1/8 TSP BAKING POWDER
  • 1/8 TSP BICARBONATE OF SODA
  • PINCH OF SALT
  • 60G UNSALTED BUTTER, SOFTENED
  • 60G CASTER SUGAR
  • 2 EGG YOLKS (you need the egg whites for the marshmallow)
  • 1/2 TSP VANILLA EXTRACT
  • 1 TBSP DOUBLE CREAM

Method

  1. Preheat the oven to 180 degrees (fan)
  2. Line 2 baking trays with baking paper
  3. Sift together the flour, baking powder, bicarbonate of soda and salt into a bowl
  4. In a freestanding mixer, beat together the butter and sugar until light and fluffy
  5. Add the egg yolks and vanilla and mix well, scraping down the sides
  6. Beat in the cream and then the flour mixture until just combined
  7. Scrape down the bowl sides and mix it quickly once more
  8. Weigh the dough and divide it by 12, then divide the dough into 12 small balls and put them onto the lined trays (they do spread so leave space between each one)
  9. Bake for around 10 minutes until the edges are lightly golden
  10. Remove from the oven and leave on the baking tray to cool

Marshmallow Ingredients

  • 2 EGG WHITES
  • 100G CASTER SUGAR
  • 1 TBSP GOLDEN SYRUP + 1 TSP
  • PINCH OF SALT
  • 1/2 TSP VANILLA EXTRACT

Method

  1. Place all of the ingredients in a bowl over a saucepan of simmering water
  2. Whisk until the mixture becomes frothy and slightly opaque (the recipe says 10-15 minutes but mine was ready in 5 minutes)
  3. Remove the bowl from the heat and then whisk it with an electric hand whisk until it hold its shape (mine was whisked for 5 minutes)
  4. Put the marshmallow into a piping bag and then pipe a dollop onto the top of each biscuit
  5. Optional - I wasn't happy with the surplus biscuit around the marshmallow so I cut each biscuit with a 5cm cutter to get a uniform shape

Chocolate Topping Ingredients

  • 250G BEST QUALITY MILK CHOCOLATE (chopped into small pieces)

Method

  1. Take 125g chocolate and melt it in a bowl over a saucepan of simmering water until melted
  2. Remove from the heat and put the remaining chocolate into the bowl
  3. Leave untouched for 7 minutes and then stir the chocolate until it's all melted
  4. Place the biscuits onto a wire rack with a tray underneath to catch the drips
  5. Once ready, use a dessert spoon to drench each teacake with chocolate - you can help the chocolate along a little so it drips down the sides - if you want a perfect finish, then you may need to keep adding more chocolate to the teacake and tease it down the sides
  6. Leave the teacakes for around 15 minutes and then carefully remove each one with a spatula, tidying up the bottoms, and then place on a tray lined with greaseproof paper to set
  7. Leave for at least an hour until the chocolate has set
  8. Enjoy with a nice cup of tea :)
In Everyday Cakes Tags Chocolate, Marshmallows, Teacakes
Comment

Flourless Chocolate Beetroot Cake

February 9, 2016 Nicola King

So let's talk about beetroot.

I have never liked the stuff. Never cooked it before. To me, it tastes so earthy it's just not a flavour that I enjoy. But -- I have always been kind of curious about baking it into a cake. 

We had friends over for lunch at the weekend and I thought it would be fun to bake a cake for the grown-ups and children and see if the kiddies could spot a vegetable disguised as a sweet treat. Ha! They didn't :)

So the cake is a flourless chocolate cake made with hazelnuts making it a great gluten-free bake and my starting point for this was a recipe from the Australian Women's Weekly's Love To Bake. They adorn it with vanilla yoghurt and candied beetroot (the candied variety seemed one step too far in my beetroot journey!) As it's a solid cake (it doesn't rise to great heights), I decided to bathe mine in chocolate ganache, add some height with chocolate garnishes and give it a light shower of freeze-dried strawberries. The cake itself is very simple to make but requires a little prep and is best made the day before you're planning to serve it.

So the day before, the beetroot needs to be cooked for around 45 minutes until it's tender and then liquidised to a beautiful purple puree (see, I can compliment the beetroot for its look!) Then the chocolate and butter are melted together whilst you whisk the eggs, sugar, vanilla, ground hazelnuts and cocoa together in a separate bowl. Add them together with the beetroot puree and pour them into your baking tin. This needs to be covered with foil to be baked for around an hour. Once it's ready, it's then refrigerated overnight - or for at least three hours if you're making it the day it's to be served. I refrigerated mine in its baking tin covered with clingfilm.

Also, the night before, I made the chocolate garnishes so they would have time to set out of the fridge. I swirled circles on greaseproof papers and left them to dry.

When you're ready to prepare your cake for serving, remove it from the fridge, take it from its tin and release the greaseproof paper. I found my cake had shrunk away from the sides a little. This is all fine and it's going to be a relatively flat cake. I made my chocolate ganache as a 1:1 ratio of chocolate to cream which is a thick ganache - if you want it runnier with smaller drips, then you can use 1:2 chocolate to cream. When the ganache is ready, pour it over the surface of the cake allowing it to drip down the sides. Place your chocolate garnishes upright on the cake, holding them in place until they set a little and stand firm. Then sprinkle your freeze-dried strawberries across the top.

The beetroot gives a lovely moistness. The hazelnuts are a tasty addition in place of the flour, where I've usually used almonds in my gluten-free cakes. You definitely can't taste the beetroot in it but that's probably because it contains quite a lot of dark chocolate (which is never a bad thing in my book!) 

I wouldn't say that I'm a beetroot convert. But whereas I can't eat it in a salad, I can definitely eat it disguised in a cake. That's progress. And the boys loved it too.

I think we'll be making this one again :)

Flourless Chocolate Cake with Chocolate Ganache and Freeze-Dried Strawberries

Flourless Chocolate Cake

adapted from the Australian Women's Weekly Love To Bake

Ingredients

  • 250G BEETROOT
  • 290G DARK CHOCOLATE
  • 150G BUTTER
  • 5 EGGS
  • 3/4 TSP VANILLA
  • 180G LIGHT BROWN SUGAR
  • 85G GROUND HAZELNUTS (I bought whole hazelnuts and ground them in a blender)
  • 3/4 TSP COCOA POWDER

Method

  1. Cook the beetroot in a small pan for 45 minutes or until tender
  2. Grease and line a 7 inch cake tin
  3. When the beetroot in tender, drain and puree in a blender until smooth
  4. Melt the dark chocolate and butter in a saucepan over a medium heat until melted and smooth
  5. Whisk the eggs, vanilla, brown sugar, hazelnuts and cocoa powder in a separate bowl
  6. Add the chocolate mixture and beetroot and whisk to combine
  7. Pour the mixture into the prepared tin and cover with baking foil
  8. Bake the cake for around 1 hour until cooked around the edge with a slight wobble in the middle (I tested mine with a skewer that came out clean)
  9. When you remove it from the oven, lift up the edge of the foil to let the steam escape
  10. Allow to cool and then cover with clingfilm and refrigerate overnight

Chocolate Garnishes & Freeze-Dried Starwberries

Ingredients

  • 100G DARK CHOCOLATE
  • 1 TUBE OF FREEZE-DRIED STRAWBERRIES

Method

  1. Melt the chocolate in the microwave until almost melted
  2. Remove from the microwave and stir the chocolate until completely melted and smooth
  3. You can either use a squeezy bottle or a teaspoon but you want to drizzle patterns on a sheet of greaseproof paper
  4. Allow the cool at room temperature (not in the fridge)
  5. My freeze-dried strawberries were little pieces and I want to create some powder too so I blitzed them in a blender to get a mix of powder and slightly larger pieces
  6. Place aside

Chocolate Ganache

Ingredients

  • 100G DARK CHOCOLATE
  • 100G DOUBLE CREAM

Method

  • Chop up the chocolate into smaller pieces and place it in a heatproof bowl
  • Heat the cream in a saucepan until a few bubbles start to appear
  • Pour the warmed cream over the chocolate and leave for a couple of minutes
  • Mix together slowly until smooth
  • Remove your cake from the fridge and place in the plate you will serve it on
  • Pour the ganache over the top of your cake
  • Carefully position your chocolate garnishes upright and hold them for 30 seconds until they stand firm
  • Scatter the freeze-dried strawberries over the top
  • Serve with cream :)
In Everyday Cakes, Free From Tags Beetroot, Chocolate, Cake
Comment

Sticky Toffee Cakes

February 5, 2016 Nicola King

This week I've been working my way through my enormous collection of cookery books looking for different dinner inspiration. (Ideally) healthy but hearty for the cold weather. Finding a keeper is so satisfying and we particularly enjoyed Jamie Oliver's Mexican Fish Tacos - well worth going to the effort of making the pineapple salsa :)

Yesterday we had Nutella Macarons and Vanilla Macarons with Love Hearts. But today it's Friday and we need a little cake love. I wanted to make some little Sticky Toffee Cakes with Dulce De Leche Frosting and Salted Caramel Sauce. The cake itself can be a cupcake but I made little round cakes. They are filled with pieces of dates and made with dark muscavado sugar to give a real intensity of flavour. The topping itself is extremely indulgent. Added to the icing sugar, we have cream cheese, butter and dulce de leche and this makes a beautifully soft, creamy and rich buttercream. Then the cakes are finished off drizzled with salted caramel which is so delicious, you can eat it with a spoon straight from the bowl (shhh...nobody needs to know, right?)

To make the cakes, I used a mini sandwich tin so each cake has a straight side. You could make one large cake and cut out rounds to get the same effect or bake them as cupcakes if you prefer. Firstly, the dates need to be soaked for around 15 minutes to make them lovely and soft so your bowl of dates needs to be covered with boiling water, then the dates broken into small pieces. The cake batter is made in the usual way (method below) and once the flour has been added, the dates are stirred through. It is easy to overcook these so err on the side of caution and check them after 15 minutes, then keep an eye on them if they're not quite ready.

Whilst the cupcakes are cooking, we make a sugar syrup. You can miss this stage if you like but I think it helps adds a moistness to the cake. It's a simple sugar solution made with caster sugar and water and this is brushed over the top of the cakes whilst they're still warm in their tins.

The cakes are topped with a rich buttercream. The icing sugar and butter are beaten together and then the cream cheese is added. When this is beaten to a smooth consistency, the dulce de leche is stirred through until just combined. This needs time to set a little in the fridge - I've made cream cheese frosting before which is too soft to pipe and setting it in the fridge for a half hour really helps. You will need to beat the buttercream again when it comes out of the fridge and then it can be piped or spread on to the top of each cake.

The salted caramel needs to cool down before being added to the top of the cakes otherwise it will melt the frosting so you can make it at the same time as the cakes and leave it at room temperature. The golden syrup and sugar are melted in a saucepan and then the butter, cream and salt are stirred in. And allowed to cool to room temperature. Delicious does not do this justice!

The salted caramel is best poured over the cakes as you're ready to serve them - and then the cakes served with a bowl of the caramel sauce on the side for extra helpings (it's that good). The frosting really is rather sweet and rich but pairs well with the cake itself.

The boys had friends over tonight and they inhaled a cake each. They would have had seconds.

I think it was the frosting and caramel sauce that really made these - they didn't realise there was something as healthy as dates in them :)

Sticky Toffee Cakes

Makes 18 cakes

Sticky Toffee Cake

Cake Ingredients

  • 150G DATES
  • 1 1/2 TSP VANILLA
  • 130G BUTTER
  • 240G DARK MUSCAVADO SUGAR
  • 290G SELF-RAISING FLOUR
  • 1 1/2 TSP BICARBONATE OF SODA
  • 1/4 TSP CINNAMON
  • 1/4 TSP PUMPKIN SPICE (you can use allspice if you don't have this)
  • 3 LARGE EGGS

Sugar Syrup Ingredients

  • 75g CASTER SUGAR
  • 75ML WATER

Cake Method

  1. Place the dates in a bowl and cover them with boiling water until they're just covered
  2. Lightly grease the cavities of the cake tin
  3. Pre-heat the oven to 170 degrees (fan)
  4. After 20 minutes, cut the dates into small pieces
  5. Place the butter and sugar in a freestanding mixer and beat until smooth and pale
  6. Whisk the eggs lightly and add them slowly to the mixture with the mixer on medium speed
  7. Sift the flour, bicarb and spices over the top of the bowl and then fold in gently with a spatula
  8. Stir through the dates
  9. Fill each cavity until it's 2/3 full
  10. Bake for 15 minutes and then check them - you want a skewer inserted in the middle to come out clean - they may need a few minutes longer but be careful not to overcook them
  11. Whilst they're in the oven, make your sugar syrup
  12. Bring the sugar and water to the boil in a small saucepan and then leave to simmer for a few minutes until all the sugar has dissolved
  13. Leave to cool
  14. When your cupcakes are out of the oven, leave to cool in their tins for 10 mins
  15. Then brush the top liberally with the sugar syrup, remove them from their tins and leave to cool on a cooling rack

Dulce De Leche Frosting & Salted Caramel Sauce

Dulce De Leche Frosting Ingredients

  • 200G UNSALTED BUTTER
  • 500 ICING SUGAR, SIFTED
  • 200G FULL-FAT CREAM CHEESE (don't be tempted to buy the light varieties here)
  • 140G DULCE DE LECHE

Caramel Sauce Ingredients

  • 100G LIGHT SOFT BROWN SUGAR
  • 50G GOLDEN SYRUP
  • 75G UNSALTED BUTTER
  • 75ML DOUBLE CREAM
  • 1 TSP SEA SALT

Dulce De Leche Frosting & Caramel Sauce Method

  1. To make the frosting, beat the unsalted butter and icing sugar until smooth and creamy
  2. Add the cream cheese and beat until smooth
  3. Stir through the dulce de leche until thoroughly combined
  4. Place in the fridge for 30 mins before using
  5. To make the salted caramel sauce, place the sugar and golden syrup in a small saucepan with a tablespoon of water
  6. Bring it just to the boil and then simmer for 3 minutes
  7. Add the butter, cream and sea salt in one go and stir for another minute until everything is melted and fully incorporated
  8. Transfer to a bowl and allow to cool at room temperature
  9. When the cupcakes are cool and the frosting chilled, remove it from the fridge and beat it again
  10. Either pipe the frosting or spread it on the top of the cakes
  11. Top with drizzles of the salted caramel sauce (attempting not to eat spoonfuls of it along the way!)
In Everyday Cakes Tags Dulce de Leche, Salted Caramel, Dates, Sticky Toffee Cakes
2 Comments

Chocolate Brownies with Peanut Butter & Popcorn Frosting

January 30, 2016 Nicola King

I love my weekends. I love my weekdays too but the weekends come with family time, long lie-in's and lots of snuggling with my boys. Perfection. And it also comes with weekend baking. Making lots of comfort food that we eat straight from the oven. Trying new combinations of ingredients because we happen to love them all and wonder what they'll look like together.

We didn't need any more sweet delights this week. We had Mini Almond Lemon Lamingtons to celebrate Australia Day, a big birthday chocolate cake to celebrate hubby's birthday, freshly baked Nutella Brioche for hubby's birthday breakfast and Pumpkin Dutch Pancakes. But what's one more chocolate delight amongst friends?

My little one and I decided to bake brownies and pair it with some of our favourite things - Chocolate Brownies with Peanut Butter and Popcorn Frosting. Three things we tend to eat a lot of in this house!

The brownies are lovely and squidgy. We got them out of the oven a little sooner than most would choose so they are *very* squidgy. That's just the way we like them. They were still warm when we frosted them so the peanut butter started to melt a little bit around the edges. That was okay. Then we sprinkled them with toffee popcorn and dusted them with icing sugar. And inhaled them.

The Chocolate Brownies are simple to make. I love that brownies are so quick to get in the oven and these ones promise a huge chocolate hit. The recipe is adapted from Hummingbird's Chocolate Brownie but I decreased the sugar a little and switched to golden caster sugar. I also decided that we'd bake it in a bread tin and make a slightly smaller batch. This is a one bowl recipe which when you do as much washing up as I do, is always a big win! Chocolate and butter are melted over a bain-marie until smooth and the sugar is added and mixed until smooth. Then the flour is added and mixed until smooth. Finally the eggs are added and mixed until smooth. Once poured into a lined baking tin (in our case, a bread tin lined with baking parchment) it goes in the oven for around 35 minutes. We baked ours for 30 minutes (when we put a cocktail stick in the middle, it was still slightly damp) and the brownies, even cooled, are pretty gooey so I'd suggest baking them for at least 35 minutes.

Whilst the brownies were cooling, we made the frosting, The butter is beaten for a couple of minutes and then the icing sugar and milk added. When these are lovely and smooth, add the peanut butter and beat until combined and smooth. We chose smooth peanut butter but you can use a crunchy one as you like. This is also the time to customise your own topping so you can add more peanut butter to taste.

When the brownies are cool and the frosting has been spread liberally over them, scatter the top with toffee popcorn and then dust with icing sugar to finish.

The boys absolutely loved these. What's not to love about a totally chocolatey and squidgy chocolate brownie covered with the sweetest frosting and finished with our favourite kind of popcorn?

Totally a weekend hit and one that can easily be made with the little ones and enjoyed by them. It won't last long!

Chocolate Brownies With Peanut Butter and Popcorn Frosting

Chocolate Brownies

adapted from Hummingbird's Chocolate Brownies

Ingredients

  • 150G DARK CHOCOLATE
  • 120G BUTTER
  • 200G GOLDEN CASTER SUGAR
  • 2 EGGS
  • 90G PLAIN FLOUR

Method

  1. Preheat the oven to 170 degrees (fan)
  2. Grease and line a bread tin
  3. Melt the chocolate and butter gently in a bowl placed over a simmering pan of water - remember not to let the water touch the bottom of the bowl
  4. Once melted and smooth, remove from the heat
  5. Stir in the golden caster sugar until fully combined
  6. Stir in the flour and mix until smooth
  7. Mix in the eggs until you have a smooth batter
  8. Pour the mixture into the prepared bread tin and make sure that the batter is level
  9. Bake for around 35 minutes until the top is flakey and the centre should still be a little wobbly - but if unsure, then test it with a cocktail stick that should come out clean
  10. Leave to cool and carefully remove from its tin

Peanut Butter Frosting

Ingredients

  • 100G BUTTER
  • 200G ICING SUGAR, SIFTED
  • 2 TSP MILK
  • 130G SMOOTH PEANUT BUTTER
  • A BAG OF TOFFEE POPCORN (we used Butterkist but you can choose whichever brand you like)

Method

  1. Beat the butter in a stand mixer for 2 minutes
  2. Add the icing sugar and milk and beat until smooth and fully combined
  3. Mix in the peanut butter until smooth
  4. Once the brownie is cooled, spread the frosting over the top
  5. Sprinkle the popcorn over the frosting
  6. Dust the top with icing sugar
  7. And enjoy :)
In Everyday Cakes Tags Chocolate, Brownies, Popcorn, Peanut Butter
Comment

Pumpkin Dutch Baby With Maple Pecan Butter

January 29, 2016 Nicola King

Who's excited about Pancake Day? Our boys are so excited and I just know we'll be making them pancakes for breakfast, they'll get them at school and will demand them for dinner too! We are huge pancake fans in this house -- the boys would eat them every day if they could but we restrict them to once or twice a week. This is a different kind of pancake -- possibly my new favourite kind -- that I've been trying out in advance of the big day in a couple of weeks.

Ever had a Dutch Baby? Making pancakes generally means hubby standing at the stove flipping a neverending supply of them onto our plates and our boys can eat a LOT of pancakes. After about 20 minutes, they declare they're full and he finally gets to eat his share. So if breakfast time is similar in your house and you haven't tried a Dutch Baby, this scenario will melt into the background. Cue one giant pancake, extremely filling, that you bake in the oven and then you all get to eat it together with your favourite toppings. Especially a cute little recipe for Maple Pecan Butter that is simply to die for. Looking good?

So I think I've said once or twice on here that Pumpkin is one of my favourite ingredients. I know it's more autumnal than winter, but when the weather is bleak outside, you need something to cheer you up and pumpkin makes a very filling and hearty ingredient (plus it's a vegetable so that must get a big tick!) I first fell in love with pumpkin when we used to visit my parents in Toronto and bought tins of Pumpkin Waffle mix from Williams-Sonoma. They are the best. But you can only get it around Halloween in their stores and we don't have the opportunity to travel to Canada right now. So I decided to bring the Pumpkin to a Dutch Baby and I promise you, this is amazing - the Pumpkin Dutch Baby with Maple Pecan Butter.

So if you're going the full mile and making the Maple Pecan Butter too (and I seriously suggest you put in the effort as it transforms the dish) you'll start the day before you plan to eat. I had some maple butter years ago in a London breakfast cafe with waffles and it was amazing. The consistency is very smooth and soft -- I refrigerated mine as I wanted the butter a little harder and this worked but it does soften up relatively fast once out of the fridge. I thought it would be as simple as softening some butter and adding the maple syrup and pecans and it is a bit more complicated than that -- but not too much! You do need a candy thermometer as you first need to gently heat the maple syrup and cinnamon stick to soft ball stage (240 degrees), then remove it from the heat, remove the cinnamon stick and add the butter. Then transfer it to a stand mixer and beat with the paddle attachment for 8 to 10 minutes. It will transform pretty quickly -- I wasn't happy with the consistency after 8 minutes (not firm enough) and less than 2 minutes later it had completely transformed so do keep an eye on it. Mix through the pecans and pop it on to some clingfilm and roll it into a sausage shape. Then refrigerate until you need it but mine had around 24 hours in the fridge. The ratios of the ingredients are 2:1 maple syrup:butter if you want to upscale it and make more. It keeps for around 2 weeks in an airtight container in the fridge.

The Pumpkin Dutch Baby itself it very straightforward. Think making pancakes and it's a one bowl and one skillet recipe. All of the ingredients go in the one bowl to be beaten. The one things to remember is that the eggs and milk need to be at room temperature. The skillet is heated in the oven so it's very hot, then the butter added and finally the batter. Then popped back in the oven for around 15-20 minutes. The outsides should be puffed and golden; the insides more of a custardy consistency. When you plan to serve this, it's best to have everyone sat ready at the table as it can deflate quickly -- so it's out of the oven, toppings on and onto the table in a couple of minutes to have the full effect.

This is delicious. The inside is like a pudding | custard and I love the orange tinge that the pumpkin brings to it. As the Dutch Baby itself doesn't have sugar or sweeteners in it, it does need lovely, sweet toppings. Mine had the Maple Pecan Butter, extra pecans, icing sugar and maple syrup to crown it -- you don't need all of these (I think it would be delicious with caramelised banana or lemon and sugar or just maple syrup or honey) but it's one of those dishes you really want to dress to impress.

And the great thing about a Dutch Baby is that if you think of it just like a pancake, you can make up your own variations with fruit inside the batter (apples, strawberries, bananas, blueberries) and really get creative.

If you fancy another alternative creation for the big day, you could also check out this fabulous Dulce De Leche & Mascarpone Crêpe Cake -- Dutch Baby for breakfast and Crêpe Cake for tea, anyone?!

I hope you all have a wonderful Pancake Day next week and would to hear what you're baking to celebrate :) xoxo

Maple Pecan Butter

adapted from Martha Stewart's Maple Butter

Ingredients

  • 232G MAPLE SYRUP
  • 166G BUTTER
  • 15G PECANS, ROUGHLY CHOPPED
  • 1 CINNAMON STICK

Method

  • Place the maple syrup and cinnamon stick in a medium saucepan and heat gently until it reaches 240 degrees (soft ball stage) - this should take around 10-15 minutes and it's important to keep this on a gentle heat for that time
  • Remove from the heat, remove the cinnamon stick and stir in the butter until it's melted
  • Transfer it to a stand mixer with the paddle attachment and beat on low at first (to save splashing it everywhere), then gradually increase to a medium speed
  • Keep beating for around 8 - 10 minutes but keep an eye on it from 8 minutes as it does change consistency very quickly - you're looking for it to turn opaque and have a smooth consistency
  • Stir through the pecans
  • Place onto a piece of clingfilm and roll it up into a sausage shape
  • Refrigerate until set - mine was prepared 24 hours before I used it

Pumpkin Dutch Baby

Ingredients

  • 3 LARGE EGGS at room temperature
  • 170ML MILK (semi-skimmed or whole) at room temperature
  • 150G PLAIN FLOUR
  • 3 TBSP PUMPKIN PUREE
  • 1 TSP VANILLA EXTRACT
  • 1/4 TSP SALT
  • 1 TSP PUMPKIN SPICE
  • 15g BUTTER

Method

  • Pre-heat the oven to 200 degrees (fan)
  • Put the skillet into the oven and heat for at least 10 minutes
  • Meanwhile, mix together all the ingredients (except for the butter) in a bowl with a whisk until smooth
  • When the skillet's ready, remove from the oven and add the butter ensuring that the melted butter coats the bottom and sides of the skillet
  • Immediately add the batter to the skillet and bake for around 15 minutes
  • The Dutch Pancake is ready when the sides are golden and slightly puffed and the middle is a custard consistency
  • Remove from the oven, add slices of Maple Pecan Butter, chopped pecans (toasted if preferred), maple syrup and icing sugar (or your preferred toppings)
  • Serve immediately and enjoy with a huge smile on your face :)
  • Happy Pancake Day!!
In Celebrations, Weekend Brunch Tags Pumpkin, Maple Syrup, Pecans, Pancake, Maple Pecan Butter
Comment

Profiteroles With Custard and Chocolate Sauce

January 23, 2016 Nicola King

I think I've made a lifetime's supply of profiteroles in the last two weeks. It has definitely been an opportunity to perfect my choux pastry technique! Chocolate and custard are favourites in this house, so it's not been unwelcome ;-)

I was making a Croquembouche for a birthday last weekend. Everything went perfectly - the choux pastry, the custard, filling the little balls of delight - until I came to build the Croq itself. I was using a recipe that used melted white chocolate to stick the buns together and I thought it was all going swimmingly until I came to release it from its cone. Collapse. Don't admit defeat, I thought. I went through all the possibilities. Time was short. Royal icing, I decided. Whipped up a batch and reglued the buns together using icing. Then I forced myself to leave the house for four hours to let it set (I had no longer and this was already a stressful thing to do when I was due to deliver it that afternoon). I returned, full of hope. Slowly I edged it out of its cone. It stood up but it looked a little crooked. Like a witch's hat with a little kink at the top. I moved around looking at it from different angles. The bottom seemed to be expanding, it leant a little bit more, then a little bit more, before a large splat on the kitchen workbench.

I have the loveliest friends. They were insistent that I deliver the mashed up Croq with some chocolate sauce on top, but I just had to make a new batch. So it was during this time that I perfected my profiterole making and streamlined a quick and easy method for making them. The custard part needs to be made before, but you can always fill them with whipped cream. And the chocolate sauce is super easy, very rich and hugely indulgent.

I suggest making the choux buns the day before you need them. They can get a little soft but I just blasted them in the oven for 5 minutes to crisp them up before filling on the day you plan to serve them. I've heard a number of people worry that choux is difficult to make but this is a pretty fullproof method. You put butter and water in a saucepan until the butter is melted and then bring to the boil. Add the flour in one go and mix vigorously over the heat until it comes together and comes away cleanly from the side of the pan. This takes around 30 seconds. Take it off the heat and place to one side for 5 minutes. After this cooling, add the eggs one by one, stirring vigorously after each one. A lot of recipes suggest that you may not need to add all the eggs but if unsure then add all the eggs. Then pop this in a piping bag. Snip 1cm off the end.

I pipe mine onto silpat lined baking trays but you can use baking parchment. Pipe 24 balls (4 x 6 balls) onto your tray. You'll probably get a little point on the top of each ball and using a little water on your finger, gently pat down the point (this stops it from burning in the oven). I cook mine for 10 minutes, then rotate the trays 180 degrees for another 10 minutes. Then remove them from the oven, cut a little slit in the side (around 1cm) and pop them back in for 5 minutes. Then allow to cool on a baking rack. Repeat with any remaining mixture. These can be stored in an airtight container until you're ready to use them.

I also make my custard the day before I need it and chill it in the fridge overnight. Now custard needs a lot of egg yolks, so it's always worth having something to make with all your leftover egg whites! It's very simple to make too. The egg yolks, sugar and flour are mixed together to make a paste. Then just boiling milk is poured over the egg mixture, whisked vigorously before returning to the saucepan. It's important to whisk this well as you don't want a scrambled egg mixture. You cook this over a low heat, always stirring, until it's thick and bubbling. Then it should be transferred to a bowl and covered with a layer of clingfilm so that the clingfilm is in contact with the surface of the custard. Once cool, it can be refrigerated.

On the day of serving, I generally give my choux buns 5 minutes at 160 degrees just to crisp them up a little. They cool down very quickly so by the time you've filled your piping bag with the custard, they're ready to fill. I use a pastry piping nozzle which has a long, thin nozzle that you can stick into the bun. Squeeze the custard in gently so you can see the filling spreading throughout and the bun will expand a little when it's full. If you're concerned you may be over-filling them, start with a little and you can always go back and top up.

The chocolate sauce is very rich and indulgent and sets quite quickly so you need to pour it on as soon as it's ready. It's warm when you pour it, but you can serve it cool (it will harden a little) or warm - both are delicious. The sauce is made from a sugar syrup (water and sugar) brought to the boil and then reduced to simmering. Whilst simmering, place a bowl with a chocolate on top (as a bain-marie) and allow the melt gently. When it's melted, pour the sugar syrup into the bowl and mix well until combined. Then pour immediately on the profiteroles.

The three elements for making the profiteroles could be really complicated, but are in fact very straightforward when broken into four steps. Making the choux buns and custard the day before, removes the stress completely when you have friends or family waiting to eat them. And making a fresh, warm, chocolate sauce poured over the top in front of your guests is the best (and not only for the smell of the chocolate!)

Profiteroles always seem to be a winner. Kids and adults alike love them. And I think they make such a special dessert, just perfect for sharing :)

Profiteroles with Custard and Chocolate Sauce

adapted from BBC Good Food

Choux Bun Ingredients

  • 185G PLAIN FLOUR
  • 175G UNSALTED BUTTER
  • 450ML WATER
  • 6 LARGE EGGS, BEATEN

Choux Bun Method

  1. Place the butter and water in a saucepan and heat gently until the butter has melted
  2. Bring to the boil and add the flour all at once
  3. Beat vigorously with a wooden spoon until the mixture comes together and comes away cleanly from the side of the pan (around 20-30 seconds)
  4. Remove from the heat and put to one side for 5 minutes
  5. Beat in the eggs one by one until the mixture is glossy and just holding its shape without being too runny
  6. Put this in a piping bag and cut 1 cm of the end of the bag
  7. Preheat the oven to 160 degrees (fan)
  8. Line 2 baking trays with silpat or baking parchment and pipe 24 rounds onto one sheet (6 x 4 balls around 3cm)
  9. If you have little peaks on the top of your buns, pat each peak gently with a lightly dampened finger
  10. Place the two trays in the oven and bake for 10 minutes
  11. Then rotate the trays 180 degrees and bake for a further 10 minutes
  12. Remove from the oven and cut a 1cm slit in the side of each bun and place back in the oven for 5 minutes
  13. Remove from the oven and place on a cooling rack
  14. Once cool, put them in an airtight container overnight

Custard Ingredients

  • 9 LARGE EGG YOLKS
  • 150g GOLDEN CASTER SUGAR
  • 50g PLAIN FLOUR
  • 500ml FULL CREAM MILK
  • 1 TBSP VANILLA PASTE (to taste)

Custard Method

  1. Beat the egg yolks, sugar, flour and vanilla paste in a bowl until you have a smooth paste
  2. Bring the milk just to the boil and then pour it over the egg mixture, whisking all the time
  3. When combined, pour it back into the saucepan over a low heat, whisking all the time
  4. Keep whisking until the custard is bubbling and thickened
  5. Remove from the heat and cover with clingfilm so the clingfilm is in contact with the surface of the custard
  6. Once cool, refrigerate until ready to use

Preparing Your Profiteroles

  1. When you're ready to assemble the profiteroles, if the choux buns feel a little soft, put them in oven at 160 degrees for 5 minutes
  2. Using a pastry nozzle, fill your piping bag with the custard
  3. Take each ball in turn, insert the piping nozzle into the side of the ball and gently fill each one with custard - you will feel the ball inflate slightly
  4. Continue until all balls are filled and then assemble on your serving dish

Chocolate Sauce Ingredients

  • 100ML WATER
  • 80G CASTER SUGAR
  • 200G DARK CHOCOLATE (broken into small pieces)

Chocolate Sauce Method

  1. Bring the water and sugar to the boil in a saucepan and then reduce to a simmer
  2. Place the chocolate in a bowl and place this over the top of the saucepan
  3. Stir the chocolate from time to time until it's all melted
  4. Once melted, pour the sugar syrup from the saucepan into the bowl of melted chocolate
  5. Stir until smooth
  6. Pour immediately over your dish of profiteroles
  7. The profiteroles can be served with either warm sauce or sauce allowed to cool - although there is something especially yummy about warm, melted chocolate sauce over a plate of these little choux buns :)
In Patisserie, Puddings Tags Chocolate, Choux, Custard, Profiteroles
Comment

Maple Syrup Monkey Bread

January 21, 2016 Nicola King

There are times when I wish our senses could transcend the written word. Like right now. If you could smell the warm, sweet, maple syrupy smell coming from my kitchen at this moment, you'd be in love. Just like me. And it doesn't just smell good - the taste is even better!

This Maple Syrup Monkey Bread is gorgeously squidgy. It has its first blanket of maple syrup when it's just out of the oven and then another one a few minutes later when it's turned out on the plate. I think mine looks like it's swimming in it :)

The recipe comes from James Martin's Sweet which I highly recommend if you're looking for lots of sweet delights to bake. I love James Martin and his recipes (whether from this book or his other savoury ones) always turn out brilliantly. They're easy to follow and always work. Win win. And there are lots of beautiful photos to inspire you!

This is simple to make but, as with all bread, you do need a little patience for the proving. The dough itself is straightforward - the milk is warmed in a saucepan, the yeast is added and then it's mixed with breadcrumbs made from flour, sugar, salt and butter. I mixed the breadcrumbs by hand but then I used my standalone mixer and dough hook to combine all the ingredients. You can work the dough by hand if you don't have this equipment - it will just take you 15 minutes rather than the 5 minutes with the dough hook. But you get bonus points for giving your arm muscles a workout!

When the dough is tacky to the touch, it's put into a bowl, covered and left for around 2 hours in a warm place until doubled in size. When it's ready, butter a 23cm savarin mold. I didn't have one of these so I used an 8 inch cake tin. You're going to make 30-35 dough balls with your dough so weigh the dough and then work out how much each dough ball should weigh. I kept my scales to hand and weighed out each amount of dough and then formed it into little balls. Then each ball is dipped into melted butter and rolled in a mixture of demerara sugar and cinnamon. By the time I formed my last ball the sugar was a complete gunky mess, clumped together with the butter, but keep going. Then place the balls into your cake tin. My bottom row was 2 balls wide (leaving a hole in the middle as it would have with a savarin mold) and then 1 circle of balls on the top layer.

The dough is left to prove again, lightly covered with some oiled clingfilm, for around 45 minutes. I generally leave my dough to prove for the second time overnight which I did with this bake but you need to ensure that you don't leave it in too warm a place as the butter will melt. I found that happened a little with mine (it didn't affect the final outcome as far as I can tell) but I suggest you place it on a baking tray when proving otherwise you might get a sticky trail when you come to pick it up!

When you're ready to bake it, preheat the oven to 180 degrees. Bake it on the baking tray for around 25 minutes until it's golden brown. I did find that the the middle hole disappeared as it baked and because I wasn't using a savarin mold, the middle dough balls underneath aren't cooked quite as well as the outer ones, so a savarin mold is preferable if you have one to hand, but not absolutely necessary.

When it's out of the oven, it's coated with 100 ml of maple syrup, left for 2 minutes and then turned out on a plate. Mine was pretty sticky and did try to come apart when being lifted from the tin to plate but I managed to get it there in one piece. It's crucial that you remove it from its tin this quickly. Then it's bathed in another 100ml maple syrup.

It is a thing of beauty. Simply delicious and especially good straight from the oven. 

I'm looking forward to trying other variations of Monkey Bread but wanted to try this one first. We are firm maple syrup lovers in this house so I know it will be a big hit when the boys come home.

If there's any left by the time the boys come home ;-)

Maple Syrup Monkey Bread

from James Martin's Sweet

Ingredients

  • 300ML MILK
  • 500G STRONG BREAD FLOUR (plus extra for dusting)
  • 75G CASTER SUGAR
  • 5G FINE SEA SALT
  • 50G SOFTENED BUTTER (plus extra for greasing your tin)
  • 2 TSP FAST-ACTION DRIED YEAST
  • 200ML MAPLE SYRUP
  • 250G DEMERARA SUGAR
  • 1 TBSP CINNAMON
  • 200G MELTED BUTTER

Method

  1. Gently warm the milk in a saucepan until it's warm but not boiling
  2. Place the flour, sugar and salt in a standalone mixer with a dough hook and mix to combine
  3. Add the butter and mix together until you have the consistency of fine breadcrumbs - I did this by rubbing it between my fingertips
  4. Then sprinkle the yeast over the warmed milk and add to the breadcrumb mixture
  5. Mix together with a dough hook on your standalone mixer on a medium speed for around 5 minutes
  6. The dough should be soft, sticky and shiny and tacky to the touch but definitely not dry
  7. Place the dough in a bowl, cover with clingfilm and leave it to prove for 1-2 hours until it's risen, spongy and doubled in size
  8. Then butter your savarin mold (23cm) or cake tin (20cm)
  9. Turn out your dough onto a lightly floured surface and knead for 1 minute
  10. Weigh the dough and divide it by 35 and then make 35 dough balls of equal size
  11. Mix the demerara sugar and cinnamon in a bowl
  12. Dip each dough ball into the melted butter and then coat in the sugar mixture
  13. Place it in the mold/baking tin - I had enough for 2 circles (one inside the other) on the bottom of the tin, leaving a hole in the middle, and then another circle on top
  14. Cover with oiled clingfilm and leave to prove in a warm place (not too warm though otherwise the butter will melt) for 45 minutes until the dough is well risen - I left mine overnight
  15. When you're ready to bake them, preheat the oven to 180 degrees
  16. Bake for 25-30 minutes until the balls are golden brown
  17. Remove from the oven and immediately coat the balls with 100ml maple syrup
  18. After 2 minutes, remove the monkey bread from the tin and place onto a plate - it's important to do this now otherwise the bread will stick to the tin and be very difficult to remove without breaking
  19. Once on a plate, bathe the monkey bread in another 100ml maple syrup
  20. And enjoy (but not so much that you eat the entire thing in one sitting!!)


In Bread, Weekend Brunch Tags Monkey Bread, Maple Syrup, Bread, Cinnamon
Comment

Melting Chocolate Puds and Brown Bread Ice Cream

January 17, 2016 Nicola King

It's been trying to snow here in London all day. We've done our Sunday fixtures of school football, run around like loons, warmed our hands on hot drinks from the cafe and returned home to work our way through a mini pile of homework and projects. And now something comforting is calling to me. Don't you just love when you know there's something buried in your freezer that's going to give you just the right amount of chocolatey TLC?

These Melting Chocolate Puds have to one of my favourite desserts. I used to make them and then lost the recipe for a while. It's buried deep in one of my Donna Hay magazines - problem is, I have over a decade's supply of her mags and it was hidden much too well. But then I found it again. And decided to pair it with a homemade Brown Bread Ice Cream. When I have the time, I love making ice cream from scratch and dusting off my ice cream machine to make rich, creamy loveliness.

The best part about the Chocolate Melting Puds is that they can be made days before you need them and baked straight from the freezer when your guests are sat at the dinner table. And if you're savvy enough to make (a lot) more than you need, when the chocolate craving comes a-calling, you can have a homemade chocolate pud from freezer to plate in 18 mins. And homemade ice cream is always a wonderful treat.

To make the ice cream, you first need to make a custard base. Egg yolks, sugar and cornflour are mixed together in a bowl and then milk brought just to the boil is poured onto the egg mixture whisking all the time. The mixture is returned to the pan and cooked gently over the heat, whisking all the time, until the custard has thickened. It is important to mix it all the time to ensure that the custard doesn't catch and burn on the bottom of the pan.

Then I generally chill it overnight in the fridge but it just needs to cool down completely. To cook the brown breadcrumbs, blitz brown bread to make breadcrumbs, melt butter in a large frying pan and then add the breadcrumbs. Mix them around, coating them evenly with the butter and then sprinkle the sugar over the breadcrumbs. You don't want to overcook the breadcrumbs but cook them for around 5 minutes until they're lightly browned. Put them to one side and cool.

When you're ready to make the ice cream, mix the vanilla into the custard and pop it in the ice cream maker. The brown bread crumbs may have clumped together as they cooled so you can blitz them but not to much as you want a breadcrumb texture rather than a fine powder. When the custard has thickened into the ice cream, add the breadcrumbs and mix for another 5 minutes. I generally freeze my ice cream until I need it, but you can serve it straight from the ice cream maker.

Whilst you're making your ice cream, you can also start to prepare your chocolate puds.  Start by melting the chocolate and butter in a saucepan over a low heat until melted and then put aside.  Place the eggs, sugar and vanilla in a mixer and whisk for around 8 to 10 minutes until the mixture has doubled in volume. Pour in the cooled chocolate in a drizzle down the side of the bowl and then mix gently until fully incorporated. Sift the flour over the top and then fold gently. It's important to mix just until it's all incorporated as you can over-mix it and toughen the mixture.

The timing of baking really determines what kind of pudding you get in the end. It's obvious I guess but a couple of minutes turns it from a gooey, liquidy centre into more of a cake with a set middle. Personally I think the gooey centre rules and that's about 16-18 minutes in my oven - but you should test it in yours to get it perfect.

I hope you enjoy this as much as me and have a go at making your own ice cream. If you don't have your own ice cream maker and fancy a no churn option that you can whip together and pop straight into the freezer, try this Mascarpone Ice Cream With Salted Caramel.The salted caramel compliments the puds perfectly.

And make more than you need. Many more. You never know when you might need one!

Brown Bread Ice Cream

Makes enough ice cream for 6-8 people as an accompaniment to pudding

Ingredients

  • 4 EGG YOLKS
  • 75G CASTER SUGAR
  • 1 TSP CORNFLOUR
  • 300ML SEMI-SKIMMED MILK
  • 40G BUTTER
  • 75G BROWN BREADCRUMBS
  • 50G LIGHT MUSCOVADO SUGAR
  • 1 TSP VANILLA EXTRACT
  • 300ML DOUBLE CREAM

Method

  1. Hand whisk the egg yolks, sugar and cornflour in a bowl until the mixture is pale and creamy
  2. Heat the milk in a saucepan until it starts to bubble, but does not quite boil
  3. Pour the heated milk into the egg mixture, whisking all the time until mixed through
  4. Then tip the mixture back into the saucepan and cook it over a gentle heat, whisking all the time, until the custard thickens
  5. Place the custard into a bowl, cover with clingfilm and refrigerate until cool
  6. To make the breadcrumbs, blitz the brown bread until you make breadcrumbs
  7. Melt the butter and add the breadcrumbs, making sure that you coat them thoroughly with the butter
  8. Sprinkle the sugar across the top of them and cook them for around 5 minutes until crisp - keep an eye on them as they can easily burn and if they blacken, you will need to start again
  9. Set aside the brown breadcrumbs
  10. When the custard is chilled, stir through the vanilla extract
  11. Place the custard in an ice cream maker and churn it until thickened
  12. Add the breadcrumbs and mix for a further 5 minutes
  13. You can either keep churning until you reach the desired consistency to serve straight from the ice cream maker or pop it in the freezer until you need it - I always serve mine from the freezer
  14. From the freezer, when you come to serve it, leave it out for around 5 minutes to soften slightly before scooping

Melting Chocolate Puddings

Makes 8 ramekins, from Donna Hay

Ingredients

  • 1 TBSP MELTED BUTTER (to brush the insides of the ramekins)
  • 200g DARK CHOCOLATE, CHOPPED
  • 110G CASTER SUGAR
  • 4 EGGS
  • 4 EGG YOLKS
  • 2 TSP VANILLA EXTRACT
  • 75G PLAIN FLOUR, SIFTED

Method

  1. Brush the ramekins with melted butter and pop in the fridge
  2. Place the chocolate and butter in a saucepan over a low heat until melted and smooth
  3. Set aside and allow to cook
  4. Put the eggs, egg yolks, sugar and vanilla in a freestanding mixer and mix for around 8-10 minutes until doubled in volume
  5. Drizzle the cooled chocolate down the side of the bowl into the mixture and then mix gently but thoroughly with a spatula until all the chocolate has been incorporated - it will all sink to the bottom of the bowl, so it's essential that you scrape the bottom and mix it all in
  6. Then sift the flour over the top and gently fold the flour into the mixture - don't over-mix it as it will toughen the mixture
  7. Divide it amongst the ramekins and then cover each one with some clingfilm
  8. Place them in the freezer for up to 1 month
  9. When you're ready to bake them, pre-heat the oven to 180 degrees (fan)
  10. Bake for around 16-18 minutes until the puddings have risen and are set on the surface - a lesser time will create a molten centre and more time for a more set consistency
  11. Serve straight from the oven with a lovely helping of ice cream on the side :)
In Ice Cream, Puddings Tags Chocolate, Ice Cream, Puddings, Brown Bread
Comment

Chocolate Celebration Cake

January 15, 2016 Nicola King

So this has been a busy week of baking and not much time to blog post so I am definitely playing catch-up - and we’re only half-way through January! I don’t often blog about my celebration cakes but I had lots of fun with different techniques for this cake so I thought I would share some of the elements that went into making it.

This was made for the husband of a dear friend and I usually make cakes covered in fondant for them. But this time we decided to go for something a bit different and this chocolate ganache drip cake was born. I made a 7 inch Chocolate Truffle Torte, split it into 3 layers and then filled and covered it with Chocolate Ganache Buttercream before adding a Chocolate Ganache drip. This is not for the chocolate faint-hearted as within its celebratory exterior, 725g dark chocolate lurks within – but I’m a firm believer that birthday cake calories definitely don’t count ;-)

Katherine Sabbath is the queen of these drip cakes with an array of fabulous colours. There is a great blog post of Katherine’s tips for styling these drip cakes from Delish here including some mini video footage that I love referring to when making these cakes.

So when you come to decorate the cake, you can use whatever comes to hand. Maracons, chocolate bark, sweeties and chocolates you have in the house, pretzels – the list goes on. As this was a special birthday cake, I wanted to make three decorations that were in keeping with the brown and gold theme. Sugar Glass, Meringue Bark and Honeycomb.

Sugar Glass


The glass is made from sugar and cocoa nibs. It’s very easy to make with just these two ingredients.

Ingredients

  • 200G CASTER SUGAR
  • 2 TBSP COCOA NIBS (or any other toppings you think would look good in the glass)

Method

  1.  Melt 200g caster sugar in a saucepan over a low heat
  2. By the time all this sugar has melted, it should have turned a lovely caramel colour and be time to take it off the stove
  3. Poured this on a baking tray lined with silpat and spread it out with a spatula - this is the time to create swirly edges that will be really interesting when you come to break it into shards
  4.  Pop it in the fridge and let it set
  5. Once set, break it into different shaped shards

Note: once set and out of the fridge, it can go a bit sticky in room temperature so break it up straight from the fridge and store it covered and in a cool place.

Honeycomb

Crunchies remain one of my favourite chocolate bars - and I was so excited the first time I made honeycomb. I've had my share of misses now with the temperature of honeycomb (making delicious toffee in the process!) so now I always use a thermometer and don't chance getting the state of readiness wrong by the colour alone.

I usually make a block of honeycomb and then break it up and coat it with chocolate. This time I wanted to see if I could made shaped honeycomb sweets by pouring it into molds. Due to the speed of the stage when the bicarb is added and then getting it into the tin, I had time to take 6 teaspoons of the honeycomb and get them into the molds. By the time I got the remaining mix into the bigger tin, it was deflated. It still tasted good when it was set but had lost its volume. I wasn't too concerned about this as I wanted to blitz the honeycomb to make a fine crumb that could be sprinkled across the cake.

Ingredients

  • 200G CASTER SUGAR
  • 100G GOLDEN SYRUP
  • 2 TSP BICARBONATE OF SODA

Method

  1. Grease the tin and line it with baking parchment
  2. Heat the caster sugar and golden syrup over a low heat until the sugar has dissolved (around 10 minutes) - it can be stirred at this stage but no stirring as soon as the sugar has dissolved!
  3. Pop in a candy thermometer and heat the sugar to 160 degrees celcius
  4. When the temperature's reached , remove it from the heat and quickly stir in the bicarb until it's fully mixed in
  5. At this stage, I scooped out 6 teaspoons of the honeycomb and put them into a silicone candy mold (each cavity had 1 teaspoon) - if you're just making one block, then pour it all into the prepared baking tin
  6. Leave to set at room temperature
  7. Once set, this can be broken up into pieces
  8. To cover with chocolate, melt the chocolate in the microwave, removing it when the chocolate is almost but not quite melted and then stir until melted completely
  9. Dip the honeycomb pieces into the honeycomb or fully immerse them using a fork and then leave to set on a piece of baking parchment
  10. To make the honeycomb dust to sprinkle on the top of the cake, take some honeycomb (without chocolate) and blitz it in the food processor until you reach your desired level of consistency

Meringue Bark

from the Meringue Girls Everything Sweet

I love meringue. My very favourite treat is macarons but I love how versatile meringue is in creating edible prettiness. I saw this in the Meringue Girls Everything Sweet and wanted to try Meringue Bark rather than Chocolate Bark. It’s the same recipe as their kisses, just treated a little differently.

Ingredients

  • 150G CASTER SUGAR
  • 75G EGG WHITES (I use Two Chicks)
  • DECORATION (these can be customised to your favourite sweeties and toppings)
    • For example, Cocoa Powder, Pearl Balls, Silver Nonpareils, Chocolate Covered Popping Candy, Melted Dark Chocolate

Method

  1. Pre-heat the oven to 200 degrees (fan)
  2. Line a baking tray with greaseproof paper and spread out the sugar evening across it
  3. Bake for 7 minutes in the oven
  4. In the meantime, whisk the egg whites in a standalone mixer, slowly at first and then increasing the speed – you want the egg whites to reach stiff peak at the same time as the sugar’s 7 minutes in the oven is up
  5. Put the mixer on full speed and add the hot sugar a spoonful at a time, allowing each spoonful to be fully incorporated and return to stiff peak before adding the next one
  6. When all the sugar has been added, mix for at least 5 minutes until you can rub a little of the meringue between your thumb and forefinger and it no longer feels grainy
  7. Turn the oven down to 100 degrees (fan)
  8. If you’re making meringue kisses, put your mixture into a piping bag and pipe rounds onto a lined baking tray, pulling up at the end to create a little peak
  9. These should take around 40 minutes in the oven and are ready when the meringue can be removed cleanly from the baking paper
  10. If you’re making meringue bark, spread the meringue out over a lined baking tray until it’s 0.5cm deep.
  11. Add any decorations you like right now – I used a sprinkling of cocoa powder, pearl balls, silver nonpareils and chocolate covered popping candy
  12. Bake for 1 hour until the meringue bark can be lifted cleanly from the baking tray
  13. When it’s cool, drizzle melted dark chocolate across the bark
  14. When the chocolate has set, break the meringue into shards of different sizes


In Celebrations Tags Chocolate, Ganache, Drip Cake, Celebration, Birthday, Meringue, Sugar Glass, Honeycomb
Comment

Twice Baked Roquefort Soufflé

January 10, 2016 Nicola King

I love having dinner parties. I also love going out for dinner, but I think there's something very special about inviting friends into your home and planning a menu they'll enjoy, then cooking it for them.

I am totally up for designing complicated menus (like making chocolate soufflés to order after the main course) but I think there's a lot to be said about taking the time to really enjoy the company of your friends. And that takes a menu where at least a couple of courses can be planned and prepped in advance so that they just require baking time when your friends are with you.

I was looking for vegetarian inspiration and came across this wonderful Twice Baked Roquefort Soufflé which I've only made once before (and that was more moons ago than I care to think of) from Delia Smith's Vegetarian Collection. What I love about it is that it can be prepped 24 hours in advance with its first bake and then finished in the oven 30 mins before it's due to be served. And it still retains its soufflé appearance and texture. Delia also has a goat's cheese version too.

The process of preparing it requires working at speed. I really recommend when making this that you have all your ingredients weighed out separately so you can just reach for this or that as required. You don't have time to be weighing out ingredients or crumbling roquefort once you've started. But the process is straightforward as long as you follow the timings below. Although the oven timings should work, keep an eye on the soufflés as they approach the end of the cooking period as they easily burn. The resulting consistency should be firm on the outside and slightly soft and velvety in the middle.

I promise you that if you want to wow your guests with something as special as a soufflé, this is a brilliant recipe for you. The hard work is all done in advance and the stress of trying to pull together something as seemingly complicated as a soufflé when your friends arrive and are chatting away with you is completely removed.

The light texture and resulting soufflé is every bit as good as the best restaurants.

You will be a masterchef in your own home :)   

Twice Baked Roquefort Soufflés

from Delia Smith's Vegetarian Collection

Makes 6

Ingredients

  • 4 LARGE EGGS, SEPARATED
  • 175G ROQUEFORT, CRUMBLED
  • 225ML MILK
  • 5MM ONION SLICE
  • 1 BAY LEAF
  • PINCH OF NUTMEG
  • 6 WHOLE BLACK PEPPERCORNS
  • 1 TBSP BUTTER (for greasing the ramekins)
  • 40G BUTTER
  • 40G PLAIN FLOUR
  • 150ML DOUBLE CREAM
  • SPRIGS OF WATERCRESS TO GARNISH

Equipment

  • 4 RAMEKINS (4cm deep x 7.5cm diameter, lightly buttered)
  • REGULAR BAKING TRAY
  • 5CM DEEP BAKING TRAY OR DISH (this will hold 6 ramekins and be filled with 1cm water)
  • STANDALONE MIXER OR WHISK

Method

  1. Pre-heat the oven to 160 degrees (fan)
  2. Lightly grease the ramekins with the butter
  3. Separate the eggs and measure out all of the ingredients so you're ready to go
  4. Place the milk, onion slice, bay leaf, nutmeg and peppercorns in a saucepan and heat over a medium heat until it just reaches simmering point (you don't want this to boil so do keep an eye on it)
  5. Strain the milk mixture into a jug and put to one side
  6. Rinse out the saucepan and then melt the butter in it
  7. Add the flour until it becomes a paste and then cook it for 3 minutes until it becomes a light straw colour
  8. Whisking all the time, slowly add the milk mixture until the sauce is thick - at this time the mixture should cleanly leave the sides of the saucepan as you stir it
  9. Lightly season with salt and pepper and take the heat down to the lowest setting on your stove
  10. Cook for 2 minutes, stirring gently
  11. Remove from the heat and leave it to cool for 3 minutes
  12. Beat in the egg yolks one at a time until they're all combined
  13. Stir in 110g crumbled roquefort into the mixture until it's mostly melted
  14. In a standalone mixer, whisk the egg whites until they reach soft peak
  15. Stir in one spoonful of the egg whites to loosen the mixture
  16. Then gently fold in the rest of egg whites
  17. Boil your kettle
  18. Divide the mixture evenly amongst the 6 ramekins
  19. Place them on the baking tray that's 5cm deep and place this onto a shelf in the oven
  20. Pour boiling water into the bottom of the baking tray until the water is 1cm deep
  21. Bake for 20 minutes until lightly golden
  22. Once baked, remove them to a cooling rack
  23. When they're almost cool, run a knife around the edge of each ramekin and gently loosen and remove each soufflé from its dish
  24. Place the soufflés on a lightly oiled baking tray and cover with clingfilm 
  25. They can now be kept in the fridge for up to 24 hours
  26. When you're ready to serve them, pre-heat the oven to 160 degrees (fan)
  27. Place the remaining crumbled roquefort evenly on the top of each soufflé
  28. Bake them in the oven for 30 minutes, during which time they should rise again
  29. When they're ready, remove from the oven and spoon the double cream over the top of the soufflés and place back in the oven for 2 minutes
  30. Remove from the oven, place on watercress garnish and serve immediately (they will deflate after a few minutes)
  31. Wow your guests with your wonderful savoury soufflé, freshly baked :)  


In Simple Suppers Tags Soufflé, Roquefort
Comment

Chocolate Cupcakes with Chocolate Frosting

January 5, 2016 Nicola King

Happy New Year! I hope you and your loved ones had an amazing festive period and aren't feeling too sad about pulling down your decorations and archiving the Christmas carols until next year :) We were very ready to welcome in the New Year and I am super excited about all the new adventures we'll enjoy! One year into blogging and here are my top photos from Instagram over the last year - I'm very proud of them and have lots of exciting goals for this year ;-)

Christmas always comes with lots of baking and I decided to take a break from blogging for the festive period as I always find it much trickier with my terrible twosome in tow! We're three weeks into our school holidays with only a couple of days left to go now. It was great to have some time to reflect and feed the soul - and also to think about some dietary changes to our family.

We already have psoriasis in the family which means staple foods like tomatoes and potatoes are struck off our shopping list as well as red meat and shellfish amongst other foods - and we also have to be mindful about how we combine food groups. We don't stick to it rigidly but there are definitely some foods we always have to avoid. A month or so ago, one of my sons was diagnosed as intolerant to dairy (cow and goat milk), egg white and nuts (almonds, pistachios and hazelnuts). The dietician and I laughed that at least he wasn’t gluten intolerant too and I promise you, I was thankful for small mercies!

We’re lucky that these foods don’t affect his gut and it’s (just?) eczema that we’re dealing with. Still in testing mode right now and we’re hopeful this is just a phase that will pass, especially since his favourite foods are milk, cheese, eggs and macarons! We’re not going to cut dairy and eggs out completely but obviously reduce and manage them and look for other options. We’ve immediately switched to soya milk and there’s no egg on toast in any form, but we’re allowing a little of these in baked goods. We’re also teaching him about making choices about how he eats. Time will tell.

So I wanted my first blog post of the year to be dedicated to him as he's been such a trooper. He's never grumbled or groaned and has embraced this new phase with gusto. I spent some time last year investigating vegan baking and looking at how I could replace ingredients that I traditionally used in baking, although at that time it was more out of interest than any kind of necessity. One of my favourite recipes was this Chocolate Cupcake with Coconut Frosting. This is a lovely frosting but its limitations are that I just can't get it to look as pretty as I’d like and if I use sprinkles or cocoa nibs as a topping, they discolour the icing after a little time. Just before Christmas I experimented with vegan butter and cream cheese in a frosting, but my son declared this was not a success taste-wise and the frosting was too soft and the peaks drooped after piping :(

I turned to a book that a friend gave me during my baking odyssey last year - Babycakes. I baked these Raspberry Scones from it which were delicious but I couldn’t easily find ingredients in other recipes and it was relegated to the bookshelf for a later date. Great to have this handy right now! One of the common ingredients they use in their cakes is apple sauce so I decided to replace the sugar that I had in my original recipe with some of this sauce and see if I could make a squidgier cake. And I also wanted to try some of their chocolate frosting.

The apple sauce can be bought (sugar free) but was very simple to make. I used two Granny Smith and two Pink Lady apples, peeled and cored and chopped into 1cm pieces. These were mixed with lemon juice, cinnamon and agave nectar (check out the free from section of supermarkets) and then roasted on a tray for 35 minutes. Once they have been roasted and cooled, they need to be blitzed to a smooth puree with hot water and more agave nectar and immediately refrigerated for up to one week in an airtight container. This made double the amount I used in the cupcakes. Very simple and amazingly sweet with the agave nectar.

I then made the frosting as it needs to be refrigerated for at least six hours (it can be kept for up to a month in an airtight container). This is also simple to make but does require dry soy milk powder which I couldn’t find locally in any health food stores and ordered from Ebay (I haven’t experimented with leaving this out). All the ingredients bar the coconut oil and lemon juice are blitzed in the food processor and then the oil and lemon juice are added slowly with the motor running. I think my lemon juice might have been too cold as the frosting did start to solidify as I added the final ingredients and became very lumpy and not very attractive! So I microwaved it in short bursts until the lumps had melted and then stirred it until it was smooth. Then covered it with clingfilm and popped it in the fridge.

I have spent the last few days working on this frosting as it still turned out lumpier than I expected so the final product looked smooth but when you dipped into it, it looked very granular. I did re-melt it and then refrigerate it again which worked. The recipe also says that if it's too soft when removed from the fridge, you can add liquid coconut oil into it - the oil will start to solidify when it hits the chilled frosting and go stiffer. BUT - given my experience, you would need to take care that the coconut oil doesn't solidify into little lumps again.

Finally I decided to remove the sugar from my previous Chocolate Cupcakes and in their place add agave syrup and the roasted apples. You can play around with the sweetness of these two so you can make it perfect for you, but this definitely made a softer crumb and squidgier cupcake. The cupcakes are simple to make - mix the dry ingredients and wet ingredients separately and then add them together, mixing thoroughly. I ran out of rice flour when I was making them so used a mixture of rice flour and gluten-free plain flour. When baked, the cupcakes need to be completely cool before adding the frosting as it could melt the coconut oil within - and once they've been frosted I found they held up well as long as kept cool but they stayed okay in the kitchen and did not need to be refrigerated. The frosting piped very easily but when holding the piping bag, I needed to hold it near the top as the warmth from my hand started to slightly melt the frosting so the first ones piped had better definition than the last ones.

These turned out brilliantly. The pro's of this frosting are that you can get a peak and look of traditional buttercream which is the one ambition I've had with making vegan frosting. The cupcakes with the apple sauce made a much lighter cake crumb and I definitely think this addition is worthwhile. However you really need to like the coconut flavour as it's predominant in the frosting (fortunately we do!) Also, I noticed that after some time, the sprinkles started to melt slightly into the frosting so if you do want to use them, I'd suggest sprinkling just before serving.

I am absolutely thrilled to start the new year off with such a bake that works for my entire family. Free from baking was definitely not my comfort zone a year ago but a girl's gotta move with the times.

Next stop - vegan vanilla frosting :)

Home-Made Apple Sauce Ingredients (can be refrigerated for up to a week, from Babycakes)

  • 2 GRANNY SMITH APPLES
  • 2 PINK LADY APPLES
  • 30ML LEMON JUICE
  • 2TSP CINNAMON
  • 80G AGAVE NECTAR (for pre-roasting)
  • 40G AGAVE NECTAR (for blitzing in the food processor)
  • 80ML HOT WATER

Home-Made Apple Sauce Method

  1. Pre-heat the oven to 160 degrees (fan)
  2. Line a baking tray with greaseproof paper
  3. Peel, core and chop the apples into 1cm pieces
  4. Mix the apples with the lemon juice, cinnamon and 80G agave nectar in a bowl
  5. Spread them out over the lined baking tray
  6. Bake for 35 mins, rotating the tray 180 degrees after 20 mins
  7. Allow to cool
  8. Blitz in the food processor with 40G agave nectar and the hot water
  9. Place in an airtight container and refrigerate for up to a week

Chocolate Frosting Ingredients (enough for 24 cupcakes, from Babycakes)

  • 360ML SOY MILK
  • 70G SOY MILK POWDER
  • 30G COCOA POWDER
  • 60ML AGAVE NECTAR
  • 1TBSP VANILLA EXTRACT 
  • 240ML COCONUT OIL
  • 2TBSP LEMON JUICE

Chocolate Frosting Method

  1. In a food processor, blend the soy milk, milk powder, cocoa powder, agave nectar and vanilla extract for 2 mins
  2. Add slowly the coconut oil and lemon juice, alternating them
  3. Extra step: if you mixture goes lumpy, then microwave it for short bursts until the lumps melt (it’s just the coconut oil solidifying)
  4. Mix until smooth and then pop it into an airtight container
  5. Refrigerate for at least 6 hours and keep for up to a month

Chocolate Cupcakes Ingredients (makes 24 cupcakes)

  • 250G RICE FLOUR
  • 1 TSP XANTHUM GUM
  • 1½  TSP BAKING SODA
  • 1 TSP SALT
  • 270G SUGAR
  • 60G COCOA POWDER
  • 320G SOYA MILK AT ROOM TEMPERATURE
  • 150G MELTED COCONUT OIL AT ROOM TEMPERATURE
  • 2½ TBSP APPLE CIDER VINEGAR
  • 2½  TSP VANILLA EXTRACT
  • 290G AGAVE SYRUP
  • 125G HOME-MADE APPLE SAUCE (see above for recipe)

Chocolate Cupcakes Method

  1. Heat the oven to 170 degrees and line 2 cupcake trays with cupcake papers.  Melt the coconut oil and put to one side to cool down. Ensure that the soya milk is out of the fridge and at room temperature.
  2. In one bowl, mix together the dry ingredients: the rice flour, xanthum gum, baking soda, salt, sugar and cocoa powder and mix well.  Then in another bowl, mix together the wet ingredients: the soya milk, coconut oil, vinegar, vanilla, agave syrup and apple sauce.  If you put the milk and coconut in first and the milk is not at room temperature, the coconut oil will start to solidify.  This can be rescued by warming gently in the microwave with short 15 second bursts until the coconut oil re-melts.
  3. Pour the wet ingredients into the dry ingredients and mix by hand with a wooden spoon.
  4. Fill each of the 24 cupcake papers with around 1/3 cup of batter and then bake for 18-20 minutes or until a toothpick inserted into the middle comes out clean.
  5. Remove the cupcakes from the tin and leave to cool.  It's important that they're completely cool before you frost them otherwise the frosting will start to melt.
  6. Keep the frosting in the fridge until you're ready to use it - I filled up my baking bag in advance and kept it in the fridge as the warmth from your hands will start to melt the frosting
  7. Hold the piping bag near the opening at the top as you pipe, keeping your hand as far away from the nozzle as possible to keep it from melting
  8. Once piped, you don't need to refrigerate the cupcakes but the frosting will start to melt and take on a sheen if the room is too warm
  9. Add sprinkles just before serving :)
In Free From, Cupcakes Tags Cupcakes, Dairy Free, Gluten Free, Chocolate
Comment

Edible Christmas Gifts

December 20, 2015 Nicola King

5 more sleeps to Christmas!!! *squeal*  Excitement levels are running high in our house right now and there's nothing better than little ones at this time of year to remind you about the magic of Christmas and the build-up to the day when the big man finally makes his appearance.

Christmas gifting often gets kind of crazy. The shops started their sales yesterday and I was feeling relieved that I was nowhere near them. Maybe some people will think I'm bah humbug but I like to steer well clear of the shops and order most of my presents online of late. London gets pretty frantic at this time of year.

Edible food gifts are kind of special. You can make the yummiest creations, tailor-made for everyone and you know exactly what's going in them. When I was little, my mum and I used to make marzipan petit-fours fruits for my great-grandma. We were reminded of them recently and I decided that I'd make some for my dad's birthday. They are so simple to make and as soon as you open a box of them, the scent instantly transports me back to my childhood Christmas days.

All you need is a pack of marzipan (home-made or shop bought), cloves and food colouring (colours dependent on the fruit you decide to make). I use gel colours as I have them available in my drawer from baking celebration cakes, but when I was little we used to use the little bottles of food colouring from the supermarket and they worked just as well. For these, I used green, red, yellow, brown and orange. Each fruit was around 15-20G but you can make them as small or large as you like.

When making them, here are a few tricks that help: to make the oranges use the raised side of a cheese grater to create the dimpled pattern by rolling the marzipan ball all over the surface, then adding a clove in the top; for the cherries, make two smaller balls and then I used some florist wire to create the stalks; the apples have a clove at the top and bottom - the bottom clove has the stem part pushed into the apple and then the top clove has the stem protruding like a little stalk; finally, the banana has some brown streaks painted on its skin and brown on either end. Pop them finished into mini cupcake cases and then present them in a box. 

It's been a busy week of playdates and parties to keep me sane as the boys started their four week break from school. Apart from my final birthday cake of the year and a couple of Christmas cakes (more pics to follow next week), here are three more ideas that you might like for Christmas.

Hope you're all enjoying your festive seasons and are (almost) all ready for the big day!!! xoxo

IMG_2950.JPG

Hot Chocolate Gift Jar

Inspired by Donna Hay, she's the queen of creating beautiful gifts in the festive season. Lovely edible treats like brownie, cookie and gingerbread men mixes all presented in glass jars are but a few. I'm not a fan of giving a gift where the recipient needs to then go shopping to get other ingredients to make their treat so this glass of hot chocolate mix really appealed - just add milk!

1/2 cup icing sugar, 1/2 cup cocoa, 1 tsp cinnamon & 3/4 malted powder

Adorned with whatever decorations you like! In this case, marshmallows and candy canes :)


Pistachio Cookies

These little cookies are wonderfully moreish, gluten free and make lovely gifts.

1 cup powdered pistachio (shelled pistachios blitzed in the blender), 3/4 cup icing sugar, 1 cup grated coconut and 1 egg white (40G liquid egg white)

Combine all the ingredients and then chill for 2 hours. Roll them into little balls and bake them at 170 degrees on a lined baking tray for 8-10 mins.

Seriously delicious, you need to package them up quickly before you eat them all! 


Festive Chocolate Bars

I wanted to give some friends' children  little chocolate bars but jazz them up. I had 2 bars of Green & Blacks chocolate (one white, one milk) and two tupperware containers a little smaller than the bar itself.

I lined the container with olive oil and a strip of greaseproof paper (so I could remove it easily when set). I melted each chocolate bar and poured it into the container. Whilst unset, add your toppings.

We have Haribo Minions and sprinkles. And then Malteser reindeer sprayed gold, Milky Way Magic Stars sprayed gold, Crunchy Rocks and Smarties.

But the best bit is choosing your own favourites :)

In Chocolates & Sweeties, Celebrations Tags Marzipan, Petit Fours
Comment

Chocolate Gingerbread Men

December 13, 2015 Nicola King

I can't believe how quickly the weeks are flying towards Christmas now. It seemed like everyone was digging out their Christmas spirit so early this year and then in the midst of parties, carol concerts and the seemingly neverending activities at school over the festive period, suddenly the boys are on holiday for four weeks and we're counting down to the big day.

I had a list as long as my arm of things I was going to bake this Christmas. But then, a couple of weeks ago, we had dairy, nut and egg allergies diagnosed in the family. They're not life threatening but they kind of scuppered my plans. And although I know that I will be still be baking with dairy, eggs and nuts in the future, we're just being a little more considered and restrained right now whilst we make our lifestyle choices.

But being Christmas time, we couldn't let it go by without out little gingerbread family. Whilst these Chocolate Gingerbread Men do contain butter, the rest of the ingredients are on our okay list and we made them pretty small (with a 5cm cutter) but just big enough to decorate.

The dough is really easy to make. After the butter is creamed in a mixer, all the rest of the ingredients are added in one go and combined. This is a soft dough and needs refrigerating so once I'd made and refrigerated it, I then cut out my little army and then popped them back in the fridge until I was ready to bake them the next day. To me, biscuits baked fresh are just the best when you have friends coming to visit.

You can use any cutters you like. I have a great set from Ikea with 3D stars, Christmas tree and reindeer which are lots of fun but I gave them to some adult friends to decorate before taking any photos and their creations disappeared home with their new friends! I bought some coloured icing pens and the kids just loved decorating them. Here is our little family :)

For me, Christmas just isn't the same without gingerbread and gingerbread people are such a fun way to celebrate with friends. I haven't met a child yet (and now it seems an adult too!) that doesn't love to become an artist and bring out their inner child.

Naked or decorated, these gingerbread men are just delicious. Just the right amount of chocolate throughout and then a lovely, but not overly intense, taste of ginger. I think this makes them perfect for kids but still completely moreish for adults.

And just right to enjoy with a mug of hot chocolate and marshmallows :)

Chocolate Gingerbread Men (makes around 20 x 5cm shapes)

Ingredients

  • 125G UNSALTED BUTTER, SOFTENED
  • 100G LIGHT BROWN SUGAR
  • 230G GOLDEN SYRUP
  • 375G PLAIN FLOUR, SIFTED
  • 1 TSP BAKING SODA, SIFTED
  • 25G COCOA, SIFTED
  • 2 TSP GROUND GINGER
  • 1 TSP PUMPKIN SPICE (you can use allspice here but I'd start with 1/2 tsp and then add to taste)
  • COLOURED ICING PENS (optional)

Method

  1. Beat the butter and sugar in a mixer for at least 5 minutes until pale
  2. Add the golden syrup, flour, baking soda, cocoa and spices and beat on low speed until combined
  3. Place on a sheet of baking paper and then pop another sheet on top
  4. Roll out the dough until around 1/2 cm thick
  5. Refrigerate for at least one hour so the dough has time to firm up
  6. Remove from the fridge and cut out your shapes - the dough will soften and get sticky quite quickly so just pop it back into the fridge if needed to firm up for 5-10 minutes
  7. You can either bake your shapes now or refrigerate them again until ready
  8. Pre-heat the oven to 160 degrees
  9. Bake for 12 minutes for a snap to the biscuit (a couple of minutes less if you want them a little softer)
  10. When you remove them from the oven, the biscuits will be soft and very fragile so you need to leave them to cool down completely before handling them
  11. When they're cool, it's time to have some fun and decorate them - or eat them just as they are :)


In Celebrations, Biscuits & Cookies Tags Chocolate, Gingerbread, Ginger
Comment

Gingerbread Marshmallows

December 5, 2015 Nicola King

So here we are in December. Who'd have thought it would come around so quickly! It kind of snuck up on us this year. We're always one of the first to put up our Christmas tree and decorations although it seems like this year everyone's ahead of the game and had them up last weekend. But we always wait until December, so this weekend is going to be jam-packed with Christmas excitement, parties, movies and yummy festive treats :)

I have been holding on to Gingerbread Marshmallows for a good few months now. I love marshmallows, love making them and especially eating them. The home-made ones are always that extra bit squidgier inside, smoother and silkier. They are simply delicious.

I started off with a few different recipes and ended up being captivated by these yummy ones from Joy The Baker, slightly mesmerised by the chocolate and crushed gingerbread biscuits adorning them. I wasn't sure I was going to go that far (but I did) and wanted to try making little gingerbread men out of them (which I did); I then got completely carried away and decided to make little gingerbread s'mores out of them (definitely glad I did). So much fun and such a sticky mess!

So making them also gave me a fantastic workout as I ran out of glucose half-way through and then had to walk the entire local area looking for more, only to find out that all the local shops have stopped selling it. You can imagine my delight at this! But then I came home, determined to find some more in my cupboard (you know that feeling when you know something you've lost is just lurking that little bit farther into the cupboard) and lo and behold, I found one last tube. A bittersweet moment - but at least I smashed my step count for the day!

So marshmallows are super simple to make. The only downside to them is that when you make them yourself, you realise that they're not at all, even the tinsiest bit, healthy for you. But just close your eyes and will those thoughts out of your mind for the next 20 minutes!

It's important to prepare the baking tin. I use a 8 inch square tin and this makes quite thick marshmallows which are generally deeper than regular cutters - so if you want to cut them into shapes you might want to choose a bigger tin or split the marshmallows into two tins. Usually I line the tin and then lightly grease the lined paper before adding the marshmallow. Joy The Baker's recipe calls for coating the tin with oil and then a very generous layer of icing sugar, thickly applied so the sides and bottom look solid white. The marshmallow did come out fairly easily but I did have to pry the sides away which made them a little dented. 

To make the marshmallow, you first put a half cup of water in a stand mixer and sprinkle the powdered gelatin on the top, leaving it for 10 minutes. When it's ready it will be a sort of yellowy sticky consistency. Meanwhile mix the caster sugar, glucose and salt in a saucepan and heat it on a medium heat until it melts. Give it a little stir. Then once the sugar is melted, turn up the heat to medium-high and leave without stirring until your thermometer reaches 240 degrees. Do keep a close eye on it and don't wander away from the stove! When the temperature is reached, turn the stand mixer onto low speed and then slowly add the sugar syrup in a long drizzle. You want to pour it in a stream somewhere between the side of the bowl and the whisk, more towards the side of the bowl if in any doubt as you must be careful the sugar doesn't hit the whisk and splatter over you - it's very hot! As you're pouring this in, gradually turn up the speed until all the sugar has been added and the mixer is working at full speed. Keep whisking for 10 minutes until the mixture has turned into a lovely white, billowy marshmallow. It looks like gooey clouds.This is the time to add your spices and vanilla. You can add whatever you like; I might be inclined to put a little less cloves in next time as that was a very prominent flavour in mine. Mix for another few minutes and then pour the marshmallow into the tin to set. If you need to smooth the surface, use a wet spatula.

After the marshmallow has set (ideally overnight) you can then decide how you want to present it. When you cut it up, either use a sharp knife that has been dipped in hot water and if you're using a cookie cutter, again pop this into hot water. Try not to get too much water all over your marshmallow as it will turn into a squidgy mess (although the upside of this is that you're compelled to eat all the messy bits then and there!)

I tried three ways: cut into regular blocks; cut into blocks and then dipped into melted chocolate and crumbled gingerbread biscuits (this was Joy The Baker's way of doing it); and then cut into little men and turned into Gingerbread Men S'mores. For the S'mores, I got a biscuit (I used a Graham's cracker but if you don't have access to these you could use, say, a gingernut biscuit istead) and heated it in the microwave for around 30 seconds - it turns soft and then working fast, you can cut it into your desired shape using a cookie cutter. So I cut my biscuit into a little man, spread him with a little dulce de leche, popped a marshmallow man on top, dipped him in chocolate and then covered him with sprinkles. Such fun! This is really your opportunity to be completely creative and make whatever you fancy.

Gingerbread Men 2.JPG

Marshmallows are fun. Home-made ones are definitely the best. And the beauty is that there are so many different flavours with which you can experiment.

Enjoy discovering your own favourite :)

Gingerbread Marshmallows (from Joy The Baker's Bonkers Awesome Gingerbread Spiced Marshmallows)

Ingredients

  • 1 CUP COLD WATER, SPLIT INTO 2 x 1/2 cups
  • 14G POWDERED GELATIN
  • 415G CASTER SUGAR
  • 270G GLUCOSE
  • 1/4 TSP SALT
  • 2 TSP VANILLA EXTRACT
  • 1/2 TSP GROUND CINNAMON
  • 1/2 TSP GROUND GINGER
  • 1/4 TSP GROUND NUTMEG
  • PINCH OF GROUND CLOVES
  • VEGETABLE OIL TO COAT YOUR TIN
  • ICING SUGAR TO COAT YOUR TIN

Method

  • Prepare your tin by coating it with vegetable oil and then cover that with icing sugar - you're looking for a thick coating so that the icing sugar looks solid white (alternatively you could line your baking tin with some greaseproof paper, lightly oiled on the inside)
  • Pour 1/2 cup of water into your stand mixer and then sprinkle the powdered gelatin over the top
  • Leave to stand for 10 mins
  • In a medium saucepan, heat the sugar, glucose, salt and other 1/2 cup of water and heat over a medium heat until it boils giving it a mix to make sure the ingredients are dissolved
  • Then using a candy thermometer, heat the mixture to 240 degrees without stirring it
  • When the sugar mixture reaches 240 degrees, turn the stand mixer onto a low speed and start to pour it in a slow, steady stream into the gelatin (you're starting on a low speed so the hot mixture doesn't spatter everywhere and burn you)
  • Gradually increase the speed of the mixer as you're pouring in the sugar until you're at high speed and all the sugar has been added
  • Continue beating at this speed for around 10 mins until the mixture has more than doubled in size and looks like fluffy white marshmallows
  • Add the vanilla extract and the spices and mix for a further 3 minutes
  • Gently pour the marshmallow mixture into the prepared tin and smooth the surface if required with a wet spatula
  • Leave to set for at least 3 hours or overnight
  • When you come to cut up the marshmallow, use a hot wet knife or use a hot wet cutter to cut it into shapes
  • Decorate your marshmallows as you like (some ideas are above) or enjoy them naked, just as they are :)
In Celebrations, Chocolates & Sweeties Tags Gingerbread, Ginger, Marshmallows, Grahams Crackers
Comment

Spiced Pumpkin Pie

November 29, 2015 Nicola King

So a little late for Thanksgiving, but definitely not too late to indulge in this year, comes the Spiced Pumpkin Pie. There are two reasons why I love this. The first, is that it contains my beloved autumnal favourite - the pumpkin. Definitely one reason to welcome in the autumn after the warm, hazy days of summer. And the other is that the first time I tasted Pumpkin Pie, it came from Williams Sonoma, one of my very favorite shops (sadly contained Stateside) - and I loved it so much, I was hooked. So it seemed only fitting that the first time I tried my hand at this, it should be a Williams Sonoma recipe.

This is actually very simple to make and consists first of making and chilling your very own pie dough and then creating a rich creamy pumpkin filling spiced with cinnamon, ginger, cloves and nutmeg. I mean, what's not to love?

In the UK, the pumpkin pie recipes tend to lean towards a sweet shortcrust pastry but an American friend reliably informed me that genuine article pumpkin crust tends to be more crumbly and flakey. So I used the (American) Williams Sonoma recipe for Pie Dough which you can make in a standalone mixer - even better! Fit your mixer with the paddle attachment, then mix together flour, sugar and salt. Next add cubed butter in one go, ensuring that you toss the butter through the flour to coat it before turning the mixer on. Mix it on low to medium speed until it forms coarse breadcrumbs where the butter is no larger than peas. Add 3 tablespoons of cold water and mix again until the dough comes together, around 30 seconds.

With this pie dough, you're going to roll it out and line the tin before you refrigerate it which is a little different from the usual method of chilling the pastry before you roll it out. So put the dough ball onto a lightly floured surface and press down with your hand to form a large disc. Roll it out to around 30 cm and then carefully transfer it to your tin. I found it pretty robust at this stage so it didn't tear or rip. Then gently press the bottom edges around the inside base of the tin and the sides, ensuring that you are pressing it into the sides. When you've finished with this, my method of cutting off the unwanted pastry is to roll my rolling pin across the top to cut off the edges (although this pastry is prone to a little shrinkage so you could cut off the excess pastry after baking if you prefer.

This is when the pastry needs to be chilled. About a hour or so should do it and if you need it be ready faster, you could pop it in the freezer. After it's chilled, preheat the oven to 180 degrees. Line your pastry shell with tin foil, ensuring that the foil covers the top edges and hangs over the side and then it fill it with pastry weights or rice. Bake this for 20 minutes in the oven and then peek under the foil. As it's going to be baked again and will turn golden brown then, you're just looking for it to lose its wetness and the pastry to turn a light golden brown. This should take 20-30 minutes.

In the meantime, whilst your pastry is partially baking, it's time to make the pumpkin filling. Again, it couldn't be easier. First whisk the eggs and dark brown sugar until smooth. Then add the rest of the ingredients and beat together until smooth.

When the pastry is ready, remove the foil and weights and then fill with the pumpkin filling. You may find it easier to place your pie tin on a baking tray to make it easier to get in and out of the oven. Bake in the lower third of the oven for around 30 - 40 minutes checking regularly as you approach the 30 minutes. You want to ensure that it doesn't crack but the filling needs to be slightly risen and firm in the middle.

Then leave to cool on a cooling rack or eat slightly warm.

It is A-M-A-Z-I-N-G. It has a consistency a little like an egg custard but lovely spiced flavours and a creamy richness from the pumpkin and cream.

I love it. Like I said, don't fret if you've missed thanksgiving but break tradition and make this as a yummy pud after Sunday lunch. Or supper with friends.

You won't regret it :)

Spiced Pumpkin Pie (from Williams-Sonoma's Pie & Tart)

Ingredients

Pie Dough

  • 200G PLAIN FLOUR
  • 1 TBSP CASTER SUGAR
  • 1/4 TSP SALT
  • 125G COLD BUTTER, CUBED
  • 3 TBSP VERY COLD WATER

Spiced Pumpkin Filling

  • 105G DARK BROWN SUGAR
  • 2 LARGE EGGS
  • 1 TSP GROUND CINNAMON
  • 1 TSP GROUND GINGER
  • 1/2 TSP SALT
  • 1/4 TSP GROUND CLOVES
  • 1/4 TSP GROUND NUTMEG
  • 250G CANNED OR FRESH PUMPKIN PUREE
  • 375ML DOUBLE CREAM

Method

  1. Firstly make the Pie Dough by putting the flour, sugar and salt into a bowl and stirring to mix the ingredients together
  2. Then add the butter in one go, tossing the butter in the flour until every piece has a light covering
  3. Put the mixer on low to medium speed until the mixture ressembles coarse breadcrumbs, where the butter pieces are no larger than peas
  4. Then add the water and mix briefly until the dough comes together, around 30 seconds
  5. Place the dough on a lightly floured surface and press down with your hand to form a large disc
  6. Roll it out to around 30 cm and then carefully transfer it to your tin
  7. Gently press the bottom edges around the inside base of the tin and the sides, ensuring that you are pressing it into the sides
  8. Roll your rolling pin across the top to cut off the edges
  9. Chill your pastry for around an hour
  10. Then preheat the oven to 180 degrees
  11. Line your pastry shell with tin foil, ensuring that the foil covers the top edges and hangs over the side and then it fill it with pastry weights or rice
  12. Bake it for 20 minutes in the oven and then peek under the foil until it loses its wetness and turns a light golden brown (takes around 20-30 minutes)
  13. Meanwhile, make the Spiced Pumpkin Filling
  14. Whisk together the eggs and dark sugar until smooth
  15. Add the rest of the ingredients and mix again until smooth
  16. When the pastry shell is ready, fill with the pumpkin mixture
  17. Bake in the lower third of the oven for around 30 - 40 minutes until the pumpkin filling is slightly risen and set in the middle
  18. Remove from the oven and cool it on a cooling rack
  19. Enjoy cold, slightly warm or with whipped cream :)


In Celebrations, Puddings, Tarts & Pies Tags Pumpkin, Thanksgiving, Pie, Pie Dough
Comment

Rainbow Meringue Cake

November 18, 2015 Nicola King

It feels like a week where a bit of colour is needed to brighten up the day. Nothing shouts colour more than this stunning Rainbow Meringue Cake with its rainbow layers, gorgeous vanilla mascarpone cream and topped with strawberries, raspberries and pomegranate seeds. 

The idea for the rainbow meringue layers was taken from the Meringue Girls Cookbook. I am a HUGE fan of meringue, particularly macarons, and their little meringue kisses which I recently turned into little ghosts for a kids' birthday party, are the loveliest treats. 

The meringue is straightforward using the Meringue Girls process. You need a couple of batches of their meringue mixture which is also the base of their kisses. It's simply oven-heated sugar added a spoonful at a time to egg white whipped to stiff peaks and then whisked for around 5 minutes until the sugar has dissolved.

The more fiddly bit is preparing the piping bags for the mixture and these need to be coated with thick food paste in the different rainbow colours. Did you ever use an acronym to remember the rainbow order? I can still be found muttering Richard Of York Gave Battle In Vain!! To achieve the different hues, I used Sugarflair Spectral Paste in these colours: Velvet Red, Yellow/Cream, Yellow Extra, Holly Green, Ice Blue and Purple. To apply them, the way that's easiest for me is to turn the piping bag inside out (I don't worry about the very tip of the icing bag as it will be snipped off and also gives us a little tag to hold onto when pulling the bag back through the right way). Once your bag is turned inside out, pop it over a wine bottle and then take your chosen food colour paste, painting the inside from tip to half-way down the bag with a thick coating of colour. If you leave the bag for too long after painting, you'll notice that the colour may start to separate so it's worth giving the bag a quick brush with a pastry brush to distribute the colour just before adding the meringue.

Then pull the bag back the right way so the food colour is on the inside. I then pop my bag into a measuring jug and fill it with a couple of scoops (I used an ice cream scoop) of meringue. Squidge the food colour into the meringue with your fingers and then snip off the end. Pipe the mixture onto a baking tray lined with greaseproof paper starting at the outside and working in. I found that I didn't have generous amount of meringue mixture for each one so had to use a spatula to smooth it and cover the whole circle. Be careful not to smooth the very outside of the circle with the deepest colour as this will show on the outside of your cake so you want a really vibrant colour.

After baking and cooling, you're ready to assemble your cake. The cream does make the inside of the meringue soften and disintegrate a little, so it's best to assemble this as close to serving as you can. I decided to fill my cake with a vanilla mascarpone cream and then top it with beautiful strawberries, raspberries and pomegranate seed and a light dusting of icing sugar.

This cake is sweet and delicious and the cream is lovely and light.

It does take a little preparation but looks so bright and colourful, it would be a welcome addition to any party, dinner affair or just for fun.

Ours is just for fun. Can't wait to show the kids what they're having for pudding tonight :)

Rainbow Meringue Cake

Rainbow Meringue (from Meringue Girls Cookbook)

  • 300G EGG WHITES (I use Two Chicks egg whites but you could also use around 10 medium eggs)
  • 600G CASTER SUGAR

Vanilla Mascarpone Cream

  • 500G MASCARPONE
  • 460ML WHIPPING CREAM
  • 4 TSP VANILLA EXTRACT (to taste)
  • 140G CASTER SUGAR (to taste)

Topping

  • PUNNET OF STRAWBERRIES
  • PUNNET OF RASPBERRIES
  • 1 POMEGRANATE
  • ICING SUGAR (to dust)

Method

  1. Pre-heat the oven to 200 degrees
  2. The meringue is made in 2 batches so the first batch will make 3 meringue discs
  3. Line 3 baking trays with greaseproof paper and draw a 10 inch circle as a guide
  4. Line a roasting tray with greaseproof paper and then pour in 300g sugar, smoothing it to get it spread as evenly as possible
  5. Put the sugar in the oven for 5 mins
  6. Measure 150g egg white in a standing mixer and start by whisking is slowly
  7. Then increase the speed to medium for a couple of minutes and then increase it again to high speed until it's formed stiff peaks
  8. The sugar should be ready to come out of the oven and with the mixer turned up to high speed, it should be added a spoonful at a time to the egg white (around 30 seconds between each addition)
  9. When the sugar is all added, keep mixing for another 5 mins - it's ready when you can rub a bit of meringue between 2 fingers and can't feel the grains of sugar
  10. Prepare 3 icing bags by turning them inside out and popping each one over a wine bottle (or similar shape)
  11. Paint the icing bags thickly with food colour paste, ensuring a heavy coating from the tip down to half-way
  12. Turn the bags the right way around and then add 2 scoopfuls of meringue into each bag, squidging the colour into the meringue with your fingers
  13. Snip off the end and then pipe a 10cm circle on the prepared baking tray
  14. Bake for around 1 hour until the meringue lifts off the baking tray
  15. Leave to cool on the tray
  16. Repeat this process with the other half of the meringue ingredients and the remaining 3 colours
  17. When you're ready to assemble the cake, prepare the mascarpone cream
  18. Put all the cream ingredients into a bowl and mix for a couple of minutes until the cream is smooth and has soft peaks
  19. Spread the cream over each of the layers and then assemble in rainbow order
  20. Top with your favourite fruit and dust with a sprinkling of icing sugar :)
In Puddings, Celebrations Tags Meringue, Mascarpone, Vanilla, Strawberry, Raspberry, Pomegranate, Rainbow
Comment

Stem Ginger Bundt Cake

November 10, 2015 Nicola King

It started with an image of a scrummy gingerbread cake from The Boy Who Bakes on Instagram. And the fact that it's Gingerbread Month on BBC Good Food. Although I've often made Gingerbread Biscuits, I've never made a Gingerbread Cake before. So I set about to find an authentic recipe with a truly gingerbready (is that even a word?) cake - and I think I've found the one.

I played around with an old recipe from the Crabapple Bakery that was originally intended to make Gingerbread Cupcakes. I wanted to make a Stem Ginger Bundt Cake. I've had my share of challenges removing cakes from Bundt tins in the past and scoured the web for help - stay tuned for the top tips I've gathered!

So this cake is a lovely traditional gingerbread and the wonderful ginger taste comes from both stem ginger and ground ginger. Although I'm not a fan of stem ginger, the small pieces throughout give a slight crunch and lovely pop of ginger when you take a bite. The cake itself is light in texture, although it does have a slight squidginess which is ever so delicious.

So before we make the cake, let's talk Bundt Tins. Ever had a bundt cake that just wouldn't release from its tin after baking? Or perhaps it broke apart when coming out of its tin? I have. So here are my tips that I now use. First I grease the tin with butter, wiping all over the surfaces with a good coating of room temperature butter. Then I get a pastry brush and make sure that all the little cracks and crevices are well coated too. Once the tin is very well buttered, I dust the whole tin with flour. I read somewhere that you shouldn't pour your batter into the tin in one go, but fill it with cupfuls so I did that here. And a final tip that I found on Crafty Baking was that when the cake is ready to come out of the oven, soak a towel with steaming water in the sink and place the cake (tin side touching the cloth) for 10 seconds, before turning out immediately onto a cooling rack. And it works!

Now on to the cake. The batter is made in a large saucepan where we start by melting the butter, dark muscovado sugar and treacle until the butter has melted and sugar dissolved but the mixture shouldn't boil. Once they're melted together, leave to cool for 5 minutes and then add in succession (stirring well between each addition) the milk, eggs, chopped stem ginger and sifted flour mixture, taking care not to over-mix and toughen the batter. Then pour this into the tin until it's three-quarters full and bake.

When I had a finished cake turned out and cooling on the rack, I warmed a quarter cup of maple syrup and brushed that all over the outside and then dusted the cake with icing sugar. It wasn't intended to look Christmassy but it does look like a light sprinkling of snow has passed overhead. And I have to confess that after spending the last few weeks practicing my son's Christmas choir songs for his school carol service, it's already beginning to look a lot like Christmas!

This makes a really lovely, light cake and/or dessert (I'm thinking of trying it with a little ice cream later!) with fresh pops of ginger throughout.

Personally I think it's all worth it for the smell alone when it's baking in the oven - but if you love ginger, then this is sure to be a hit :)

Stem Ginger Bundt Cake (adapted from Crabapple Bakery's Ginger Lovers' Cupcakes)

Ingredients

  • 300G UNSALTED BUTTER
  • 200G DARK MUSCOVADO SUGAR
  • 160G TREACLE
  • 240ML SEMI-SKIMMED MILK
  • 3 EGGS, BEATEN
  • 1 PIECE OF STEM GINGER, CHOPPED INTO TINY PIECES
  • 400G SELF-RAISING FLOUR
  • 1½ TBSP GROUND GINGER
  • ¼ TSP SALT

​Method

  1. Grease with butter and flour your bundt tin
  2. Preheat the oven to 150 degrees
  3. In a large saucepan, gently heat the butter, sugar and treacle until the butter is melted and the sugar dissolved but don't let it boil
  4. Once the mixture is melted and well-mixed, remove from the heat and leave to one side for 5 mins
  5. Sieve the flour, ginger and salt into a separate bowl
  6. Add the milk to the saucepan and stir until well-mixed
  7. Then add the eggs one at a time, ensuring that all the egg is combined well with the mixture
  8. Stir through the stemmed ginger
  9. Add the flour mixture 1 cup at a time, ensuring that the flour is well incorporated and the mixture smooth but taking care not to over-mix it
  10. Transfer the batter to the bundt tin one cup at a time
  11. Bake for around 40 mins until a skewer inserted in the middle comes out clean
  12. Just before the cake is due out of the oven, soak a tea towel with steaming hot water in the sink and place the tin on top of it (tin side touching the towel) for 10 seconds
  13. Then turn out the cake immediately onto a cooling rack
  14. Leave to cool for 10 mins and then heat a quarter cup of maple syrup for 20 seconds in the microwave
  15. Lightly brush the outside of the cake with the syrup
  16. Sieve icing sugar over the top of the cake and serve on a pretty platter (Christmas look optional!!)
In Everyday Cakes, Celebrations Tags Ginger, Maple Syrup, Bundt, Cake, Christmas
Comment
← Newer Posts Older Posts →

To subscribe, please enter your email address:

Delivered by FeedBurner

Yay for the weekend!! If you saw how I made pineapple flowers earlier this week, here they are adorning my very first Hummingbird cake. I am totally in love with them! I also added a few @edible_flowers to complement them and this makes the perfect w
I was so grateful to be #gifted some beautiful @cotswoldflour flour recently with a challenge to make something from my #bakingbucketlist and so I set about making a Nutella babka and scrolls with them. I’ve had a mixed love affair with bread m
I found the cutest miniature pineapple in the local petrol station co-op so decided to make these roasted pineapple flowers. I think they’re so pretty and remind me of lovely sunflowers. I thought they’d go well with a Hummingbird cake so
We had great fun baking this Malteser Millionaire’s Shortbread which is absolutely delicious! This was something the boys wanted to bake - who can resist a delicious shortbread base, topped with gooey caramel and then a final layer of swirled m
As the rain and clouds returned to our skies this weekend, we’ve been looking for comforting lockdown treats. These Blackberry & Star Anise Friands, dripping with sticky blackberry juice icing are the perfect choice 💗 The recipe is from Sw
You might have seen from my Stories this weekend that I made cinnamon buns. I don’t have the best track record with bread but I’m overcoming my inner fear! These buns were so delicious. It was an amalgamation of a few recipes but the base
  • Serendipity Bakes
    Coconut & Raspberry Friand Muffins
    May 29, 2019, 9:38 PM
  • Serendipity Bakes
    Thank you for sharing my photo of your delicious recipe 😋 @rkhooks Happy Sunday! https://t.co/niKamgfjvt
    Mar 3, 2019, 2:38 PM
  • Serendipity Bakes
    RT @BiscuiteersLtd: Our friends at @thewhitecompany asked us to design something special to celebrate their New York stores first birth… https://t.co/kTsMH57wRv
    Jun 28, 2018, 11:09 AM

Enter your email address:

Delivered by FeedBurner

Powered by Squarespace

Nicola King at Serendipity Bakes Follow my blog with Bloglovin Follow