• About
  • Blog
  • Recipe Index
  • Your Celebrations
  • Contact Me
Menu

Serendipity Bakes

Street Address
City, State, Zip
Phone Number

Your Custom Text Here

Serendipity Bakes

  • About
  • Blog
  • Recipe Index
  • Your Celebrations
  • Contact Me

Chocolate Olive Oil & Almond Cake

March 7, 2015 Nicola King

It's been a crazy week. I haven't had much time for baking and have mostly been running around doing back to back errands. We're ending it with an impromptu visit from my parents and there was a definite need for something rich and chocolatey this afternoon! This is Nigella's recipe for Chocolate Olive Oil & Almond Cake and is both gluten and dairy free - and I can assure you that the lack of either of these does not compromise the taste of this lovely little cake! A couple of changes I might try next time would be to exchange the almond meal for plain flour (needed for anyone with a nut allergy), add instant espresso in place of the vanilla or use coconut sugar in place of the regular white sugar. 

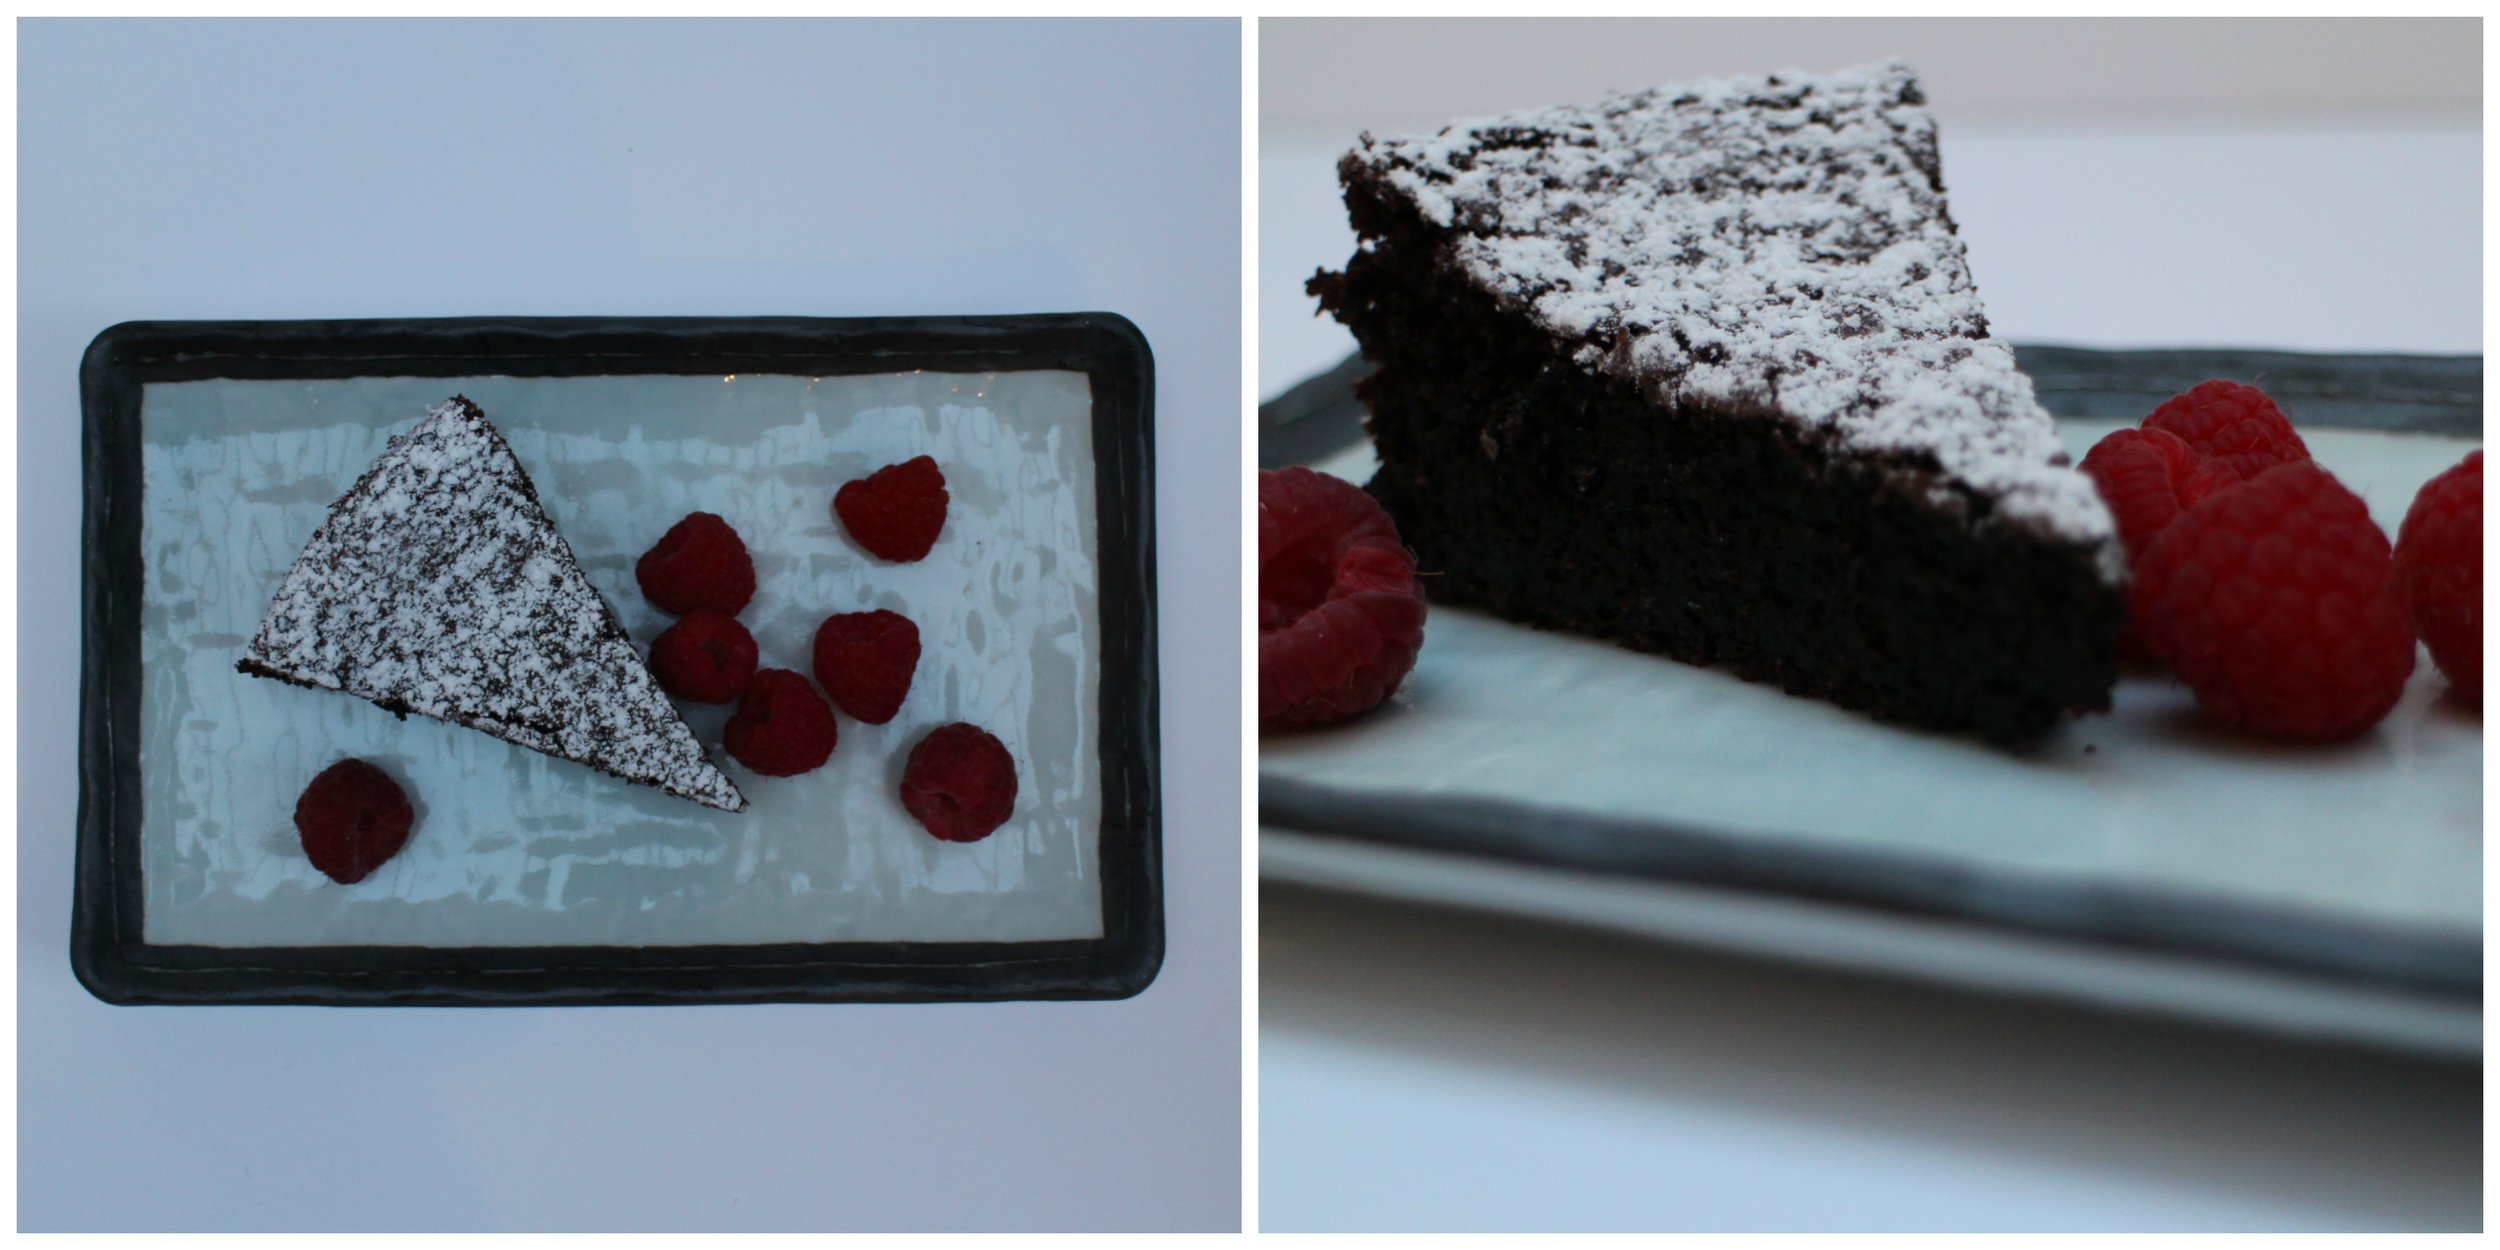
I had a slice about 15 mins out of the oven and just warm, it was seriously delicious and would only be improved with a dash of vanilla ice-cream, I think. There are lots of flourless chocolate cake recipes with dark chocolate, but I wanted one that was made from cocoa so chose this one from Nigella and I would wholehearted recommend this for Sunday lunch with friends, a dinner party or maybe even a weekend afternoon treat. It's also very simple to make :)

Chocolate Olive Oil & Almond Cake

Ingredients

  • 150ML OLIVE OIL (PLUS A LITTLE MORE FOR GREASING THE CAKE TIN)
  • 50G GOOD-QUALITY SIFTED COCOA POWDER (I USED GREEN & BLACK'S)
  • 125ML BOILING WATER
  • 2 TSP VANILLA EXTRACT
  • 150G GROUND ALMONDS
  • ½ TSP BICARBONATE OF SODA
  • PINCH OF SALT
  • 200G CASTER SUGAR
  • 3 LARGE EGGS
  • ICING SUGAR FOR DUSTING

Method

  1. Preheat your oven to 170°C. Grease an 8" springform tin with a little oil and line the base with baking parchment.
  2. Sift the cocoa powder into a bowl or jug and whisk in the boiling water until you have a smooth paste. Whisk in the vanilla extract and then set it aside to cool a little.
  3. In another bowl, combine the ground almonds with the bicarbonate of soda and pinch of salt.
  4. Put the sugar, olive oil and eggs into a mixer and beat together on fast speed for 3 minutes (it should be a pale, aerated and thickened cream).
  5. Turn the speed down a little and slowly pour in the cocoa mixture. When it's mixed in, scrape down the side of the bowl and then slowly tip in the ground almond mixture with the mixer still running.
  6. Scrape down the sides again and then pour this liquid batter into the prepared tin.
  7. Bake for 40-45 minutes or until the sides are set and the very centre, on top, still looks slightly damp. 
  8. Leave it to cool for 10 minutes on a wire rack, still in its tin, and then ease the sides of the cake with a small metal spatula and spring it out of the tin. 
  9. Eat warm or leave to cool, if you can wait that long!
In Free From, Everyday Cakes Tags Chocolate, Dairy Free, Gluten Free, Olive Oil, Almonds
Comment

Banana, Chia & Blueberry Loaf

February 19, 2015 Nicola King

Half term holidays are my most favourite kinds of school breaks - only a week long, it feels like you have to pack in the fun quickly before it's time to go back to school and they always leave you wanting more - which is a nice way to enjoy family time. This week, the weather has been mixed. Pouring with rain some days and then beautiful sunshine but cold days the rest of the time. Today we have been making bonfires and climbing trees in the winter (I should be saying springtime, but we're most definitely still feeling the chill of winter) sunshine.  

A week with grandma and grandpa always leads to far too many treats and sweeties so I've been looking for a bake that's secretly packed with superfood goodness. For many years, I've been an avid fan of Donna Hay - of her cooking, baking and styling - but she doesn't always cook the healthiest of food. Although about a week ago, a post popped up for her new magazine Fresh & Light which is geared towards a healthier and more balanced lifestyle. There's lots of recipes I plan to try in here, but being half term, I wanted something for the kids that didn't take too long to make (having both children in tow).

Now who doesn't love banana bread?  In this healthy magazine, a few variations of the classic bread are included so I decided to pack my little loaf with blueberries and chia seeds as well as the banana.  This is so easy to make and completely gluten free. The ingredients mean a trip to the health food shop rather than the local supermarket, but it is whipped together in no time and the longest part of making it is the baking - which is great when you want a lovely home-made treat but don't have hours to spend in the kitchen.

The resulting loaf is very moist and packed full of fruit. Regular sugar is switched for coconut sugar and the other sweetness comes from the maple syrup and bananas. At this time of year, the blueberries, not quite in season, are a little tart, but this works well. We're not traditionally a gluten-free family, but this is yet another recipe that shows me that gluten-free baking can be just as yummy as the alternative and doesn't even feel like a compromise!

Banana, Chia & Blueberry Loaf (from Donna Hay's Fresh & Light)

Ingredients

  • 1½ CUPS (225G) BUCKWHEAT FLOUR
  • 1 CUP (220G) COCONUT SUGAR
  • 1 TSP GLUTEN-FREE BAKING POWDER 
  • ½ TSP GLUTEN-FREE BAKING SODA
  • 2 TSP GROUND CINNAMON
  • 1 CUP MASHED BANANAS (APPROX 3 BANANAS)
  • 1 EGG
  • ½ (140G) CUP NATURAL YOGHURT
  • ¼ (60ML) CUP GRAPESEED OIL
  • 1/3 (80ML) CUP MAPLE SYRUP (PLUS EXTRA FOR BRUSHING OVER FINISHED LOAF)
  • 2 TSP VANILLA PASTE
  • 1 CUP (150G) BLUEBERRIES
  • ¼ CUP (45G) CHIA SEEDS

Method

  1. Pre-heat the oven to 160 degrees.
  2. Place the dry ingredients in a bowl (flour, sugar, baking powder, baking soda and cinnamon) and stir to combine.
  3. Add the banana, egg, yoghurt, oil, maple syrup and vanilla paste, then mix to combine.
  4. Stir through the blueberries and chia seeds.
  5. Pour into a 1½ litre loaf tin, greased and lined with baking paper.
  6. Bake for 1 to 1 hour 10 mins until a skewer comes out clean.
  7. Leave for 5 mins and then turn out carefully onto a cooling rack and leave to cool.
  8. Brush the top with maple syrup and serve!
In Free From, Bread Tags Banana, Chia, Blueberries
Comment

Chocolate Cupcakes With Coconut Cream Frosting (Gluten & Dairy Free)

February 4, 2015 Nicola King

I've always loved eating cakes and sweet things. I don't eat a lot of them but I need my regular fix. The thing about baking is that when you make things yourself, you get to see what actually goes into them. I have my favourite bakeries across London and then when I bought their recipe books, I realised that there's an awful lot of sugar and chocolate and other things that you probably should eat in moderation in one tiny slice. I remember once using a kilo of sugar in one 8 inch celebration cake. It definitely makes you think!

I was flicking through Bloglovin' the other day and stumbled across a few recipes that were really exciting.  They were really exciting because there's a little boy in my son's class who's both gluten and dairy intolerant.  I took in a batch of cupcakes for Hallowe'en (completely over-the-top full of dairy and gluten) and I still remember the disappointment on his face when he asked me if they were dairy free.  And then there's another mum who's highly allergic to eggs (can you imagine a life without eggs?) So I've been wanting to find a cake that tastes and looks as good as normal cupcakes that will pass my test of yumminess and that they can enjoy too.  And I found a few recipes to try.

This one is a hybrid of a couple of recipes.  The chocolate cake is very simple to make and I've deliberately used ingredients that are easy to find in the supermarket but any items like cocoa nibs (if you want to use them) can be picked up in a health food shop.  

Now on to the coconut cream frosting. Hmmm...this was a little trickier!  Coconut cream frosting has been around for years and promises fluffy delight but this is the first time I've made it. Any recipes ask you to chill the cans of coconut milk in the fridge for at least 5 hours, but preferably overnight. This is because you only want the solid part (the cream) and you then drain the water away before using.  What they don't tell you is that this process of refrigerating doesn't always work! So I went through 4 cans of failure; then I tried freezing it; adding pure coconut cream; and whipping it for 20 mins in the hope that it would magically set.  It didn't.  I then reverted to google looking for any tips for success.  I read a lot of blogs and conversations and recommendations.  This is the sum of my findings: ideally use cans that only contain coconut and water; avoid guar gum; brands change their recipes all the time so you may find one that works and then the next time it doesn't; it's often down to the contents of an individual can itself; and then I finally found a recommendation from someone to use Waitrose Full Fat Coconut Milk.  Now this does contain guar gum and there's also no guarantee that it will work every time, but it was great to have some sort of recommendation - and it actually worked for me!

Coconut cream frosting is very different from the buttercream that I'd normally use.  It's much lighter in texture and fluffier, but it does have a very distinct taste of coconut (obviously!) although you can flavour it with vanilla or honey.  It won't replace regular buttercream for me as it doesn't hold its shape for celebration cakes and cupcakes, but it's very refreshing and much lighter - and has the added benefit of being much healthier!

Chocolate Cupcakes With Coconut Cream Frosting (Gluten & Dairy Free) (recipe adapted from Local Milk and How Sweet It Is) Makes 12 cupcakes

Ingredients

  • 250G RICE FLOUR
  • 1 TSP XANTHUM GUM
  • 1½  TSP BAKING SODA
  • 1 TSP SALT
  • 270G SUGAR
  • 60G COCOA POWDER
  • 320G ALMOND MILK AT ROOM TEMPERATURE
  • 150G MELTED COCONUT OIL AT ROOM TEMPERATURE
  • 2½ TBSP APPLE CIDER VINEGAR
  • 2½  TSP VANILLA EXTRACT
  • 2 TINS FULL FAT COCONUT MILK
  • 2TBSP ICING SUGAR
  • COCOA NIBS TO DECORATE

Method

  1. At least 5 hours before baking or preferably overnight, put the cans of coconut milk in the fridge.
  2. Heat the oven to 175 degrees and line a 12 hole muffin tin with cupcake papers.  Melt the coconut oil and put to one side to cool down. Ensure that the almond milk is out of the fridge and at room temperature.
  3. In one bowl, mix together the dry ingredients: the rice flour, xanthum gum, baking soda, salt, sugar and cocoa powder and mix well.  Then in another bowl, mix together the wet ingredients: the almond milk, coconut oil, vinegar and vanilla.  If you put the milk and coconut in first and the milk is not at room temperature, the coconut oil will start to solidify.  This can be rescued by warming gently in the microwave with short 15 second bursts until the coconut oil re-melts.
  4. Pour the wet ingredients into the dry ingredients and mix by hand with a wooden spoon.
  5. Fill each of the 12 cupcake papers with around 1/3 cup of batter and then bake for 18-20 minutes or until a toothpick inserted into the middle comes out clean.
  6. Remove the cupcakes from the tin and leave to cool.  It's important that they're completely cool before you frost them otherwise the frosting will start to melt.
  7. Turn your chilled coconut cans upside down, open and pour out the liquid.  Scoop out the remaining cream and whisk until the frosting is light and fluffy.  This should take around 3 minutes. Then add any favouring that you choose: I added 2 tbsp icing sugar but you could use vanilla, honey or something of your own choosing. Mix through and then your frosting is ready to use.  Refrigerate if you don't use immediately.
  8. Frost the cupcakes and add some garnish.  I used cocoa nibs.  Then enjoy!
In Free From, Cupcakes Tags Chocolate, Cupcakes, Coconut Oil, Almond Milk
Comment
← Newer Posts

To subscribe, please enter your email address:

Delivered by FeedBurner

Yay for the weekend!! If you saw how I made pineapple flowers earlier this week, here they are adorning my very first Hummingbird cake. I am totally in love with them! I also added a few @edible_flowers to complement them and this makes the perfect w
I was so grateful to be #gifted some beautiful @cotswoldflour flour recently with a challenge to make something from my #bakingbucketlist and so I set about making a Nutella babka and scrolls with them. I’ve had a mixed love affair with bread m
I found the cutest miniature pineapple in the local petrol station co-op so decided to make these roasted pineapple flowers. I think they’re so pretty and remind me of lovely sunflowers. I thought they’d go well with a Hummingbird cake so
We had great fun baking this Malteser Millionaire’s Shortbread which is absolutely delicious! This was something the boys wanted to bake - who can resist a delicious shortbread base, topped with gooey caramel and then a final layer of swirled m
As the rain and clouds returned to our skies this weekend, we’ve been looking for comforting lockdown treats. These Blackberry & Star Anise Friands, dripping with sticky blackberry juice icing are the perfect choice 💗 The recipe is from Sw
You might have seen from my Stories this weekend that I made cinnamon buns. I don’t have the best track record with bread but I’m overcoming my inner fear! These buns were so delicious. It was an amalgamation of a few recipes but the base
  • Serendipity Bakes
    Coconut & Raspberry Friand Muffins
    May 29, 2019, 9:38 PM
  • Serendipity Bakes
    Thank you for sharing my photo of your delicious recipe 😋 @rkhooks Happy Sunday! https://t.co/niKamgfjvt
    Mar 3, 2019, 2:38 PM
  • Serendipity Bakes
    RT @BiscuiteersLtd: Our friends at @thewhitecompany asked us to design something special to celebrate their New York stores first birth… https://t.co/kTsMH57wRv
    Jun 28, 2018, 11:09 AM

Enter your email address:

Delivered by FeedBurner

Powered by Squarespace

Nicola King at Serendipity Bakes Follow my blog with Bloglovin Follow