• About
  • Blog
  • Recipe Index
  • Your Celebrations
  • Contact Me
Menu

Serendipity Bakes

Street Address
City, State, Zip
Phone Number

Your Custom Text Here

Serendipity Bakes

  • About
  • Blog
  • Recipe Index
  • Your Celebrations
  • Contact Me

Raspberry Friands

May 1, 2015 Nicola King

Hurray, it's Friday! We've had 7 days back at school and now have a bank holiday to look forward :) Cue sunshine (wishful thinking?) and the seaside. Double hurray! It's been a busy cake week but I wanted a little treat to welcome us into the long weekend.

I love raspberries. I love friands. And now I love raspberry friands. These gorgeous little cakes are dainty, yummy and with quite a dense texture, rather filling too. They are best served warm and straight from the oven but are still delicious several hours later. Um, I'm hoping there might actually be some left by the time the boys get home from school...

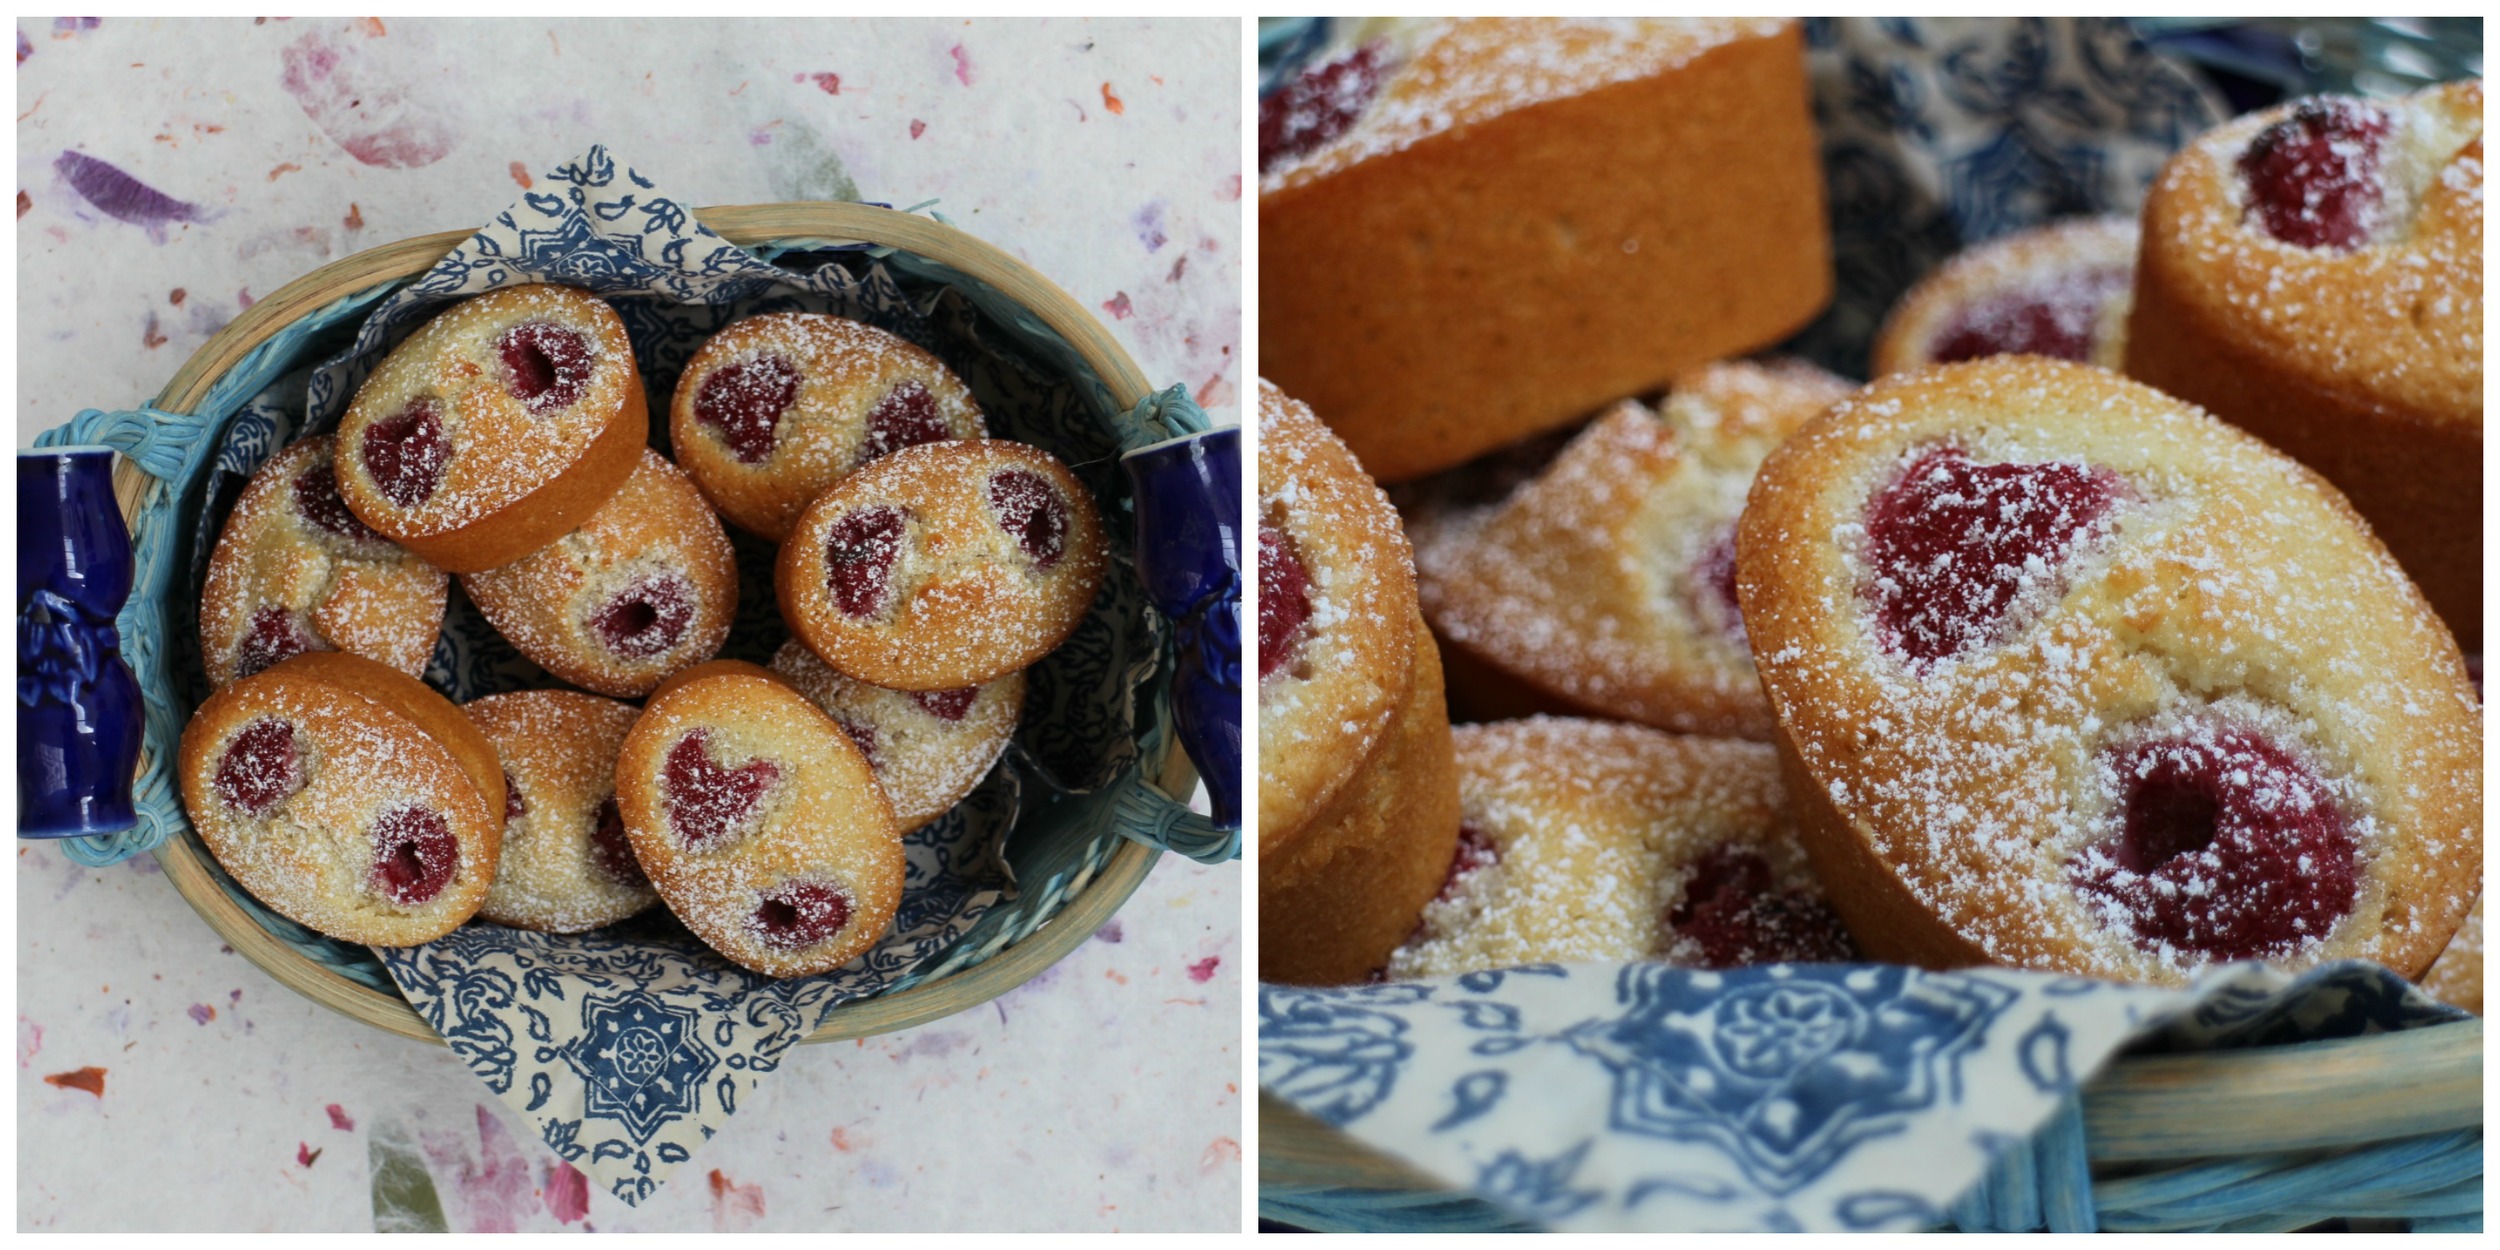
These are very simple to make and can be made with different types of fruit which will be a project for the future. I had some amazing friands from a small bakery in New Zealand at Christmas which were filled with delicious lemon curd. They were my absolute favourite. These raspberry ones are very simple where the almond taste really shines through and then the raspberry gives it a lift. All they need is gentle folding through of the ingredients (making the effort to sift the icing sugar and flour) and well greased friand tins (otherwise you may find that they break up when you try to remove them from the tins). 

These are perfect for a lunch in the sun or afternoon tea. Go on, give them a go and treat yourself this bank holiday :)

Raspberry Friands (makes 9 friands)

Ingredients 

  • 200G LIQUID EGG WHITES (or 5 egg whites if you want to crack open your eggs)
  • 150G MELTED BUTTER
  • 90G GROUND ALMONDS
  • 185G SIFTED ICING SUGAR
  • 50G SIFTED PLAIN FLOUR
  • 125G RASPBERRIES (you need 18 raspberries with 2 on each friand)

Method

  1. Preheat the oven to 180 degrees (fan)
  2. Grease a friand tin - you need to grease these well getting into all the nooks and crannies to make sure that your friands don't stick - you will need to grease 9 holes
  3. Whip the egg whites for a few seconds just to mix them up
  4. Then add the rest of the ingredients (except the raspberries) - the butter, ground almonds, icing sugar and flour
  5. Mix on the lowest setting until just combined
  6. Pour into the friand tin, filling each hole until it's 2/3 full
  7. Then pop 2 raspberries on the top of each friand
  8. Bake in the oven for 25 mins or until a skewer inserted in the middle comes out clean
  9. Loosen the friands in their tin and then tip them out gently onto a cooling rack
  10. Serve warm (ideally) and sprinkled with icing sugar
  11. Try not to eat them all before your guests arrive!
In Everyday Cakes, Patisserie Tags Friands, Raspberry, Almonds
Comment

Tomato Cake With Cream Cheese Frosting

April 24, 2015 Nicola King

A few weeks ago, when I was staying with my parents, my mum dug out a recipe book that she was given in the 70's when we lived in Japan. My parents were members of the American Club over there and the female members all contributed recipes to make up a recipe book that was then sold for charity. Containing brilliant headings such as "Dinner When The Ambassador Comes To Visit" and "Light Supper After A Mahjong Evening", this was a deadly serious book that was designed as a kitchen aid for the ladies of leisure.

It was very entertaining and in it, I stumbled across a recipe for Tomato Cake With Cream Cheese Frosting. The chief ingredient is Campbell's Tomato Soup. I had to give it a go!! I wanted to stay loyal to the original recipe as am often intrigued by food flavours and recipe ideas from previous decades, although could only find Campbell's Cream Of Tomato Soup where I think the cream has been added since the 70's. Maybe you can still find it without cream but I was out of luck so cream it was!

Cake icing.jpg

The other flavour that is very strong in this cake is cloves.  The recipe calls for 1 tsp cloves but I think this is too strong and would have benefitted from a 1/2 tsp instead so I would definitely make this change. One change I did make after my recent discovery that I'm not a fan of shortening, is that I switched this for butter (I know, I know - not very loyal to the original recipe but a necessity I felt!)

The texture was very moist and I do love the colour of this cake. The cream cheese topping was a nice addition of sweetness on the top. Once the balance of the cloves is addressed, I think this would make a lovely morning coffee or afternoon tea cake. You can definitely play an ingredients' guessing game with your guests and feel pretty confident that you will win :) 

Tomato Cake With Cream Cheese Frosting

Cake Ingredients

  • 225G CASTER SUGAR
  • 120G BUTTER
  • 400G CAMPBELL'S TOMATO SOUP (these cans are now condensed so I used 1 and a bit cans for this)
  • 1 TSP BAKING SODA
  • 250G PLAIN FLOUR
  • 2 TSP BAKING POWDER
  • 1 TSP CLOVES (suggest reducing this to a ½ tsp)
  • 1 TSP CINNAMON
  • 1/4 TSP SALT

Frosting Ingredients

  • 85G FULL-FAT CREAM CHEESE
  • 300G SIFTED ICING SUGAR 

Method

  1. Preheat the oven to 160 degrees (fan)
  2. Lightly grease and line a loaf tin
  3. Cream together the sugar and butter until light and fluffy
  4. Add the baking soda to the tomato soup and then add this mixture to the cream and butter. Mix until well incorporated.
  5. Sift the flour, baking powder, cloves, cinnamon and salt and then add this mixture to the soup mixture
  6. Stir until combined and then put this into the loaf tin
  7. Bake for around 40 mins until a skewer inserted in the middle comes out clean
  8. Leave in the tin for 5 mins and then remove and cool on a cooling rack
  9. Mix together the cream cheese and icing sugar until smooth, adding enough milk to make it spread easily
  10. Decorate the top of the cake with the cream cheese frosting - I enjoyed making organic swirls but you can choose a design of your liking!
In Everyday Cakes Tags Tomato, Cream Cheese
Comment

Butterscotch Cake

April 23, 2015 Nicola King

Well, four weeks has flown by and it's back to school with a bump for the boys (and me!) We had a fun last day yesterday and treated ourselves to seeing Home, even enjoying the entire cinema to ourselves :) The boys thought this was fantastic (the film and having the whole screening for just us!) Then back home in the afternoon to make an end of holiday treat for the boys.

The recipe for this Butterscotch Cake comes from Treatology by Wilton and I was directed to it by the fantastic Man Bakes Cake. This is an American recipe and uses shortening in the buttercream (I use Trex here in the UK). This is the first time I've used shortening in a buttercream like this and having tasted it, I have to say that I'm a full-butter buttercream kind of girl. The cake itself is light and moist; the buttercream with chocolate chips and butterscotch is tasty (as mentioned, in my humble opinion would be improved by 100% butter | 0% shortening); but the winner of this recipe for me is the delicious butterscotch ganache which is added to the buttercream to give it a butterscotch flavour and then the pure ganache is drizzled over the top. This part is definitely a keeper!

Next time I make this, I think a chocolate cake would be pretty tasty with full-butter butterscotch buttercream (what a mouthful!) and then the butterscotch ganache over the top. Or even transformed into cupcakes would be super tasty too with a drizzle of the butterscotch ganache over the top. Yum!

I didn't manage to get many photos of the this before the boys dived in with a large slice each - although it was for them to celebrate the end of a fab holiday so who can blame them?!

Butterscotch Cake (from Treatology by Wilton)

Ingredients

Butterscotch Cake

  • 340G PLAIN FLOUR
  • 2 TSPS BAKING POWDER
  • 1 TSP SALT
  • 170G BUTTER
  • 160G DARK BROWN SUGAR
  • 3 EGGS
  • 2 TSPS VANILLA EXTRACT
  • 240 ML MILK

Butterscotch Icing and Ganache

  • 300G BUTTERSCOTCH CHIPS
  • 120ML DOUBLE CREAM
  • ¼  TSP SALT
  • 230G BUTTER
  • 115G SHORTENING (I USED TREX)
  • 375G SIFTED ICING SUGAR
  • 50G CHOCOLATE CHIPS

Method

  1. Preheat the oven to 160 degrees
  2. Lightly grease 3 baking tins - the recipe calls for a Wilton 6 inch Cake Pan Set but I used 3 7-inch cake tins
  3. In a large bowl, stir together the flour, baking powder and salt
  4. In a separate bowl, beat the sugar and butter until light and fluffy
  5. Add the eggs one at a time, beating for 1 minute after each addition. If the mixture looks like it's curdling a little, add a tablespoon of the flour mixture
  6. Add the vanilla and mix well
  7. Add one third of the flour mixture and mix until just combined and then add half of the milk
  8. Repeat ending with the final flour addition and mix until just combined - don't over mix otherwise this will toughen the mixture
  9. Divide evenly amongst the tins and bake for 20 minutes until a skewer comes out clean
  10. For the ganache, combine the butterscotch chips, cream and salt. Then microwave for 1 minute and stir. Continue to microwave in 30 second bursts (this stage took me a further 2 minutes). I then stirred the mixture until it was almost melted but there were still traces of unmelted butterscotch chips so I kept heating it at 15 second bursts until the butterscotch was smooth.
  11. Put the butterscotch to one side and allow to cool
  12. In a separate bowl, beat the butter and shortening and then add one third of the icing sugar on medium until well mixed. Continue until all the icing sugar is incorporated.
  13. Add 2/3 of the cooled butterscotch and beat until well combined
  14. Remove around 2 cups of the butterscotch buttercream and put to one side
  15. Add the chocolate chips to the original bowl of buttercream
  16. Then level the cakes if necessary and prepare to assemble
  17. Put one of the cakes on a plate and then add half of the chocolate chip buttercream spreading it to the edge of the cake.
  18. Top with the second cake, the remaining chocolate chip buttercream and the final cake.
  19. Then use the remaining non-chocolate chip buttercream to cover the top and sides of the cake and refrigerate until the icing is set
  20. When completely chilled, take the remaining butterscotch and blast it in the microwave for 10-15 seconds and then drizzle over the top of the cake
  21. Optional: I took some of the leftover non-chocolate chip buttercream and piped a few swirls on top and then scattered some chocolate coated popping candy on the top
In Everyday Cakes Tags Butterscotch, Ganache, Cake
Comment

German Apple Cake

April 14, 2015 Nicola King

We've been lucky enough to have a couple of planned roadtrips and lots of daytrips across this school holiday. Last week, we were down in Dorset enjoying the sea air and sunshine and on a visit to Weymouth, we stopped off at a little cafe which my Dad proclaimed served the best Dorset Apple Cake ever! I tasted a little and it reminded me of a German Apple Cake that my mum used to make when I was little. So this week, when our next roadtrip included a visit to mum and dad's house, I found myself digging through her old recipe collection - you know, the lovely kind of handwritten and typed recipe cards shared by friends some twenty or thirty years ago. There are a number of old favourites which re-surfaced (and which may make an appearance on the blog at some time!) and it was an enjoyable trip down memory lane.

So after a fun day out running around castle ruins, this afternoon saw the recreation of the childhood favourite, the German Apple Cake. I had a look on the internet and there are a number of variations for apple cakes, some including nuts, some missing out the cinnamon, some with apple inside and some on top. Our version is a simple sponge covered with butter, cinnamon and sugar, layered with sliced apple and then topped with more butter, cinnamon and sugar. It's a light cake which is great for afternoon tea or covered with dollops of custard (my boys' favourite) for pudding. I've never made it before, but it was definitely the same as my mum used to make.

The boys loved it.

I think we may have found another childhood favourite for them too :)

German Apple Cake

Cake Ingredients

  • 170G SELF-RAISING FLOUR
  • 1 TSP BAKING POWDER
  • 85G CASTER SUGAR
  • 30G BUTTER (MELTED)
  • 1 EGG (BEATEN)
  • 140ML MILK

Cake Topping Ingredients

  • 340G COOKING APPLES (I USED BRAMLEY APPLES)
  • 30G BUTTER (MELTED)
  • 1 TSP CINNAMON
  • 85G SUGAR

Method

  1. Prepare and slice the apples, putting them into a bowl of cold water
  2. Turn on the oven to 170 degrees
  3. Grease and line a round baking tin
  4. Firstly, to make the cake, put the flour, baking powder and sugar into a bowl and mix to combine
  5. Melt the butter and add to the beaten egg and milk
  6. Stir the wet ingredients into the dry ingredients and then put pour into the prepared tin
  7. Melt the remaining 30g butter and brush half of this over the cake mix in the tin
  8. Mix the cinnamon and sugar together and sprinkle half of this over the cake mix
  9. Drain the apples and pat them dry. Then place them in overlapping rows on the cake mix
  10. Brush with the remaining butter and then sprinkle with the remaining cinnamon | sugar mixture
  11. Bake in the oven for 35 minutes (test with a skewer to ensure it come out clean)
  12. Leave in the tin for 5 minutes to cool down (or longer if desired) and then move to a serving plate
  13. Excellent with custard or just naked!
In Everyday Cakes Tags Apple, Cake
Comment

Salted Caramel Brownie Squares

April 12, 2015 Nicola King

We're speeding merrily through our four week Easter holiday with lots more fun planned and today was no exception. Catching up with friends is always a lovely way to spend a Sunday afternoon - accompanied by lots of good food and drink! Whenever we meet up with these friends, there's always sure to be lots of dessert as we always make one each - hers was a beautiful chocolate cake made with savoiardi biscuits, mascarpone and almonds; mine was a rich gooey salted caramel chocolate brownie. So lots of chocolate. Always a winner. Especially with five children around to enjoy them too :)

The Salted Caramel Brownie Squares are simple to make but do require a little planning as it needs around 5 hours of setting. And I always use a sugar thermometer for my caramel but this is the only additional equipment you'll need - and you can do it without but I've previously had varying degrees of success with caramel not quite at the right temperature! Once on the brownie, it does take a while to set the caramel and we had to uplift them from one fridge to another mid setting and then end with a quick blast in the freezer - so I'd say the longer you can leave this, the better! But it makes a delicious and rather gooey topping to the lovely little brownie.

Just perfect for sharing with friends.

Salted Caramel Brownie Squares (from Donna Hay) Makes 25 small squares

Brownie Ingredients

  • 150G DARK CHOCOLATE
  • 200G UNSALTED BUTTER
  • 265G BROWN SUGAR
  • 3 EGGS
  • 110G PLAIN FLOUR (SIFTED)
  • 2 TBSP COCOA (SIFTED)
  • SEA SALT FLAKES (FOR SPRINKLING BEFORE SERVING)

Method

  1. Preheat the oven to 160 degrees (fan)
  2. Place the chocolate and butter in a saucepan over a low heat and stir until melted and smooth
  3. Set aside to cool slightly
  4. Place the sugar, eggs, flour and cocoa in a bowl and whisk to combine
  5. Add the melted chocolate | butter and whisk again until well combined
  6. Pour the mixture into a greased and lined baking tin (mine is 23cm x 23cm) and spread evenly
  7. Bake for 30 - 35 mins until a skewer inserted in the middle comes out clean
  8. Allow to cool a little to room temperature and then refrigerate to cool completely

Caramel Ingredients

  • 180ML SINGLE CREAM
  • 90G UNSALTED BUTTER
  • 330G CASTER SUGAR
  • 125ML WATER

Method

  1. To make the caramel, place the cream and butter in a saucepan over a medium heat until the butter is melted
  2. Set aside to cool a little
  3. Place the sugar and water into a saucepan. Mix just until they are combined but then stop mixing and let the sugar bubble and boil with no stirring until golden brown and the thermometer reads 175 degrees
  4. Remove from the heat and add the cream mixture in a steady stream stirring all the time
  5. Return the pan to a low heat and stir for 5 minutes until the caramel has thickened
  6. Pour onto the cooled brownie and then refrigerate for 4-5 hours
  7. Cut into squares and sprinkle with salt before serving
In Everyday Cakes Tags Brownies, Chocolate, Salted Caramel
Comment

Egg Chocolate Brownies

March 30, 2015 Nicola King

It's almost Easter. Cue a week of chocolate and bakes featuring mini eggs, bunnies and baby chicks. I wouldn't say the boys are as excited as at Christmas, but it definitely ranks up there and we're frequently counting down the number of sleeps until the Easter bunny arrives with an abundance of yet more chocolate! For those of you that don't know me so well, I kind of like Pinterest - not quite as much as some of my friends (you know who you are!!!) - but I love it for inspiration and ideas from cooking to baking to crafts to homes to travel and more. But pinning me down to do something with the pins is another thing entirely. I first saw this idea on Pinterest a year ago and it's taken me this long to do it (well, my excuse is that I was waiting for Easter as that kind of feels like the best occasion for this one!)

Baking brownies in eggshells. Cute, eh? Originally in Italian. I followed a crude translation and my own ingredient quantities but the idea came from Brownies In Eggshells and is inspired. A touch fiddly to create this little work of art, but still lots of fun and I decided to add my own twist and pop in a small chocolate egg into each eggshell. This meant that the holes I had to create in the bottom of the eggs were a touch larger than you'd ideally need but I experimented with two different types of egg: Mini Cadbury Creme Eggs (these mini eggs are actually quite large compared to an actual egg so you do have to create quite a gaping hole) and Lindt Eggs (white and milk chocolate).

So, the results. Well, the recipe suggested baking them for 20 mins. This seemed a long time considering the size of each egg so I went with 15 mins, but really my instinct alarm bells were ringing and I should have gone for 10-12 mins I think for the perfect bake. The Cadburys Creme egg (I only made one with this) exploded out of the top so there was little Creme Egg left in it! The Lindt eggs fared better but still needed a little less cooking I think. I will definitely make this again but perhaps next time, I might try Chocolate Oil & Almond Cake for a change and freeze the chocolate eggs before putting them into the batter. The kids love them. They're addicted to eggs anyway but present them with an egg that they can peel and find a chocolate brownie inside - awesome! And the possibilities are endless with these little creations - definitely fun for Easter and for making with the kids in the school holidays :)

Egg Chocolate Brownies (adapted from Craft Marmalade) Makes 6

Ingredients

  • 70G DARK CHOCOLATE
  • 40G BUTTER
  • 1 EGG
  • 60G CASTER SUGAR
  • 40G PLAIN FLOUR
  • PINCH OF SALT
  • 10G COCOA
  • 6 EGGSHELLS
  • 6 MINI CHOCOLATE EGGS

Method

  1. To prepare your eggshells, make a small hole in the bottom of each egg - I used the sharp point of scissors, made a small hole and then picked away some of the eggshell until I had enough of a hole to be able to fill with batter
  2. Shake the eggs until the insides come out into a bowl and then soak the eggshells in salty water for 30 mins
  3. Remove from the water and allow to thoroughly dry
  4. Pour a little olive oil into each eggshell to coat the insides
  5. Turn on the oven to 180 degrees
  6. Then to prepare the batter, start by melting the chocolate and butter in the microwave (around 1 min but keep an eye on it so it doesn't burn) and then set it aside to cool
  7. Put the egg and sugar in a bowl and whisk it by hand and next add the chocolate until thoroughly mixed
  8. Then add the flour and cocoa and mix evenly
  9. Finally add the salt and stir through until the batter is smooth
  10. Pour the batter into a pastry bag and fill the eggshells until they're ¼ full and then insert a little chocolate egg. Then top up the batter until the eggshells are ¾ full
  11. Bake for 10-12 mins until a toothpick inserted in the middle comes out clean
  12. If the batter spills over the edge of the eggshell you can wipe away the excess when they're still warm
  13. Allow to cool, peel and enjoy :)
In Everyday Cakes, Celebrations Tags Chocolate, Brownies, Easter
Comment

Lemon Polenta Cake

March 29, 2015 Nicola King

Although it's technically springtime and we've seen some signs of sunshine in recent days, today it's grey and windy here in south-west London and we need to bring a little bit of sunshine into our home! A couple of friends recommended I try Nigella's Lemon Polenta Cake - although to date on the blog I've been keen to work through different bakers (and have already featured a Nigella recipe) but am making an exception here as both waxed lyrical about this one. And then yesterday Nigella posted a Regram of this very same cake but suggesting that the butter could be replaced with olive oil to make a completely gluten-free and dairy-free which sealed the fate of this bake and here it is.

It's a very light cake and the real magic is the infusion of lemon syrup which soaks into the cake post-baking. The original recipe I looked at contained 200g butter, but as I mentioned, Nigella yesterday posted on Instagram suggesting that this could be replaced with 150ml light olive oil so I thought I'd make this switch. Although Nigella suggests baking for 40 mins, I checked mine after 35 mins and it was very much done by then so I'd keep an eye on it from 30 mins onwards.

I also read a few comments from people that their cake tended to drop in the middle when it comes out of the oven and this is to be expected due to the lack of gluten. However I found that mine didn't drop and kept good form - until I decided that I couldn't wait for it to be completely cool before removing it from the tin and then I put it on a non-flat plate and it did drop a little! But I can assure you it didn't affect the taste :) I love the yellow sun-shine colour of the inside and it's super-moist from all of the lemon syrup, but remains lovely and light, whilst the polenta adds a slight grittiness which gives it some added texture. This would be a great cake for afternoon tea or lunch with friends.

Lemon Polenta Cake

Ingredients

  • 150ML LIGHT OLIVE OIL (YOU CAN USE 200G UNSALTED BUTTER AT ROOM TEMP IF YOU PREFER) 
  • 200G CASTER SUGAR
  • 200G GROUND ALMONDS
  • 100G POLENTA
  • 1 ½ TSP BAKING POWDER (GLUTEN-FREE IF REQUIRED)
  • 3 LARGE EGGS
  • 2 LEMONS (ZEST FOR CAKE BATTER & JUICE FOR SYRUP)
  • 125G ICING SUGAR

Method

  1. Pre-heat the oven to 180 degrees
  2. Line the base of an 8 inch spring form cake tin with baking paper and grease the sides with butter
  3. Put the olive oil and sugar into a mixer and beat together until light brown
  4. In a separate bowl, mix the almonds, polenta and baking powder
  5. Add a third of this to the mixer and beat until well-mixed then add 1 egg
  6. Repeat twice, ending with the final egg
  7. Add the lemon zest and beat until well-mixed
  8. Scrape the batter into the prepared baking tin
  9. Cook in the oven for around 35 mins until a skewer comes out clean-ish and the edges have shrunk away from the sides of the tin. My cake was well set when it came out of the oven but the middle may wobble slightly and that's okay. Leave the cake to cool on the side whilst you make the syrup
  10. Boil the lemon juice and icing sugar in a small saucepan until the icing sugar has dissolved
  11. Make little holes across the top of the cake with a cocktail stick and then pour the syrup all over the top - you may need to do this in bursts waiting for the syrup to sink in before you add more
  12. Leave to cool before taking it out of its tin. And enjoy!
    In Free From, Everyday Cakes Tags Gluten Free, Dairy Free, Polenta, Lemon, Almonds, Olive Oil
    2 Comments

    Karpatka

    March 18, 2015 Nicola King

    Last year, I had the pleasure of attending the baby shower of a Polish mum-to-be. Even though it was her party, she made dinner for all the children there as well as treating us to a platter of Polish delicacies. The one that has been firmly planted in my mind since then was a beautiful Polish version of our vanilla slice - Karpatka. She was full of apologies about how it wasn't as perfect as her mother's and I think was taken aback by its success! Instead of the puff pastry of an English vanilla slice, this has layers of choux pastry sandwiched together with vanilla custard. It is seriously delicious (and I've been dreaming about it ever since!) It reminds me of the choux buns my mum used to buy for me when I was little although they had chocolate drizzled across the top too :)

    This recipe is a hybrid of my research into this lovely Polish dessert but all published recipes follow a similar process and it's surprisingly easy to make.  The choux pastry is springy to the touch and the custard sets really well in between the two layers so it makes a robust bake that's easy to cut. The choux pastry in the oven browned VERY quickly and I was really worried that it wouldn't make the full 25 minutes, but I also know it's imperative not to open the oven door whilst it's baking so I decided to ride it out - and with a great result. Although it looked crispy when it came out of the oven, it was still really springy to the touch which is exactly what I was looking for.

    The vanilla custard is absolutely beautiful in texture. We are huge custard fans in this house so it had a lot to live up to and surpassed all expectations. There were multiple slices of the Karpatka being handed around when the boys had dinner tonight and it was a big hit. I think this is my favourite bake of the journey so far!

    Karpatka

    Choux Pastry Ingredients

    • 1 CUP WATER
    • 125G BUTTER
    • 1 CUP FLOUR
    • 5 MEDIUM EGGS
    • 1 TSP BAKING POWDER

    Method

    1. Preheat the oven to 200 degrees (fan)
    2. Line 2 baking trays (around 32 x 23cm) with baking paper
    3. Put the butter and water into a medium saucepan and bring to a boil
    4. Add all the flour and mix vigorously with a wooden spoon until the mixture comes away from the sides of the saucepan which is very quick (around 30 seconds)
    5. Then put the mixture into your mixer with a paddle attachment (or food processor if you prefer)
    6. Add the eggs one at a time, beating well after addition until each egg is fully mixed in and the mixture is smooth and sticky
    7. Finally add the baking powder and beat until it's fully mixed
    8. Divide the mixture between the two baking trays and smooth it out until it forms two rectangles the shape of the baking tray
    9. Place in the oven and bake for 25 minutes until the tops have browned. It's very important not to open the oven door once they're in until they're cooked so don't be tempted to check on them too early!
    10. When they're ready, put them on a kitchen surface to cool down and you can start preparations for your vanilla custard.

    Vanilla Custard Ingredients

    • 720ML (3 CUPS SEMI-SKIMMED MILK)
    • 170G SUGAR (3/4 CUP)
    • 110G BUTTER
    • 1 TSP VANILLA PASTE (OR VANILLA EXTRACT IF YOU DON'T HAVE PASTE)
    • 30G PLAIN FLOUR (1/4 CUP)
    • 5 TBSP CORNFLOUR
    • 4 EGGS
    • ICING SUGAR (FOR DUSTING)

    Method

    1. Whisk together the eggs and vanilla in a bowl and then add the flour a little at a time - the mixture went a little lumpy with the addition of the flour so you want to add it slowly and mix thoroughly so you can ensure than it's lump-free
    2. Then add a cup of the milk (240ml) milk and whisk thoroughly until smooth
    3. Place 2 cups (480ml) of milk, the sugar and butter in a medium saucepan and bring to the boil
    4. Once this is boiling, pour the egg mixture into the saucepan and whisk well until the custard thickens and starts to boil - this took mine around 90 seconds - but be careful to ensure that you're scraping the bottom of the boil when whisking as it can burn very easily
    5. Pour this custard onto one rectangle of choux pastry and spread it out leaving a small border around the edge (you're going to trim the rectangles down at the end)
    6. Sandwich the custard with the top layer and then place in the refrigerator until the custard cools and sets
    7. When ready to eat, dust the top layer with the icing sugar and cut it into squares - I got 16 squares from mine (and lots of edges to eat when neatening it up!)
    In Everyday Cakes, Patisserie Tags Choux, Custard, Karpatka
    Comment

    Raspberry Scones

    March 10, 2015 Nicola King

    I had the best start to the day today.  Not only was the sun shining on the school run this morning, promising the start of spring (am I tempting fate??) but when I arrived at school I was given the fantastic baking book Babycakes by a lovely friend. This book is from the NYC bakery of the same name and has achieved acclaim through being "vegan, gluten-free and (mostly) sugar-free" although not necessarily all at the same time - and has lots of celebrity endorsements for its vegan and healthier favourites.

    Before I started this blog, I hadn't tried any Free From recipes before (gluten, dairy or vegan) or at least, I hadn't wittingly tried them. But I have friends and friends' children who have some dietary restrictions and I'm enjoying trying new ways of baking as well as tasting them for myself as I'd always assumed that Free From meant that there was something lacking. Oh, how wrong I was! Armed with my new book, I wanted to try out a new recipe immediately although some of them are going to require a little more product sourcing (I am putting Agave-Sweetened Brownie Gems on my baking list for the next few weeks when I've gathered the ingredients for it!) and so I opted for a simpler recipe whose ingredients I already had with the exception of the spelt flour, agave nectar and a punnet of raspberries - Raspberry Scones. Now these aren't gluten-free as they have spelt flour but they are vegan and therefore dairy-free. 

    This is a very simple one-bowl recipe but the flavours are fantastic in them. There's a faint taste of coconut, then a sweetness from the Agave Nectar and a freshness from the raspberries which all work together incredibly well. My only criticism is that the batter was quite wet so even though I used an ice-cream scoop for portion control, they tended to spread into random (messier) shapes on the baking tray. However not everything fits into a neat circle! I did think that making them into muffins might make them tidier next time. And although the recipe calls them "scones", the texture of mine are a mix of cake and bread.

    But it's great to know that they're a healthier alternative to the usual sweet treats the boys would want for pudding and one of the boys wolfed one down super-fast declaring it to be "very yummy", praise in its highest form from my younger son and it even featured in his daily news report to daddy at bedtime!

    Raspberry Scones (Vegan & Dairy-Free) from Babycakes

    Ingredients (Makes 8)

    • 2 CUPS (225G) WHOLE SPELT FLOUR (I got this from our local health food shop but you can get it from supermarkets)
    • 1 TBSP BAKING POWDER
    • ½ TSP SALT
    • 1/3 CUP (70ML) COCONUT OIL PLUS A LITTLE EXTRA FOR BRUSHING
    • 1/3 CUP (100ML) AGAVE NECTAR PLUS A LITTLE EXTRA FOR BRUSHING (again I got this from our local health food shop but then saw it in our local supermarket)
    • 1 TBSP VANILLA EXTRACT
    • 1/4 (59ML) CUP HOT WATER
    • 1 CUP (200G) FRESH RASPBERRIES

    Method

    1. Pre-heat the over to 175 degrees and line a baking tray with parchment paper.
    2. In a medium bowl, mix together the flour, baking powder and salt.
    3. Add the oil, agave nectar and vanilla and stir together until a thick, dry batter has come together.
    4. Pour the hot water into the batter and combine.
    5. Using a rubber spatula, mix through the raspberries until they're just marbled through the mixture.
    6. Using a 1/3 cup ice-cream scoop, drop mounds of batter onto the baking tray leaving them 1 inch apart as they will spread. Lightly brush the top with coconut oil.
    7. Bake the scones for 14 minutes rotating them 180 degrees after 7 minutes.
    8. The finished scones should be golden brown and slightly firm. Remove them from the oven and brush the top with a little agave nectar.
    9. After 10 minutes, gently slide a spatula under each scone to remove them and tranfer them to a cooling rack to cool completely.


    In Free From, Everyday Cakes Tags Vegan, Dairy Free, Raspberry
    1 Comment

    Chocolate Olive Oil & Almond Cake

    March 7, 2015 Nicola King

    It's been a crazy week. I haven't had much time for baking and have mostly been running around doing back to back errands. We're ending it with an impromptu visit from my parents and there was a definite need for something rich and chocolatey this afternoon! This is Nigella's recipe for Chocolate Olive Oil & Almond Cake and is both gluten and dairy free - and I can assure you that the lack of either of these does not compromise the taste of this lovely little cake! A couple of changes I might try next time would be to exchange the almond meal for plain flour (needed for anyone with a nut allergy), add instant espresso in place of the vanilla or use coconut sugar in place of the regular white sugar. 

    I had a slice about 15 mins out of the oven and just warm, it was seriously delicious and would only be improved with a dash of vanilla ice-cream, I think. There are lots of flourless chocolate cake recipes with dark chocolate, but I wanted one that was made from cocoa so chose this one from Nigella and I would wholehearted recommend this for Sunday lunch with friends, a dinner party or maybe even a weekend afternoon treat. It's also very simple to make :)

    Chocolate Olive Oil & Almond Cake

    Ingredients

    • 150ML OLIVE OIL (PLUS A LITTLE MORE FOR GREASING THE CAKE TIN)
    • 50G GOOD-QUALITY SIFTED COCOA POWDER (I USED GREEN & BLACK'S)
    • 125ML BOILING WATER
    • 2 TSP VANILLA EXTRACT
    • 150G GROUND ALMONDS
    • ½ TSP BICARBONATE OF SODA
    • PINCH OF SALT
    • 200G CASTER SUGAR
    • 3 LARGE EGGS
    • ICING SUGAR FOR DUSTING

    Method

    1. Preheat your oven to 170°C. Grease an 8" springform tin with a little oil and line the base with baking parchment.
    2. Sift the cocoa powder into a bowl or jug and whisk in the boiling water until you have a smooth paste. Whisk in the vanilla extract and then set it aside to cool a little.
    3. In another bowl, combine the ground almonds with the bicarbonate of soda and pinch of salt.
    4. Put the sugar, olive oil and eggs into a mixer and beat together on fast speed for 3 minutes (it should be a pale, aerated and thickened cream).
    5. Turn the speed down a little and slowly pour in the cocoa mixture. When it's mixed in, scrape down the side of the bowl and then slowly tip in the ground almond mixture with the mixer still running.
    6. Scrape down the sides again and then pour this liquid batter into the prepared tin.
    7. Bake for 40-45 minutes or until the sides are set and the very centre, on top, still looks slightly damp. 
    8. Leave it to cool for 10 minutes on a wire rack, still in its tin, and then ease the sides of the cake with a small metal spatula and spring it out of the tin. 
    9. Eat warm or leave to cool, if you can wait that long!
    In Free From, Everyday Cakes Tags Chocolate, Dairy Free, Gluten Free, Olive Oil, Almonds
    Comment

    Dulce De Leche Brownies

    February 25, 2015 Nicola King

    Back to school, back to waking up to an alarm clock, back to earth with a bump! This week I am pretty busy with planning and creating - and in need of a bit of time to myself without having to entertain young children, but I always miss them when the house is so quiet. I have a couple of batches of birthday cupcakes for friends this week and have been working on the decorations for my very first (yes, I said very first - eek!) wedding cake due in a couple of weeks time. These things always challenge me but that's good, right?

    So we have arrived mid-week and I hadn't even had a moment to contemplate blog baking this week - but then I found a lovely looking recipe for Dulce De Leche Brownies from Butter Baking which was adapted in turn from David Lebovitz. My go-to recipe for chocolate brownies has always been Hummingbird Bakery's but I loved the sound of the dulce de leche with Lebovitz's version. Now this recipe suggests it makes nine to twelve brownies. I took one bite and I'm honestly not sure who could make it through an entire one of these as they are super-rich and very sweet - but cut up into one-bite brownies they are kind of cute and do-able (although I served the boys a brownie bite with ice cream for dessert tonight and they wanted one, then another, then another...I think faced with a whole big one, it's too much but sitting in front of a plate of little ones, you want to keep eating and eating them!)

    The recipe is very straightforward and although I've used David Lebovitz's recipe, I added the digestive biscuits that Natasha (Butter Baking) included in her version as I thought they may cut through the intense chocolate. The brownie mix is simple to make but it does make a very heavy, thick mixture which is trickier to spread - so once you add the base of biscuits and dulce de leche and then have to spread the brownie mix on top, it takes a little moulding and was very reminiscent of plastering! But totally worth it as the resulting brownies were squidgy, chocolatey and very yummy :)

    Dulche De Leche Brownies (recipe from David Lebovitz & Butter Baking)

    Ingredients

    • 115G BUTTER
    • 170G DARK CHOCOLATE
    • 25G COCOA POWDER
    • 3 LARGE EGGS
    • 200G SUGAR
    • 1 TSP VANILLA EXTRACT
    • 140G PLAIN FLOUR
    • 6 DIGESTIVE BISCUITS (CRUSHED)
    • 1 CUP DULCE DE LECHE

    Method

    1. Line an 8 inch (20cm) square pan with aluminium foil and grease the bottom and sides (I greased my pan and lined it with baking parchment).
    2. Melt the butter in a medium pan. Add the chocolate and stir constantly over a low heat until the chocolate has melted.
    3. Remove from the heat and whisk in the cocoa powder until smooth.
    4. Add the eggs one at a time, whisking after each addition.
    5. Then stir in the sugar, vanilla and flour.
    6. Sprinkle half of the digestive biscuits over the base of the pan and then add half of the brownie mix, spreading the mix evenly over the whole base.
    7. Then using half of the cup quantity, drop teaspoonfuls of the dulce de leche across the brownie mix, evenly spacing it.
    8. Sprinkle the remaining half of the biscuits over the mixture and then spread the remaining brownie mixture evenly across the pan.
    9. Finally, add the remaining dulce de leche in teaspoonfuls and swirl it lightly with the brownie mix.
    10. Start by baking it for 25 mins but it could take up to 45 mins (the two recipes have different timings). You're looking for the centre to feel just slightly firm and then remove them from the oven. My brownies took 30 mins.
    11. Allow to cool in their tin and then cut up into whichever size brownie chunks you think you can handle!
    In Everyday Cakes Tags Brownies, Chocolate, Dulce de Leche
    Comment
    ← Newer Posts

    To subscribe, please enter your email address:

    Delivered by FeedBurner

    Yay for the weekend!! If you saw how I made pineapple flowers earlier this week, here they are adorning my very first Hummingbird cake. I am totally in love with them! I also added a few @edible_flowers to complement them and this makes the perfect w
    I was so grateful to be #gifted some beautiful @cotswoldflour flour recently with a challenge to make something from my #bakingbucketlist and so I set about making a Nutella babka and scrolls with them. I’ve had a mixed love affair with bread m
    I found the cutest miniature pineapple in the local petrol station co-op so decided to make these roasted pineapple flowers. I think they’re so pretty and remind me of lovely sunflowers. I thought they’d go well with a Hummingbird cake so
    We had great fun baking this Malteser Millionaire’s Shortbread which is absolutely delicious! This was something the boys wanted to bake - who can resist a delicious shortbread base, topped with gooey caramel and then a final layer of swirled m
    As the rain and clouds returned to our skies this weekend, we’ve been looking for comforting lockdown treats. These Blackberry & Star Anise Friands, dripping with sticky blackberry juice icing are the perfect choice 💗 The recipe is from Sw
    You might have seen from my Stories this weekend that I made cinnamon buns. I don’t have the best track record with bread but I’m overcoming my inner fear! These buns were so delicious. It was an amalgamation of a few recipes but the base
    • Serendipity Bakes
      Coconut & Raspberry Friand Muffins
      May 29, 2019, 9:38 PM
    • Serendipity Bakes
      Thank you for sharing my photo of your delicious recipe 😋 @rkhooks Happy Sunday! https://t.co/niKamgfjvt
      Mar 3, 2019, 2:38 PM
    • Serendipity Bakes
      RT @BiscuiteersLtd: Our friends at @thewhitecompany asked us to design something special to celebrate their New York stores first birth… https://t.co/kTsMH57wRv
      Jun 28, 2018, 11:09 AM

    Enter your email address:

    Delivered by FeedBurner

    Powered by Squarespace

    Nicola King at Serendipity Bakes Follow my blog with Bloglovin Follow